ILIAS Support (English)
Reiter
Manual: Page Editor
Deutsch | English
Manual: Page Editor

1. Launching & closing the page editor
2. Insert & format page elements
2.1 Text
2.2 Image/Media
2.3 Section
2.4 Accordion
2.5 Column Layout
2.6 Interactive Image
2.7 Item Group
2.8 Interactive Video
2.9 Opencast Video
3. Copy, delete & deactivate content
4. Set up & use a customized style
4.1 Set up a stylessheet
4.2 Apply style to subordinate objects
5. View editing history and restore version
6. Copy page design and content to other environments
7. Design examples
.
1. Launching & closing the page editor
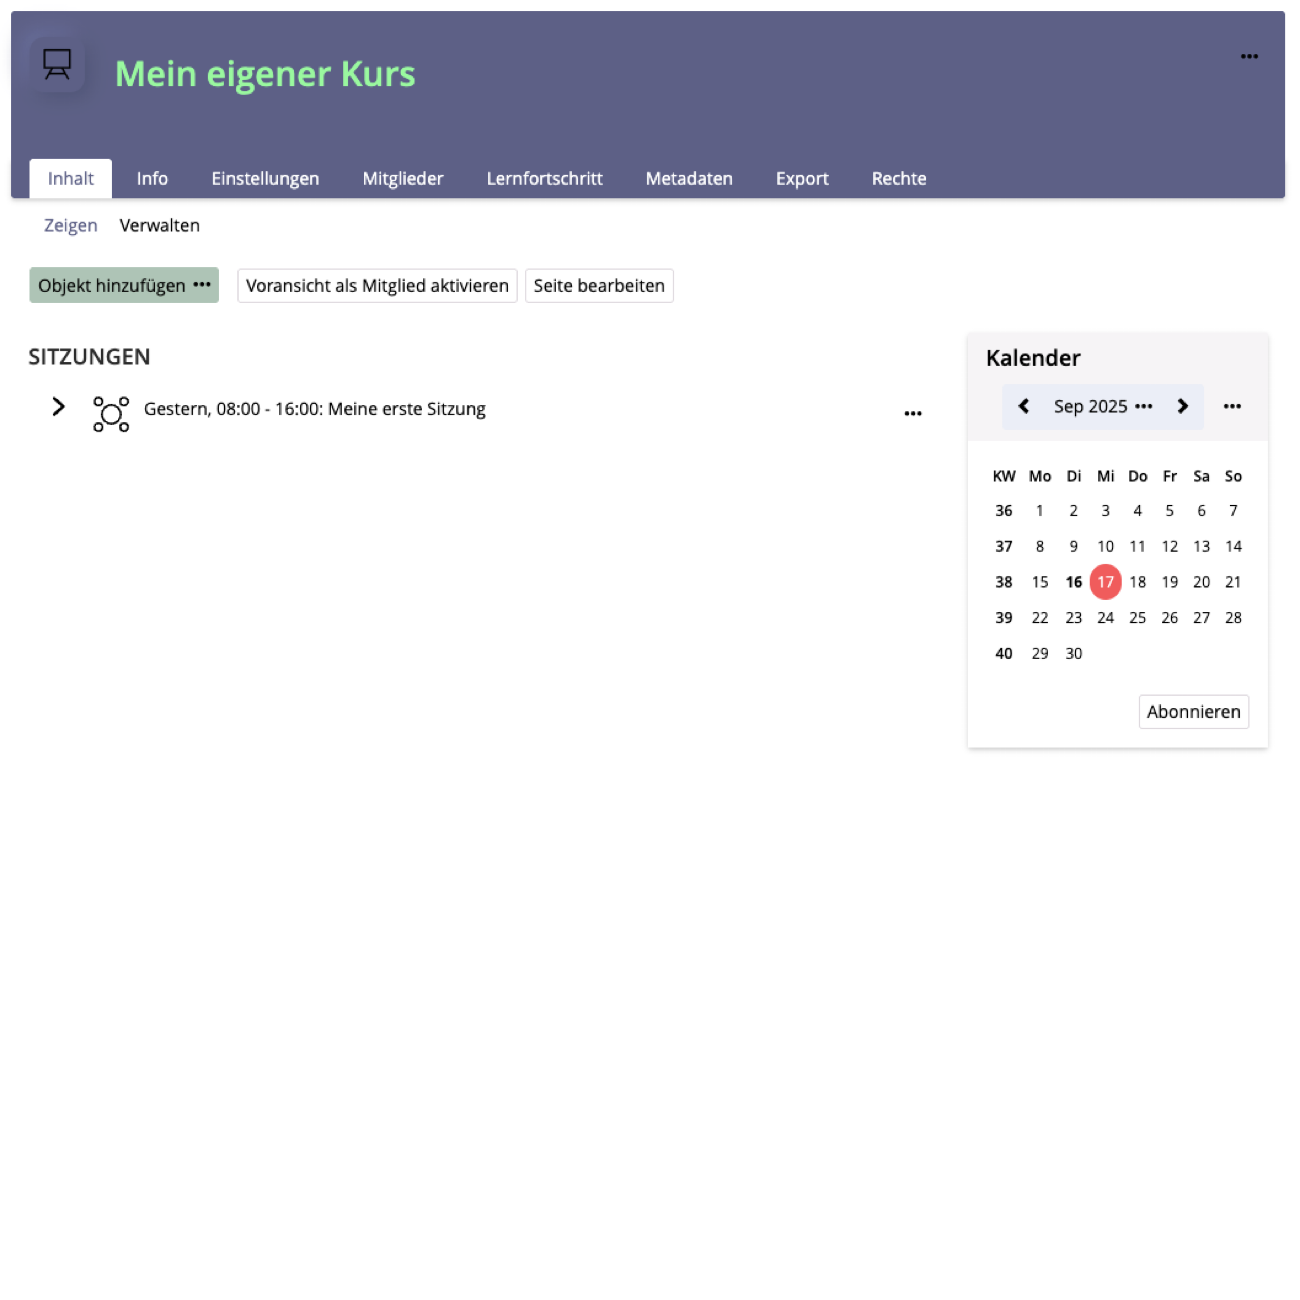
In the following items, the page editor can be launched using the «Customize Page» or «Edit Page» button, which in most cases is located in the upper left corner of the «Content» tab of the item:
| |
In the Glossary, Learning module and Blog launching the page editor works differently and is described separately in the respective manuals. | |
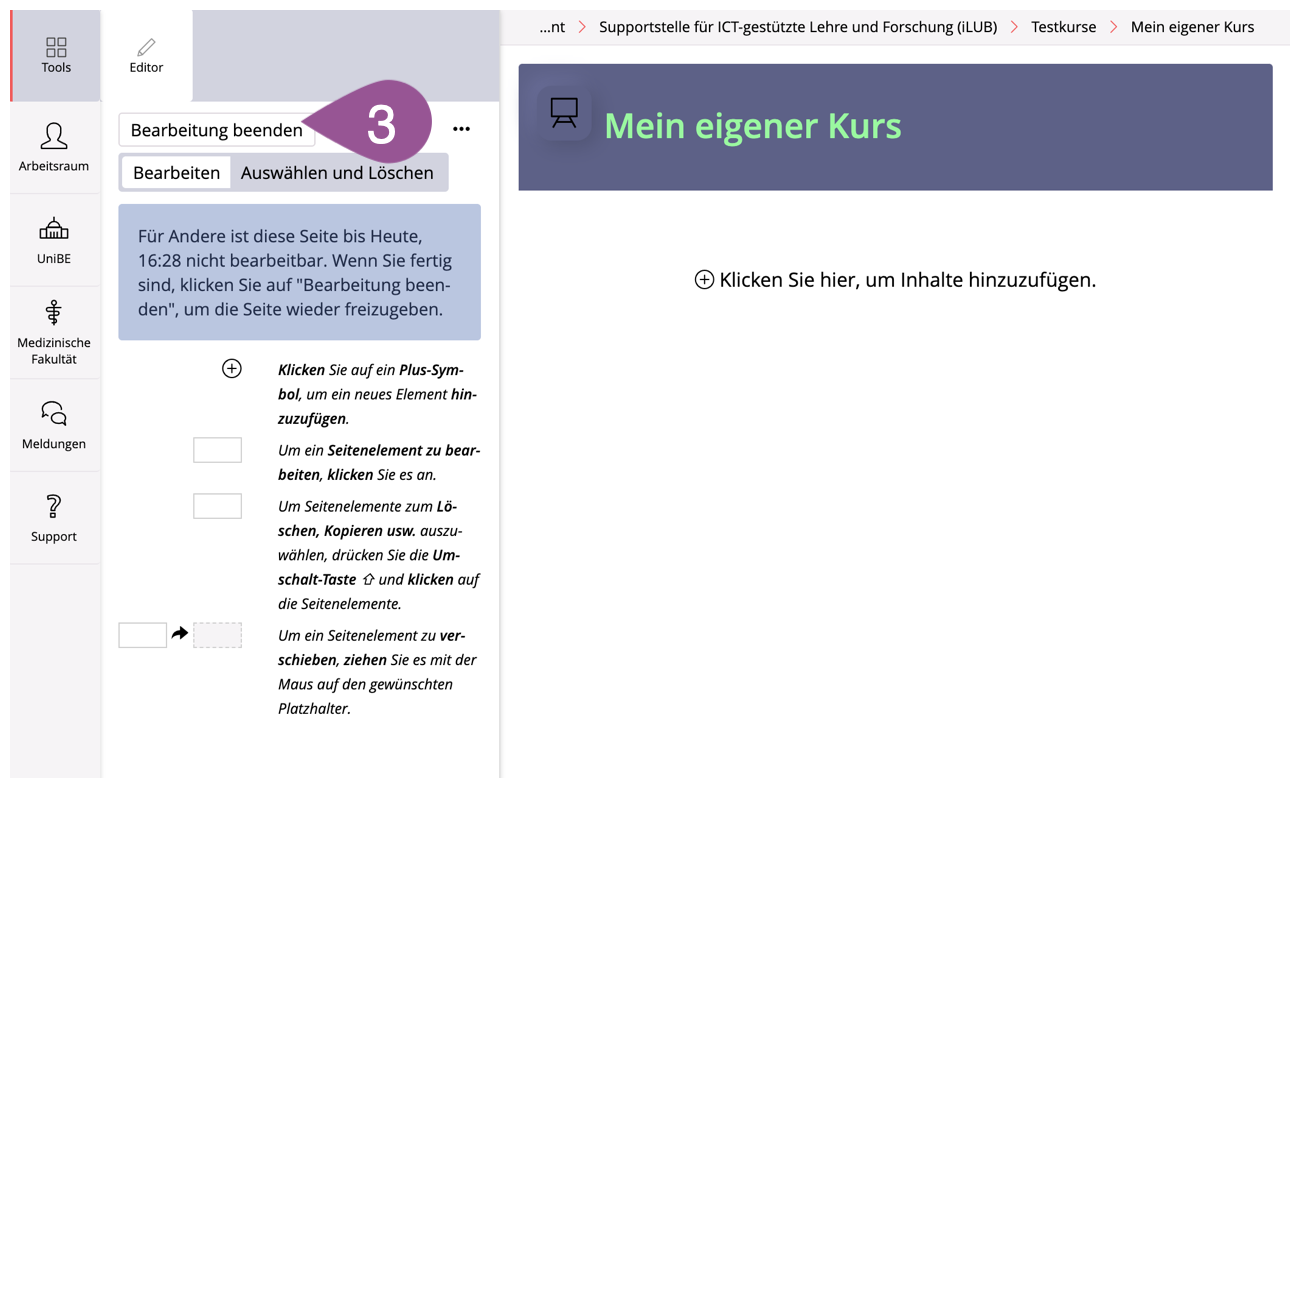
To stop editing a page and leave the page editor, click «Finish Editing». If you don't see a «Finish Editing» button, click on the «Tools» menu to expand it. |
.
2. Insert & format page elements
This chapter describes the most important page elements and explains how to insert and edit them.
Note that the availability of page elements may vary depending on the item you are designing a page in.
.
Text
The «Text» page element contains plain text, such as headings, a greeting, learning outcomes, a process description, or general notes.
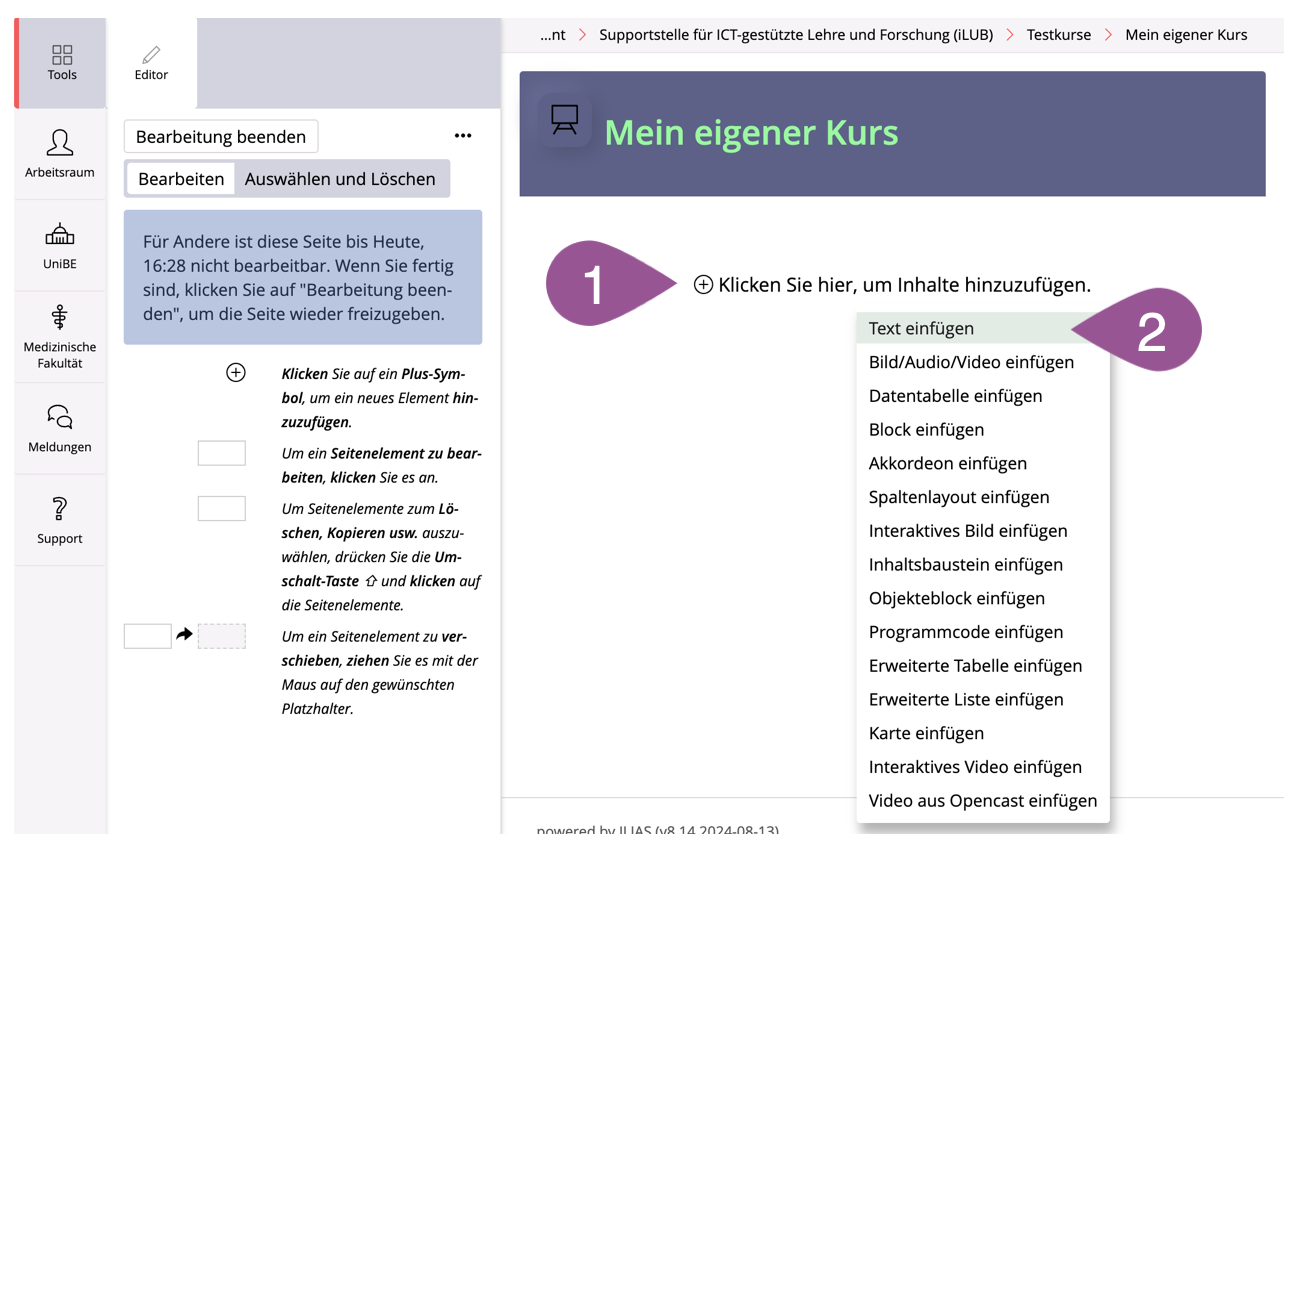
On the page, click on «+». | |||||||||
Select «Insert Text». | |||||||||
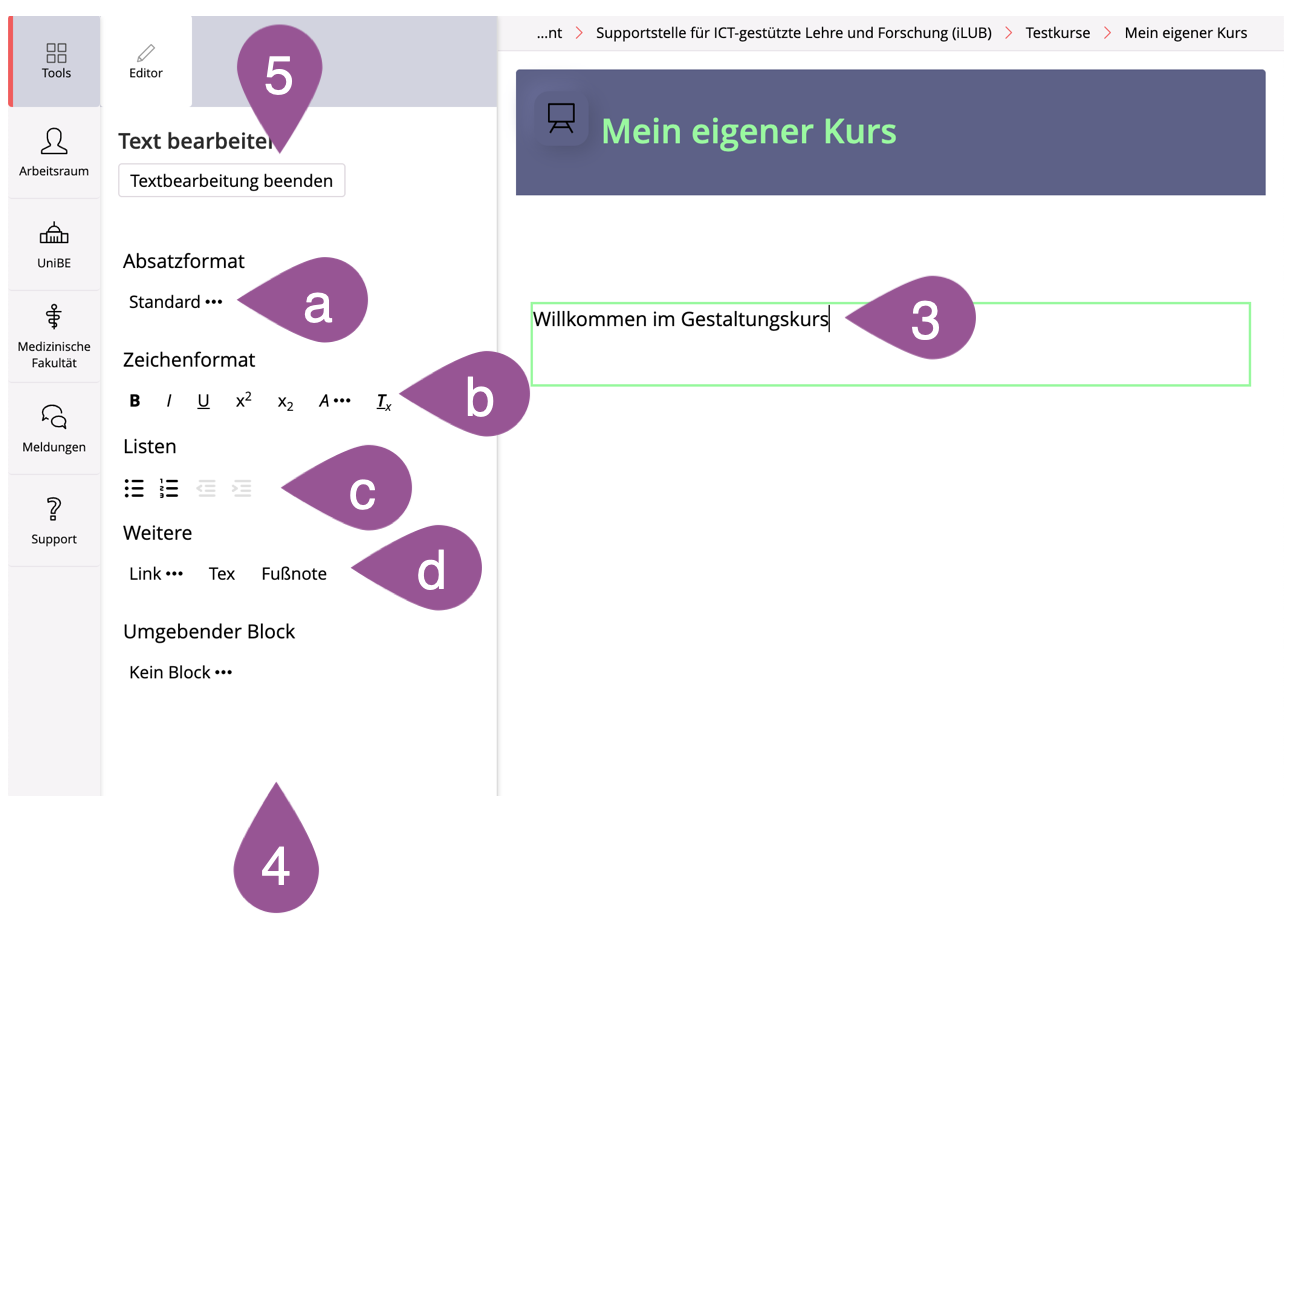
Type your text in the outlined text field. | |||||||||
On the left side you have several predefined formatting options. For customized formatting options you have to create your own stylesheet (see 4. Customize Style).
If you do not see the formatting options, click on «Tools» in the upper left corner. | |||||||||
Click «Finish Text Editing» to save your text. | |||||||||
To edit a section of text later on, click on the paragraph. |
The «Text» page element can also be used to embed online content via iFrame in ILIAS (e.g., Zoom Whiteboards, Miro Boards, videos, etc).
.
Image/Media
The «Image/Media» element can be used to insert images into a page.
When inserting images, please follow the recommended image sizes (see Notes on image sizes on ILIAS).
For audio and video, use the «Opencast Video» page element (see 2.9 Opencast Video).
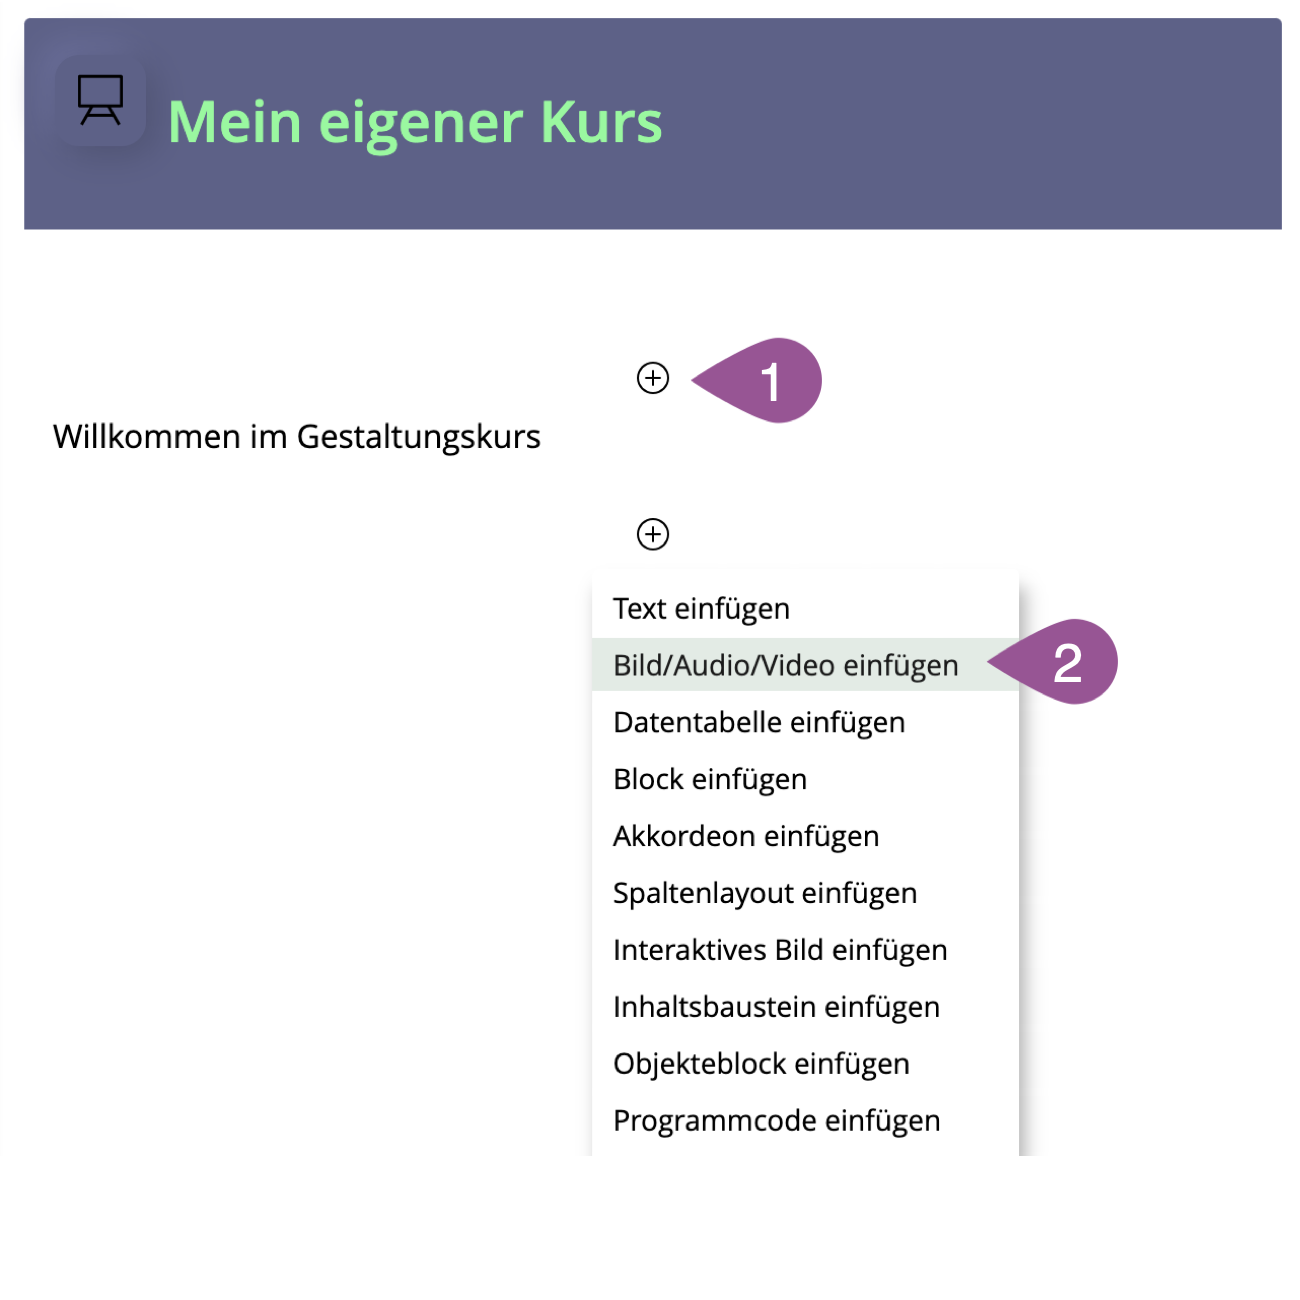
On the page, click on «+». | |||||||||||
Select «Insert Image/Media». | |||||||||||
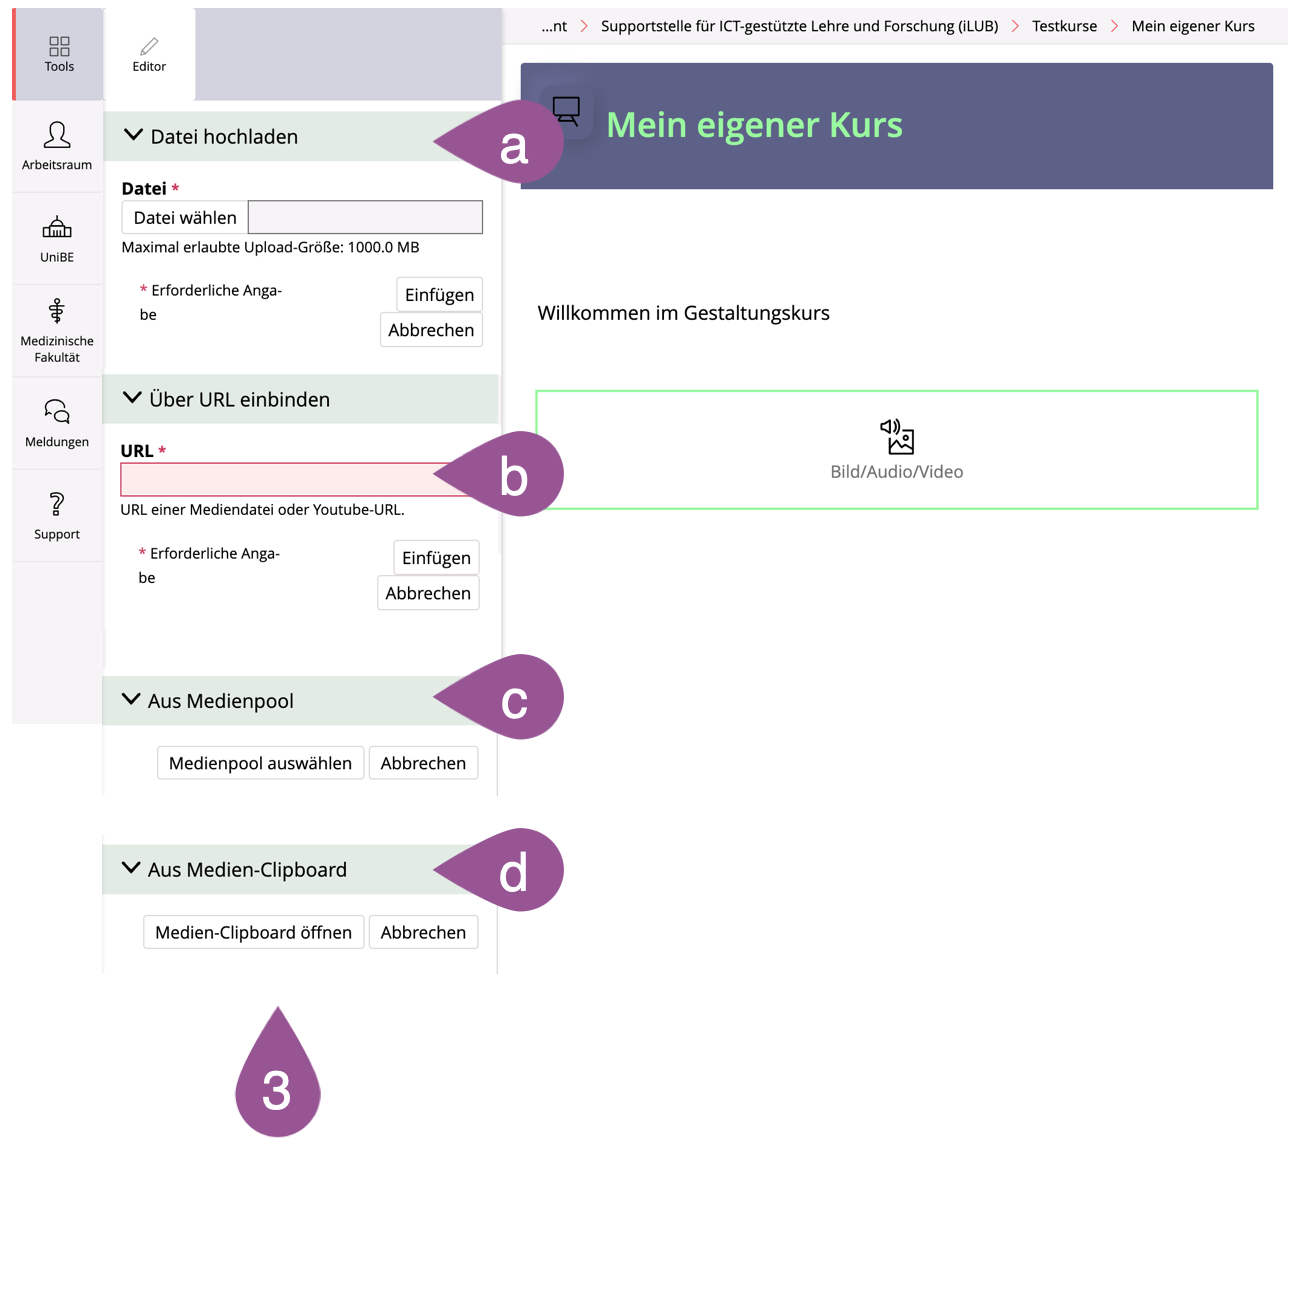
Select your image source:
| |||||||||||
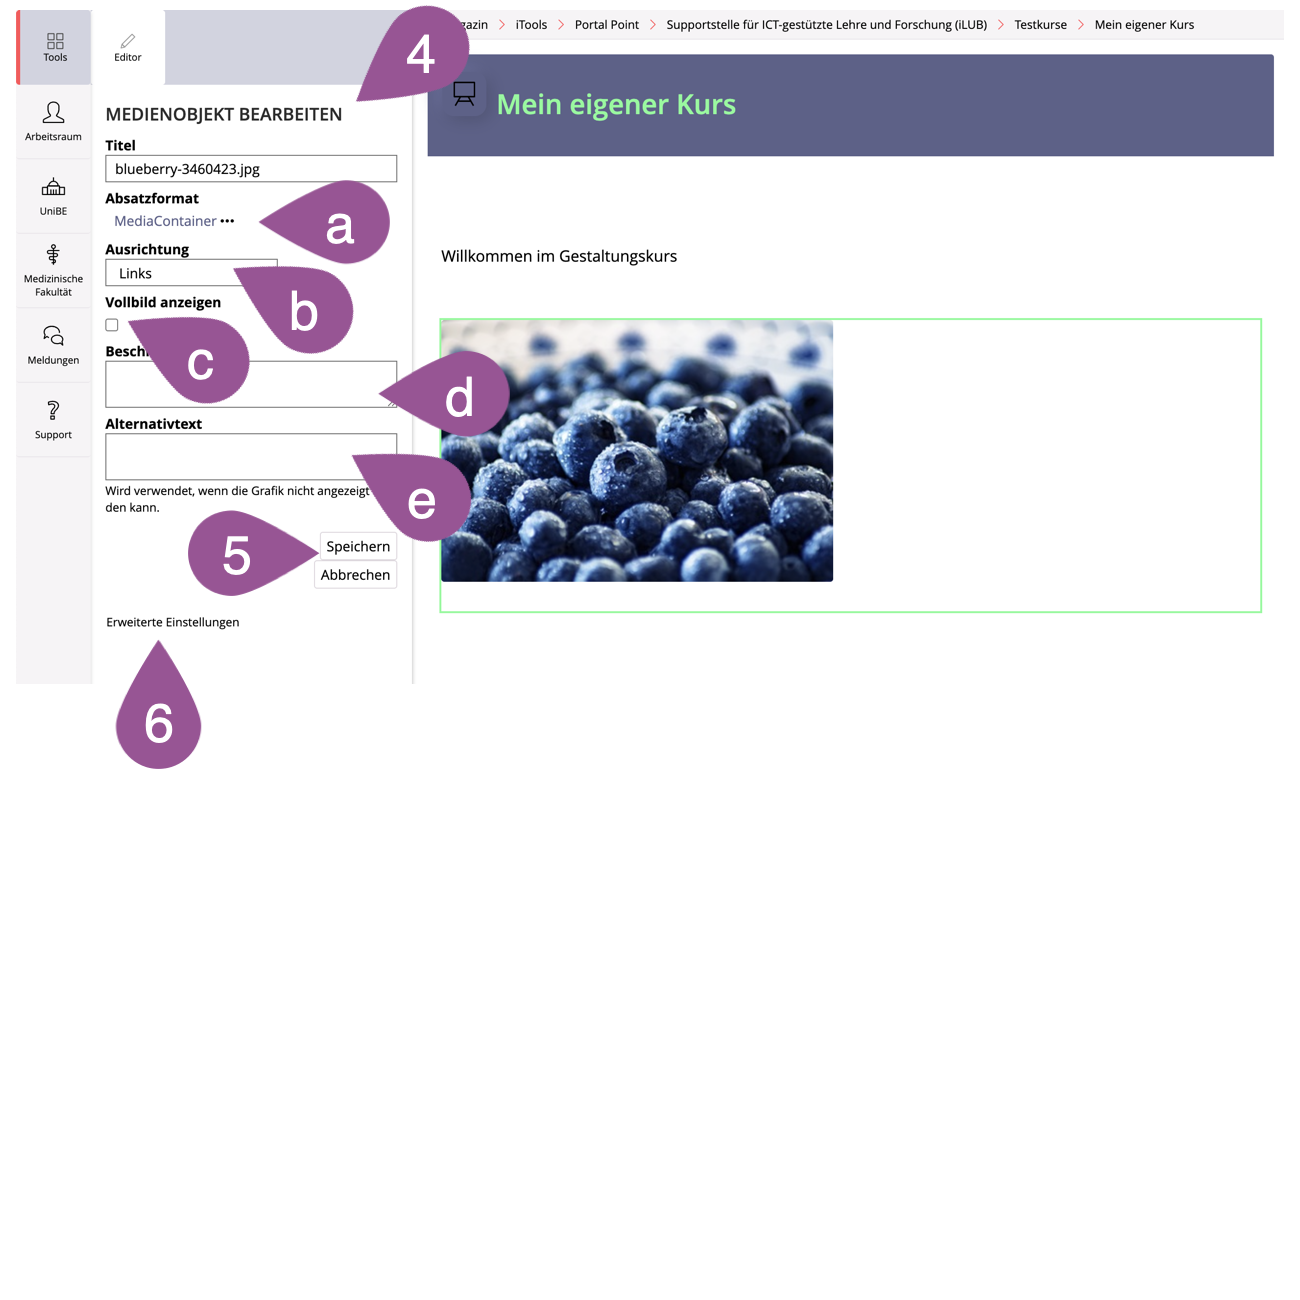
To change the image settings, click on the image and select your preferences for the following aspects:
| |||||||||||
«Save» your settings. | |||||||||||
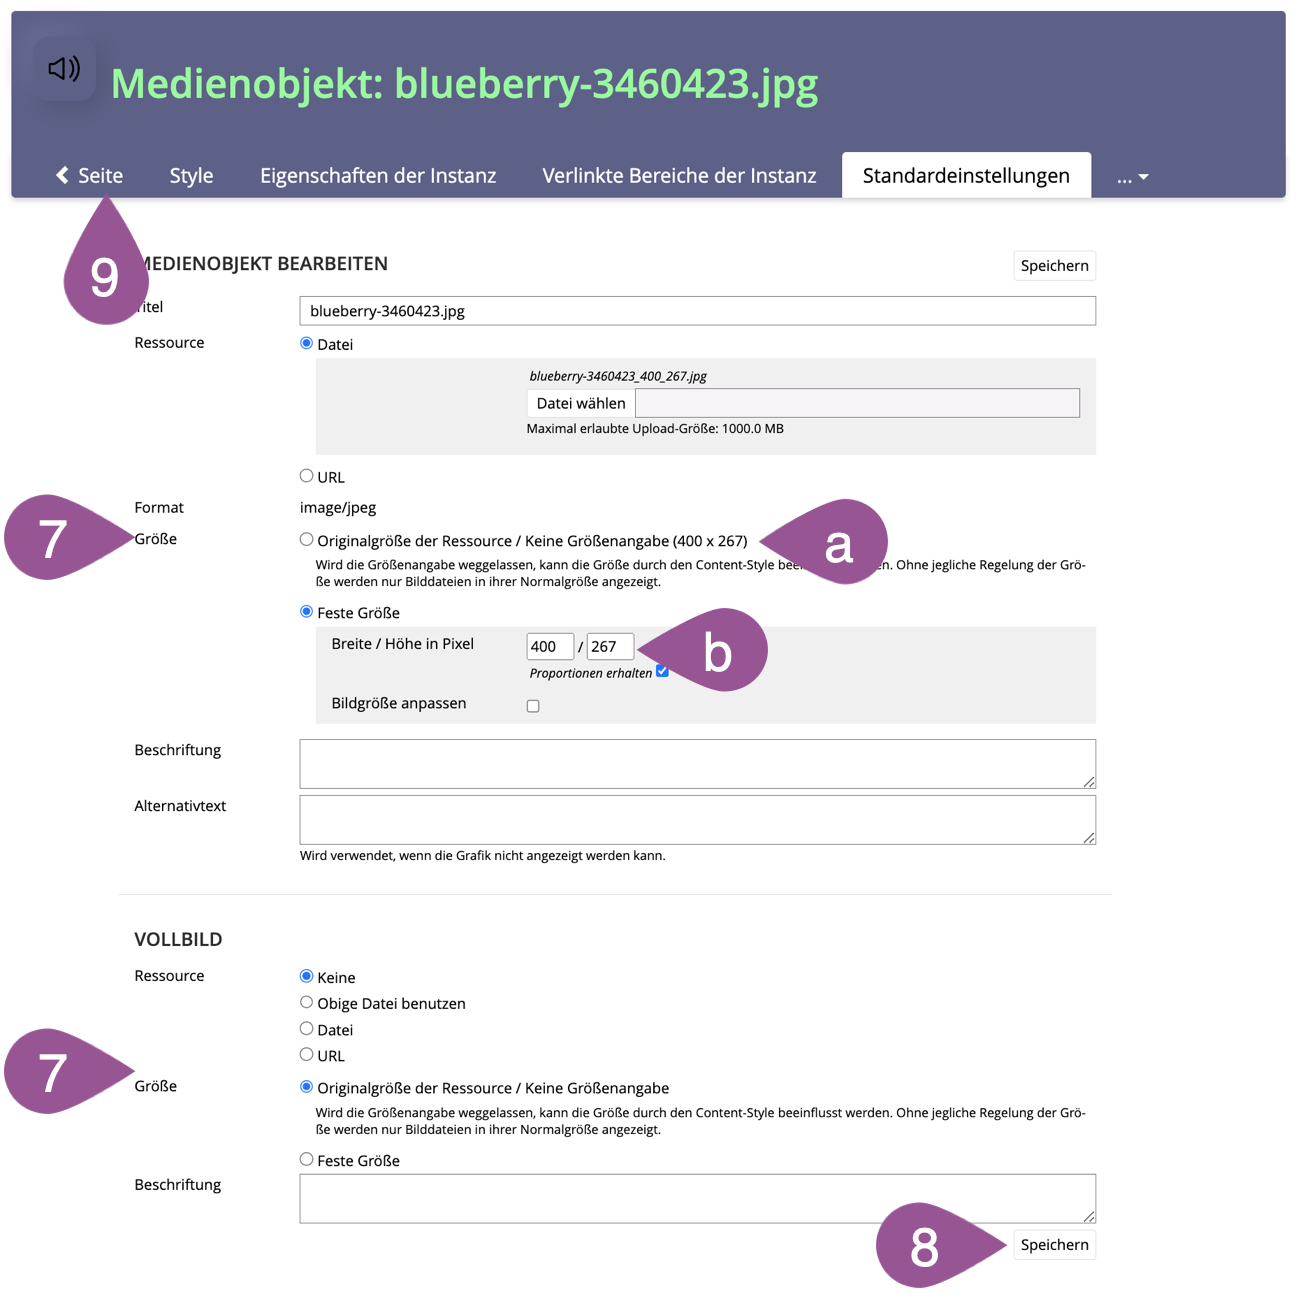
To adjust the size of the image or full screen display, click on the image and on «Advanced Settings». | |||||||||||
In the «Insert Media Object» set the display size of the image on the page; in the «Full Screen» section set the full screen size. Under «Size» select one of the two options::
| |||||||||||
«Save» your settings. | |||||||||||
Click on «Page», to return to the page. |
.
Section
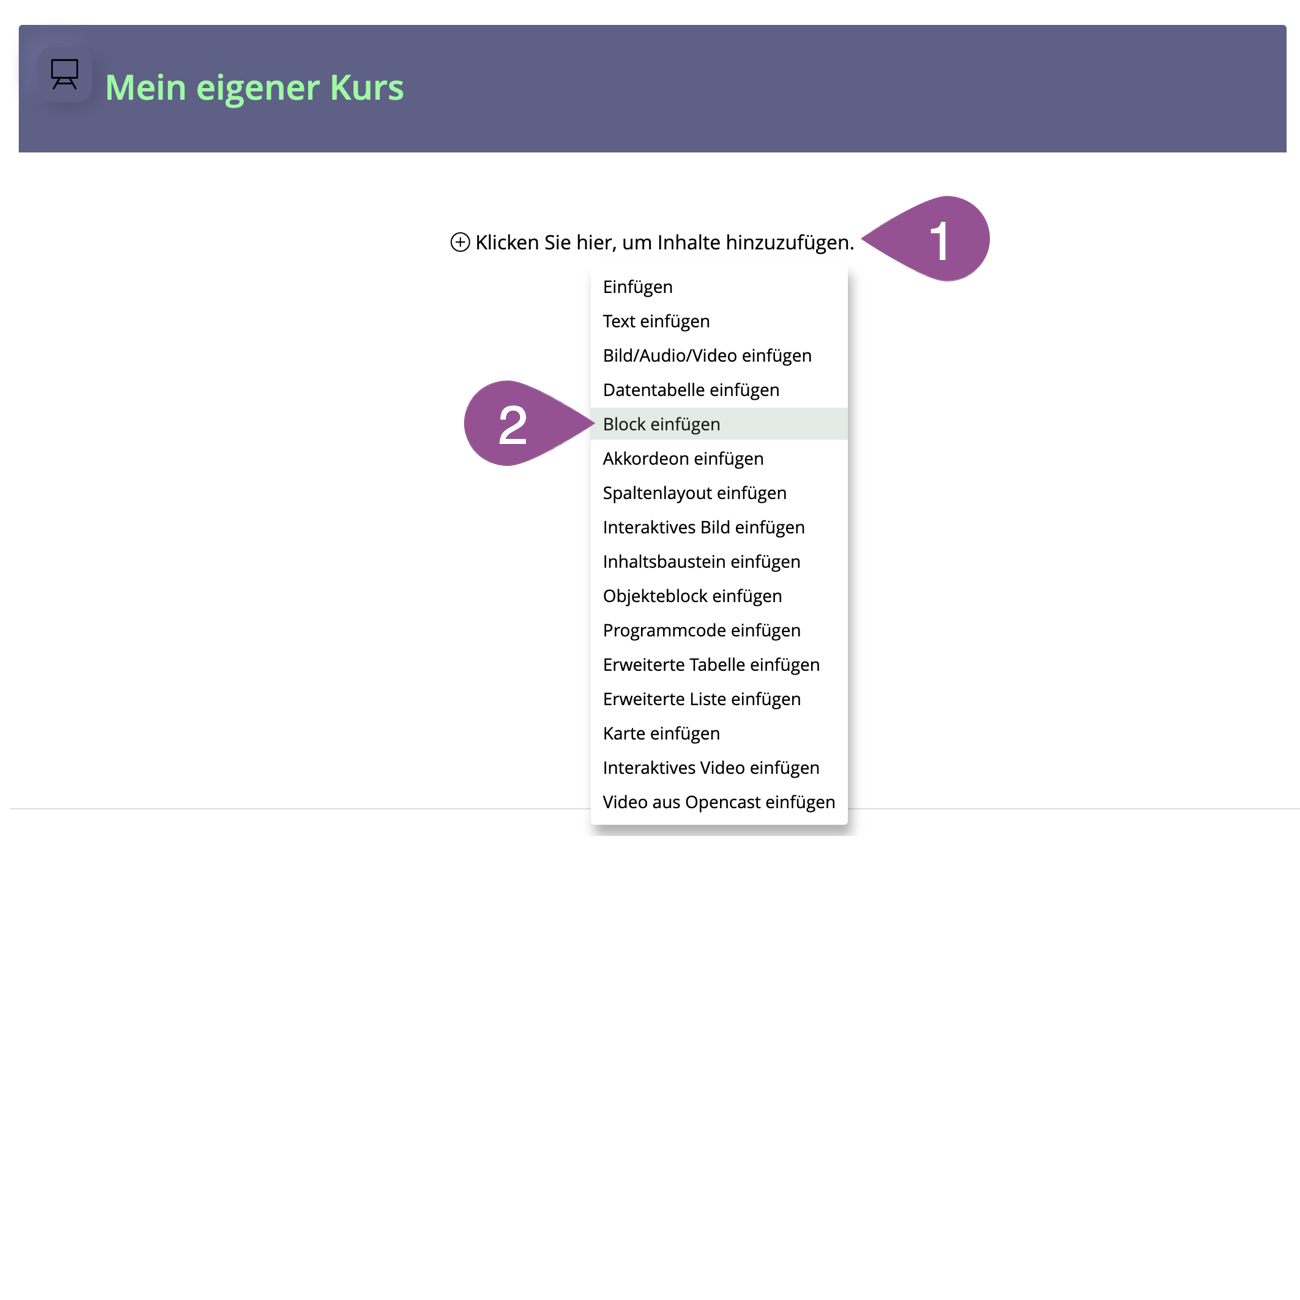
The «Section» element can be used to add backgrounds and colored sections to a page and to increase the spacing between page elements.
On the page, click on «+». | |||||||
Select «Insert Section». | |||||||
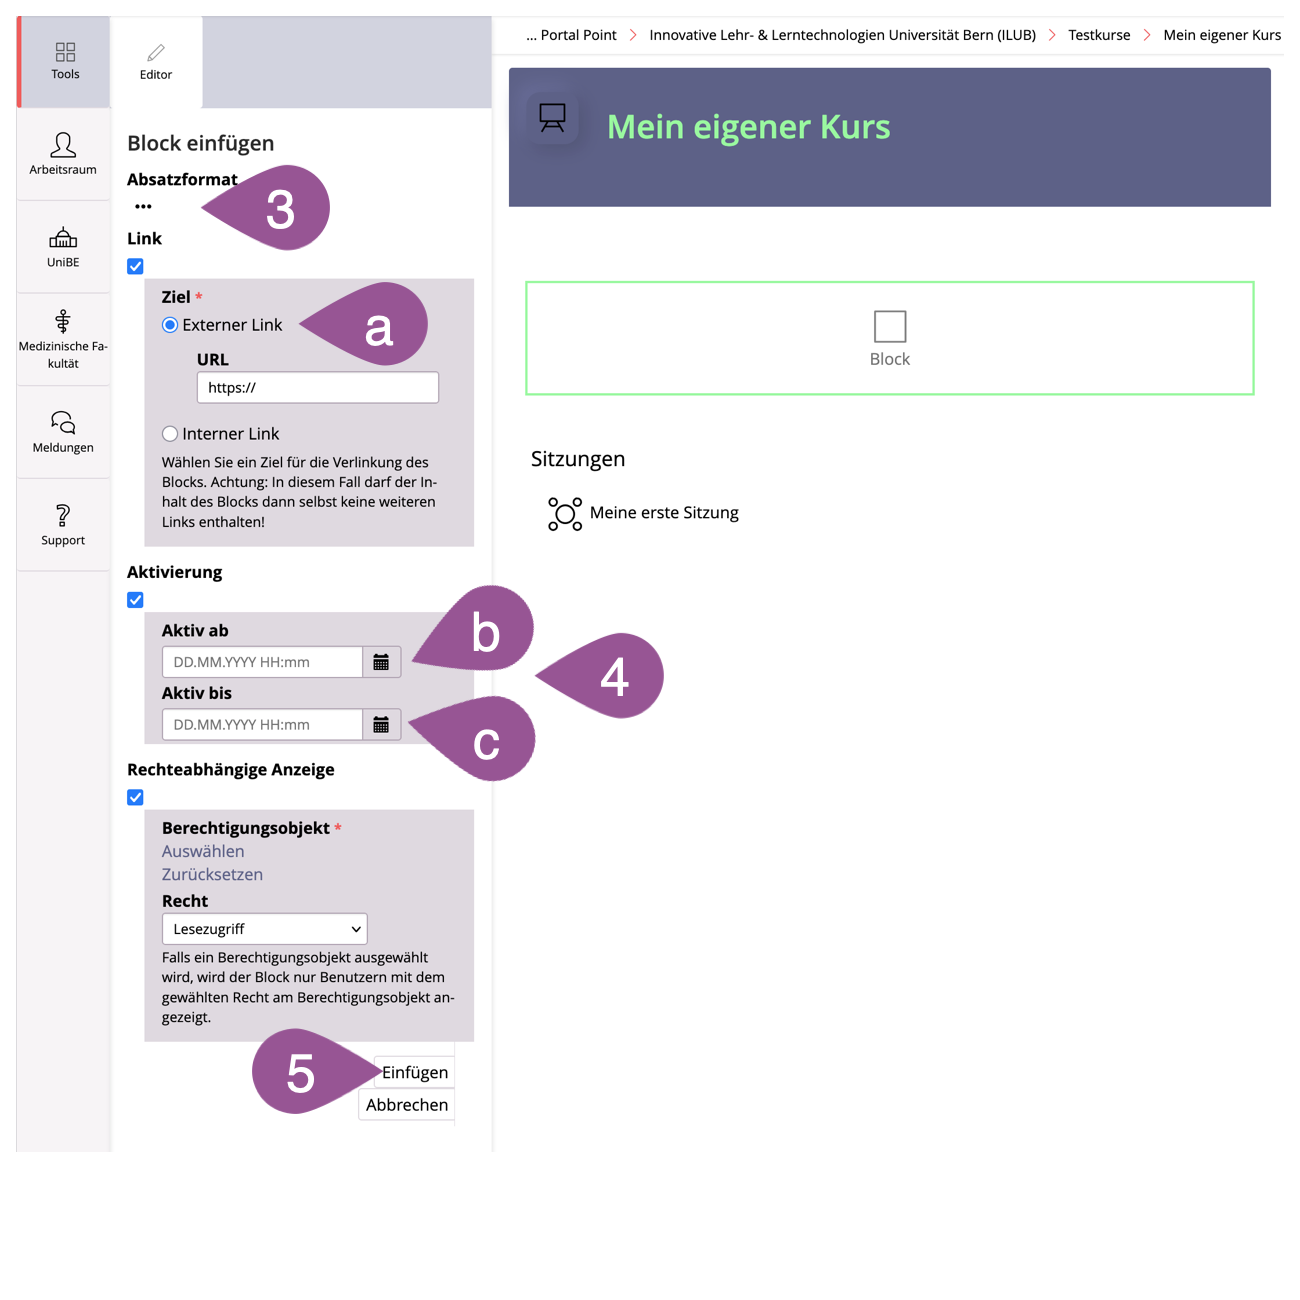
Open the menu below «Style Class» and select a predefined section. For customized sections you have to create your own stylesheet (see 4. Customize Style). | |||||||
If necessary, configure further settings for the section.
| |||||||
Click «Insert». | |||||||
To insert content into the section, click «+» inside the section and select the page element or drag and drop existing elements into the section. | |||||||
To edit a section later on, click on the section. |
.
Accordion
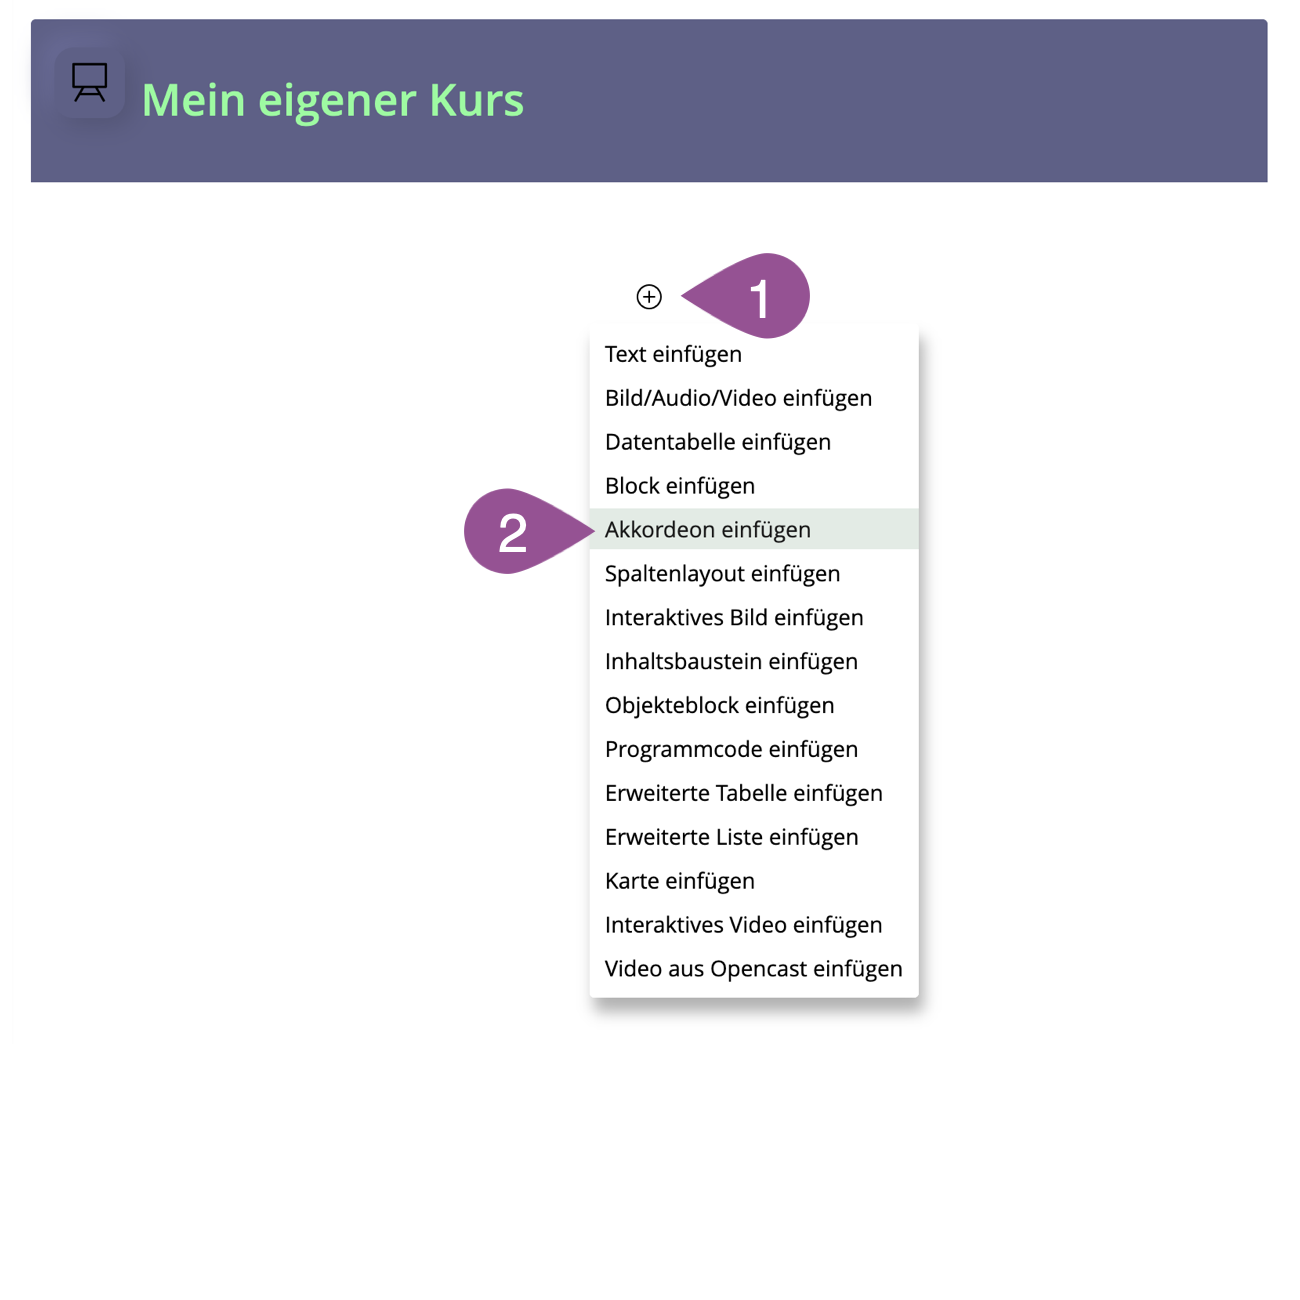
The «Accordion» element can be used to add expandable, collapsible, or rotating segments to a page.
On the page, click on «+». | |||||
Select «Insert Accordion». | |||||
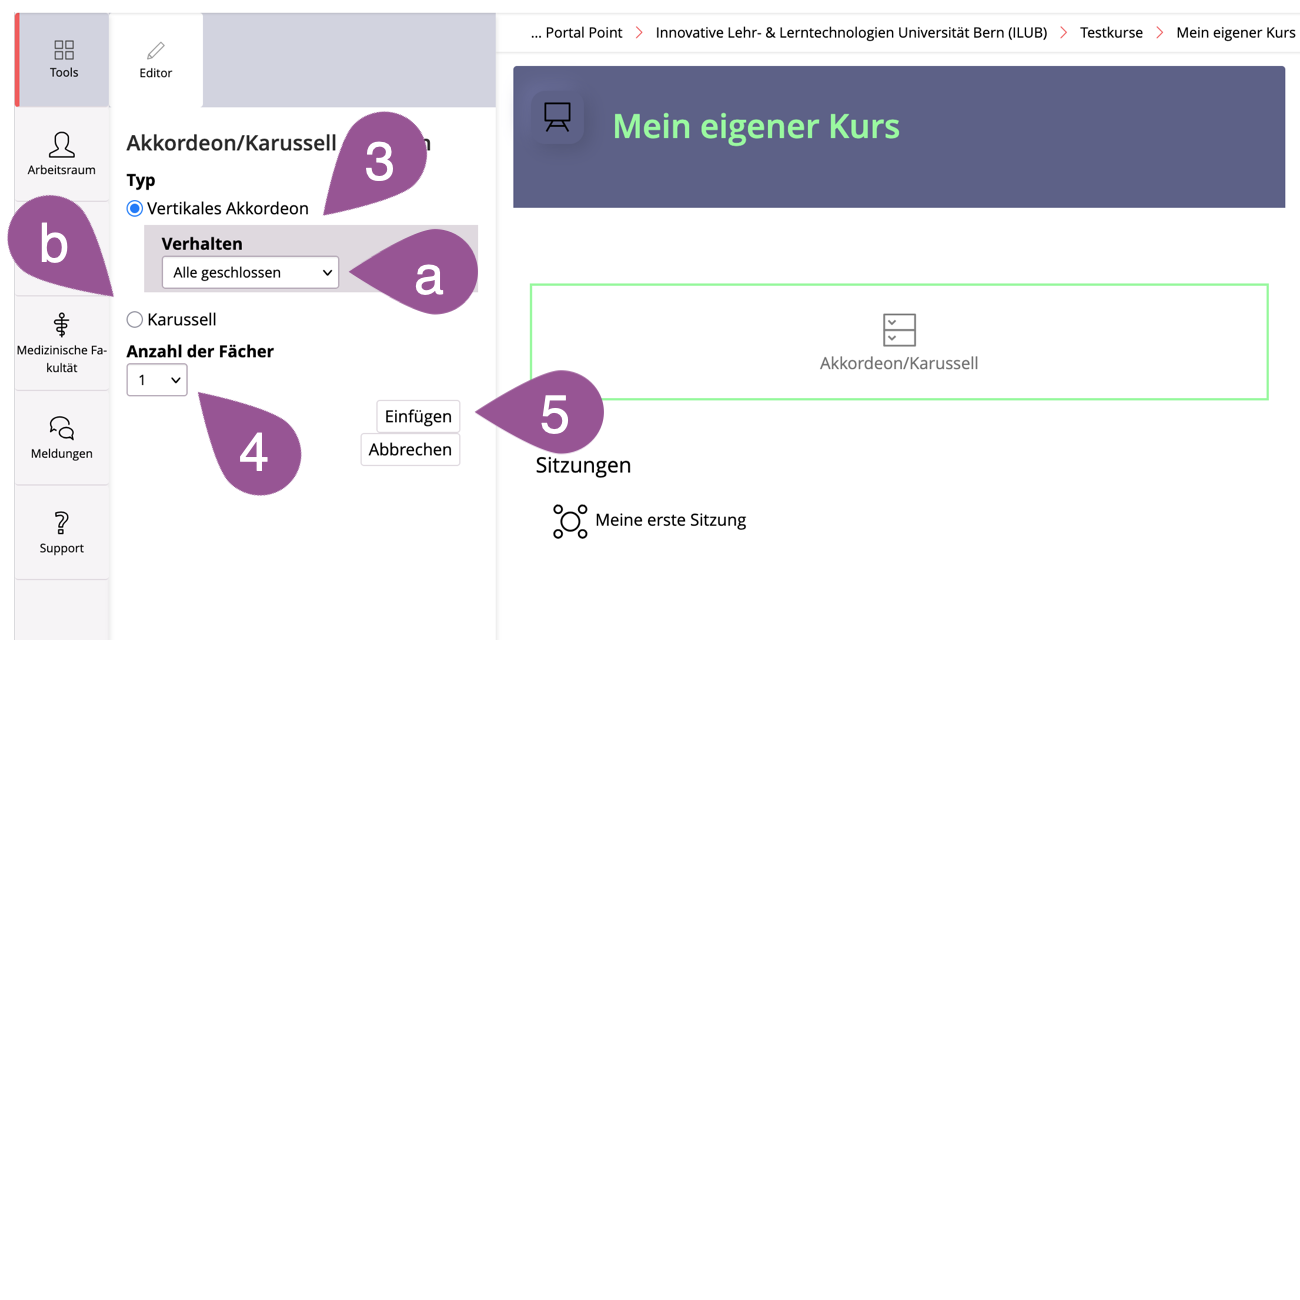
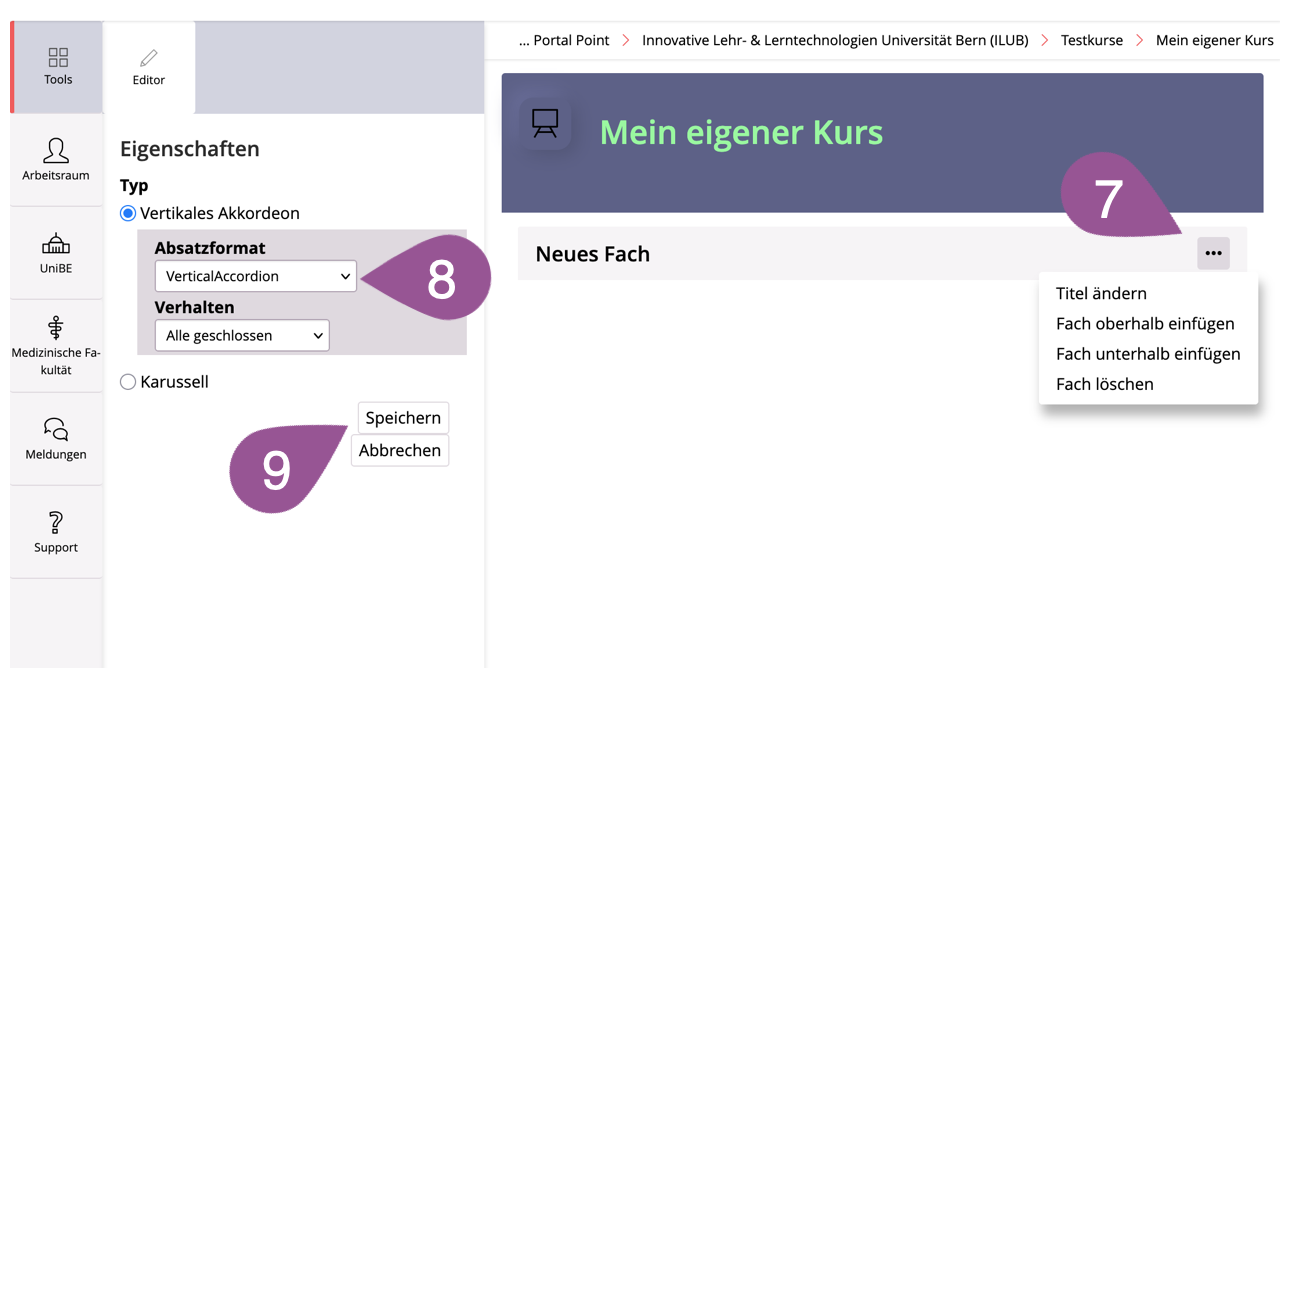
Select an accordion type and its settings.
| |||||
Select the number of panels. Panels can also be added or removed later. | |||||
Click «Save». | |||||
Give each of the panels a title. | |||||
Click «Save». | |||||
Click on «Page», to return to the page. | |||||
To insert content into the panels of an accordion, click «+» inside the panel and select the page element or drag and drop existing elements into the panel. | |||||
To edit an accordion later on, click on the accordion. |
.
Column Layout
The «Column Layout» element can be used to split a page into multiple columns to display content side by side. The columns react to the screen sizes and break automatically, so columns are displayed one below the other on small screens.
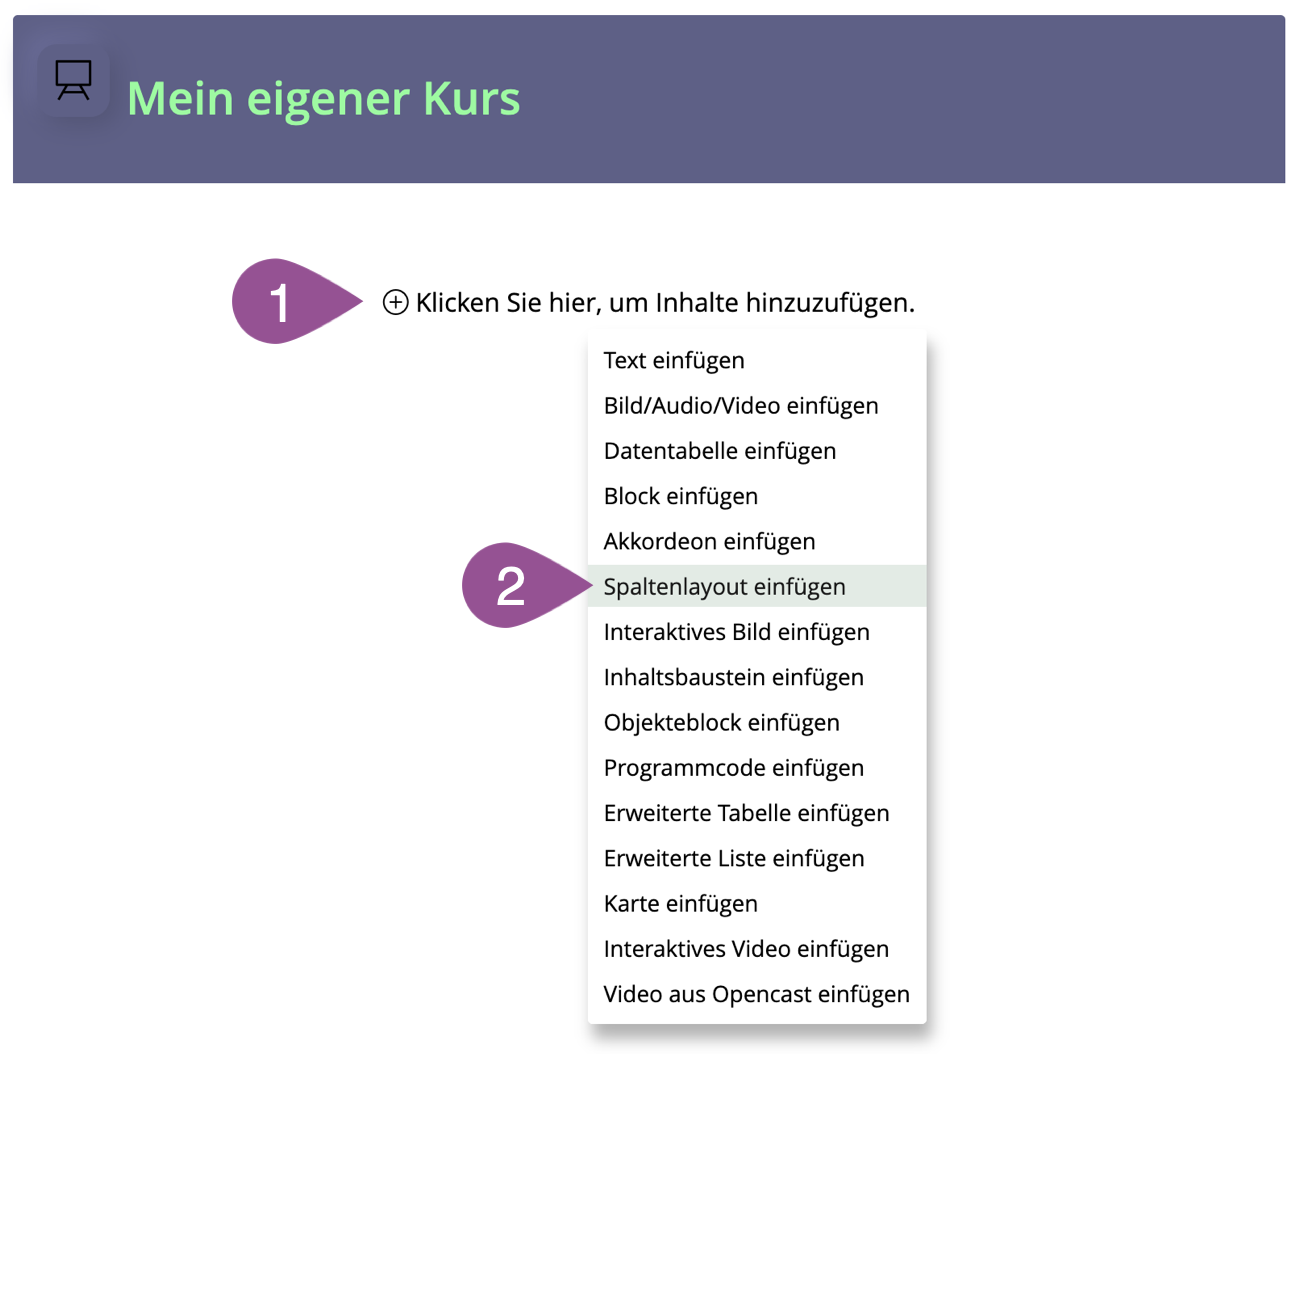
On the page, click on «+». | |||||||
Select «Insert Column Layout». | |||||||
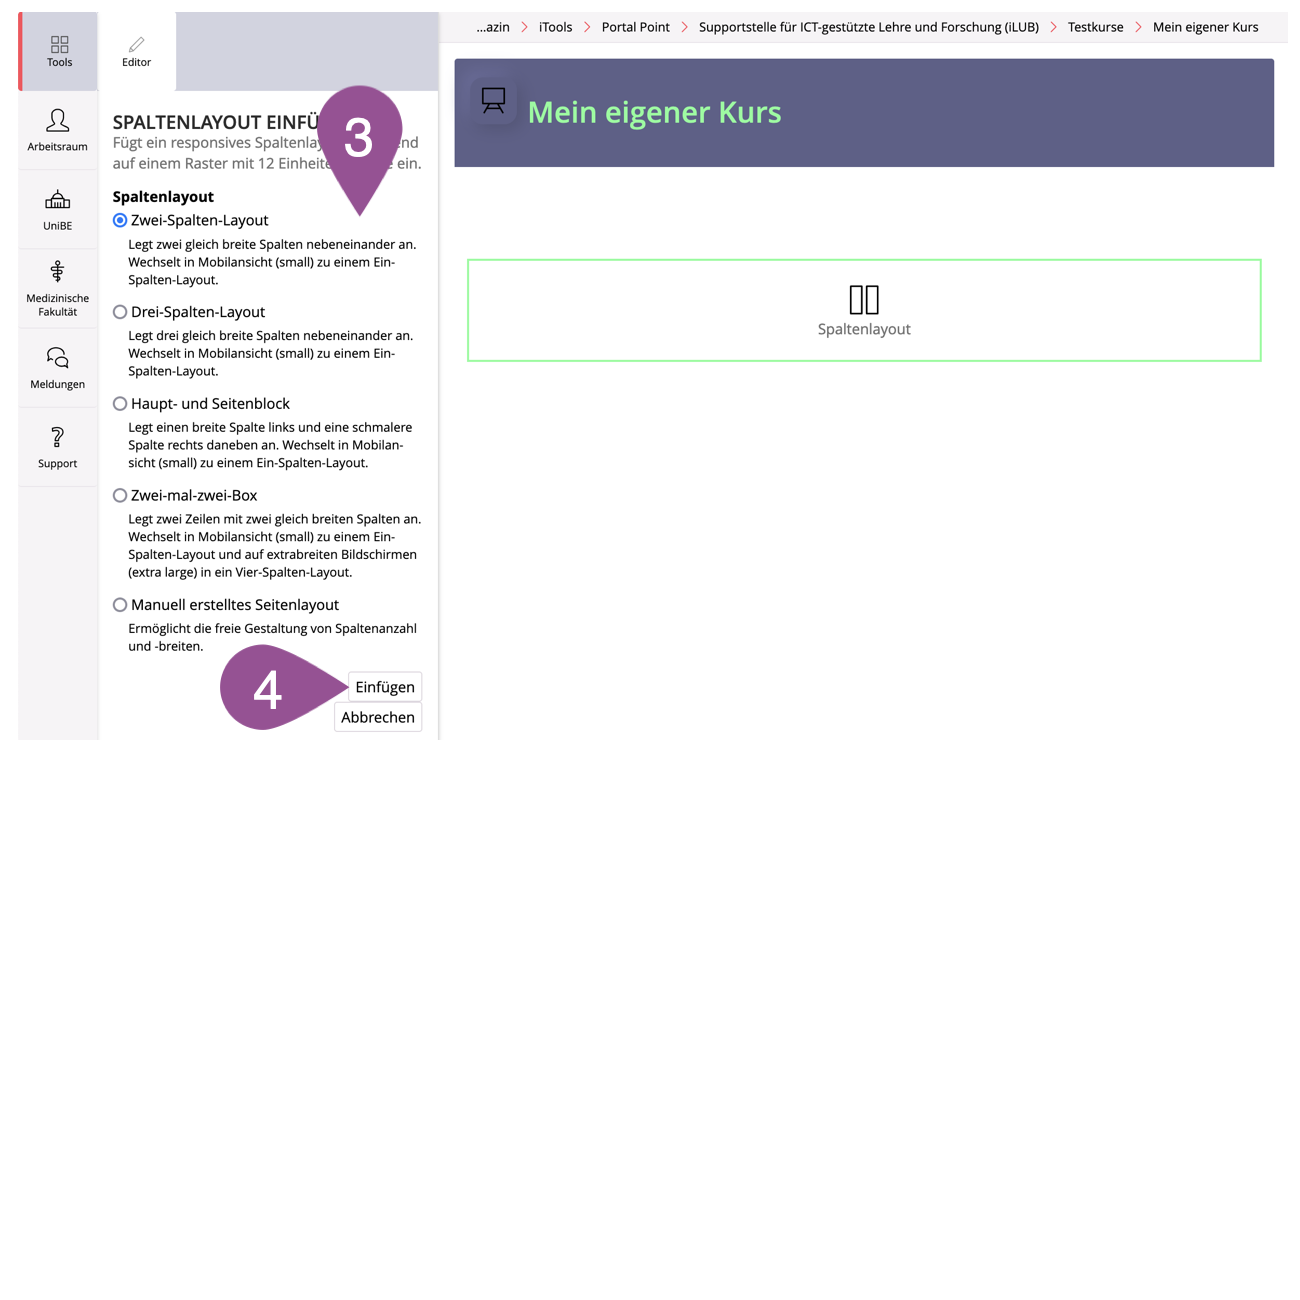
Select a predefined layout or create your own. | |||||||
Click «Insert». | |||||||
To insert content into a column, click «+» inside the column and select the page element or drag and drop existing elements into the column. | |||||||
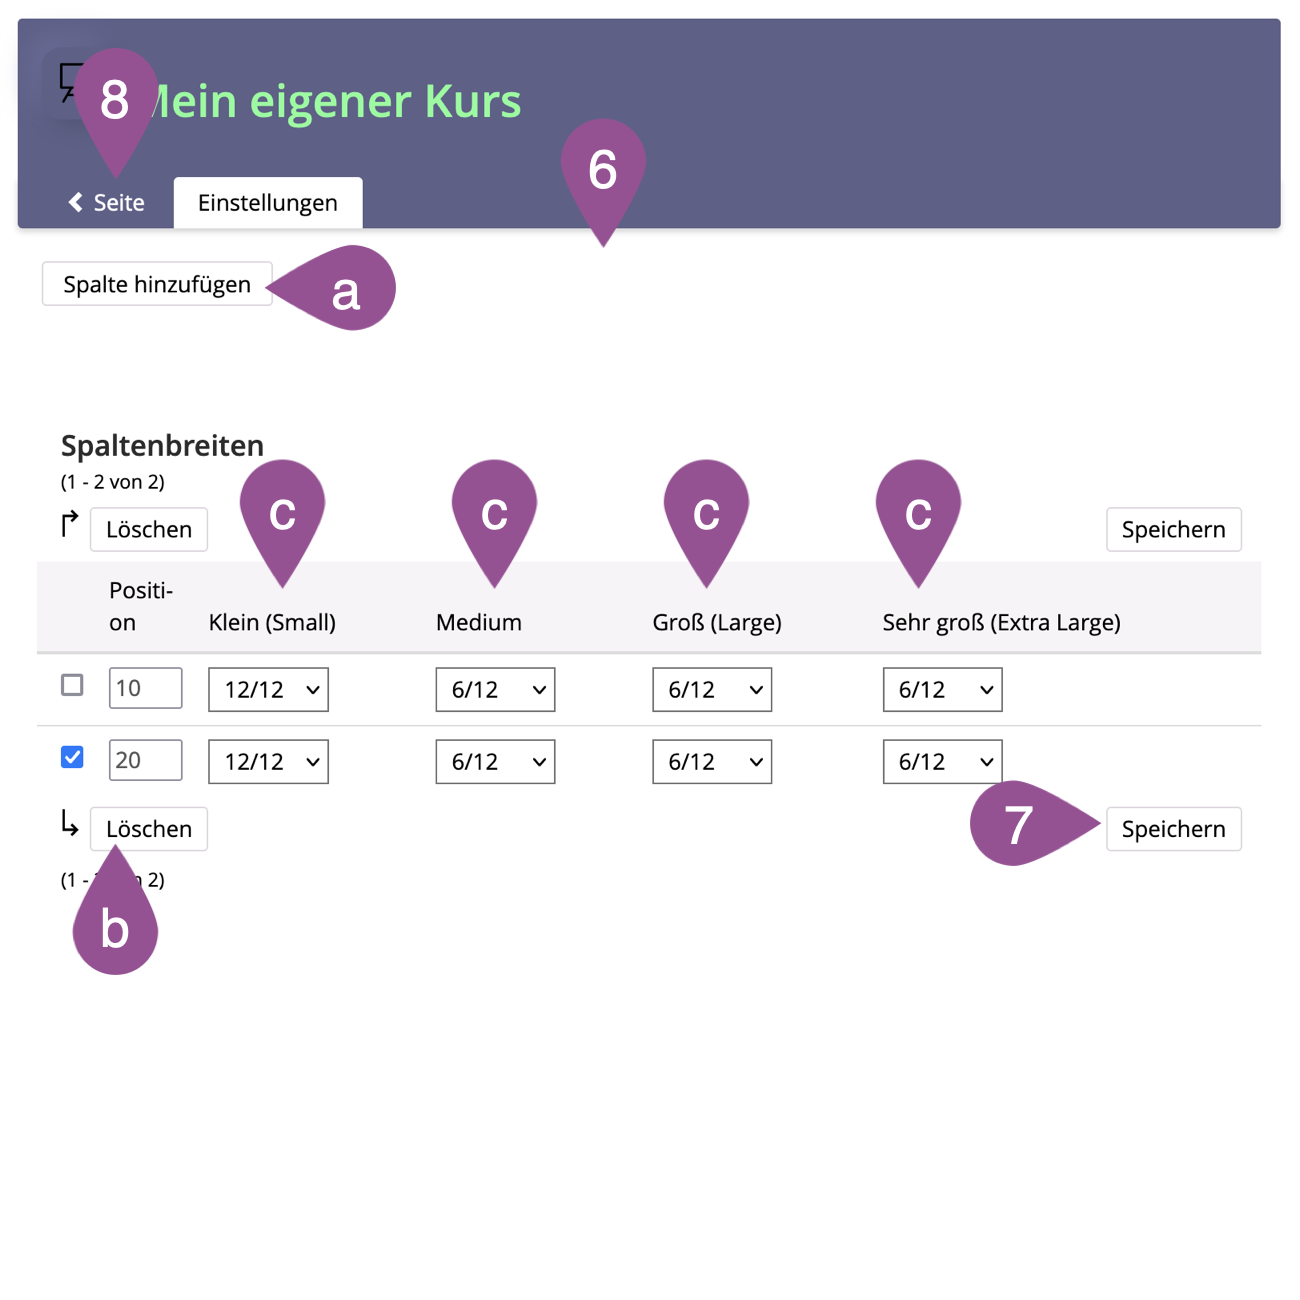
To edit a column layout later on, click on the accordion. A table opens.
| |||||||
Click «Save». | |||||||
Click on «Page», to return to the page. |
.
Interactive Image
The «Interactive Image» element allows you to add an image to a page on which certain spots or areas have additional content (overlay images or content popups) that is initially invisible and becomes visible when you move the cursor to the defined spot or area of the image (overlay images) or click on it (content popups).
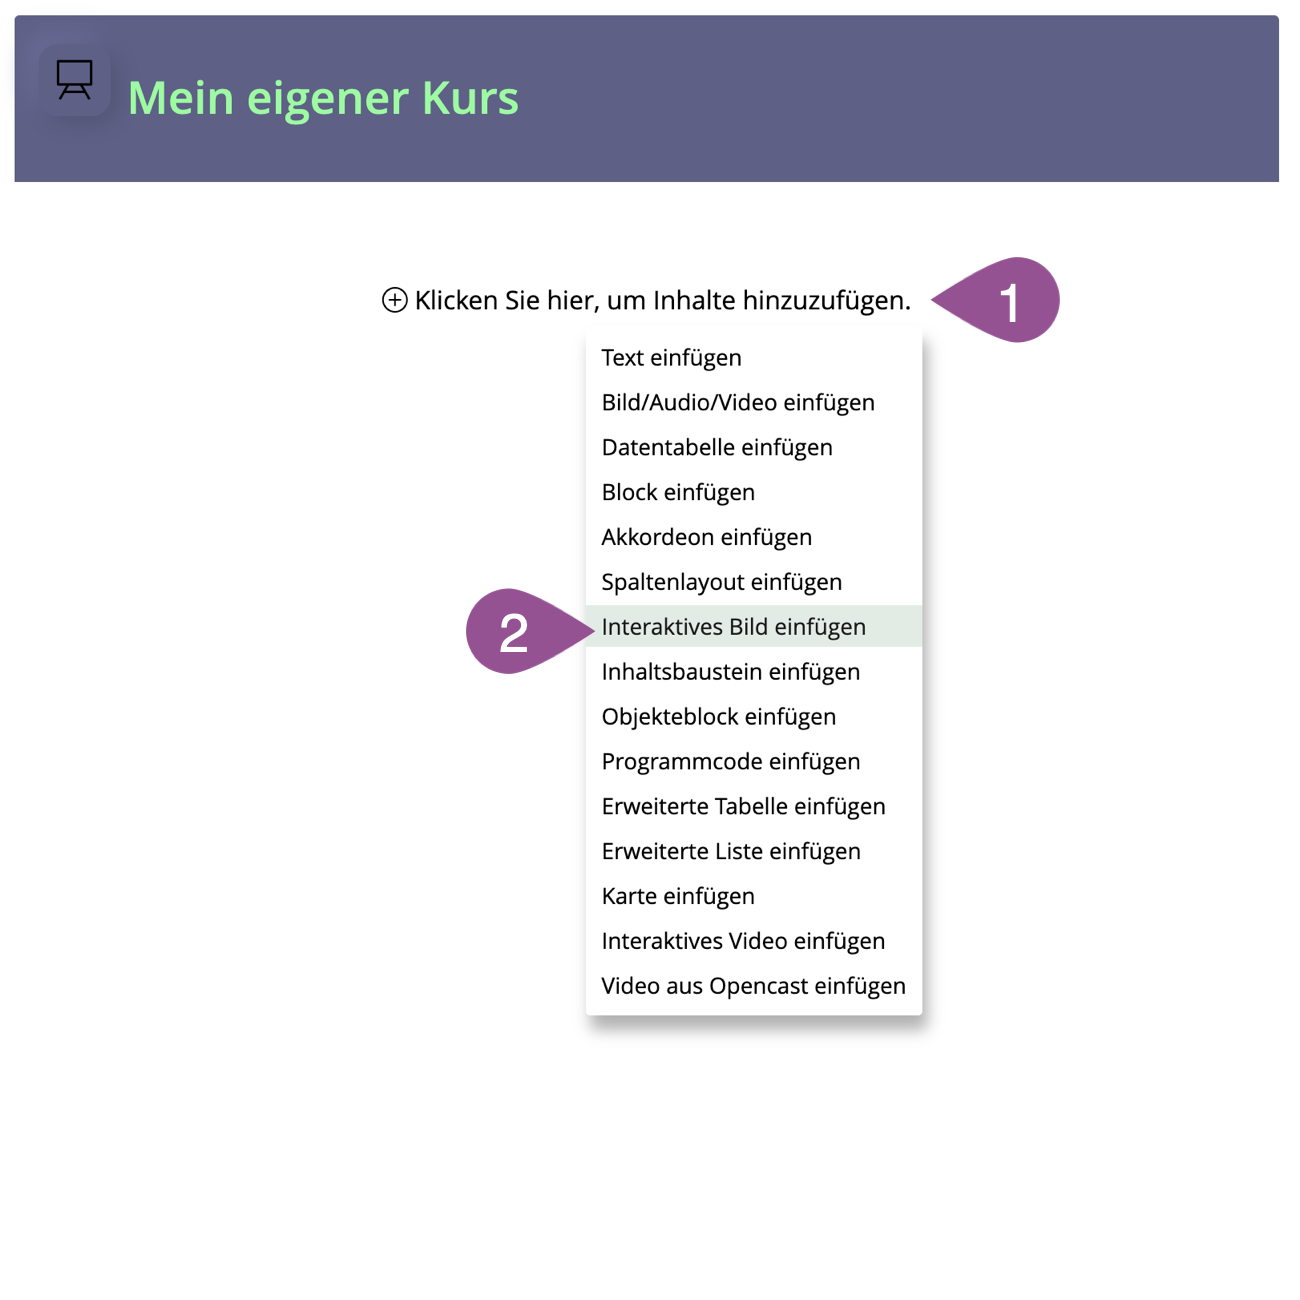
On the page, click on «+». | |||||||||
Select «Insert Interactive Image». | |||||||||
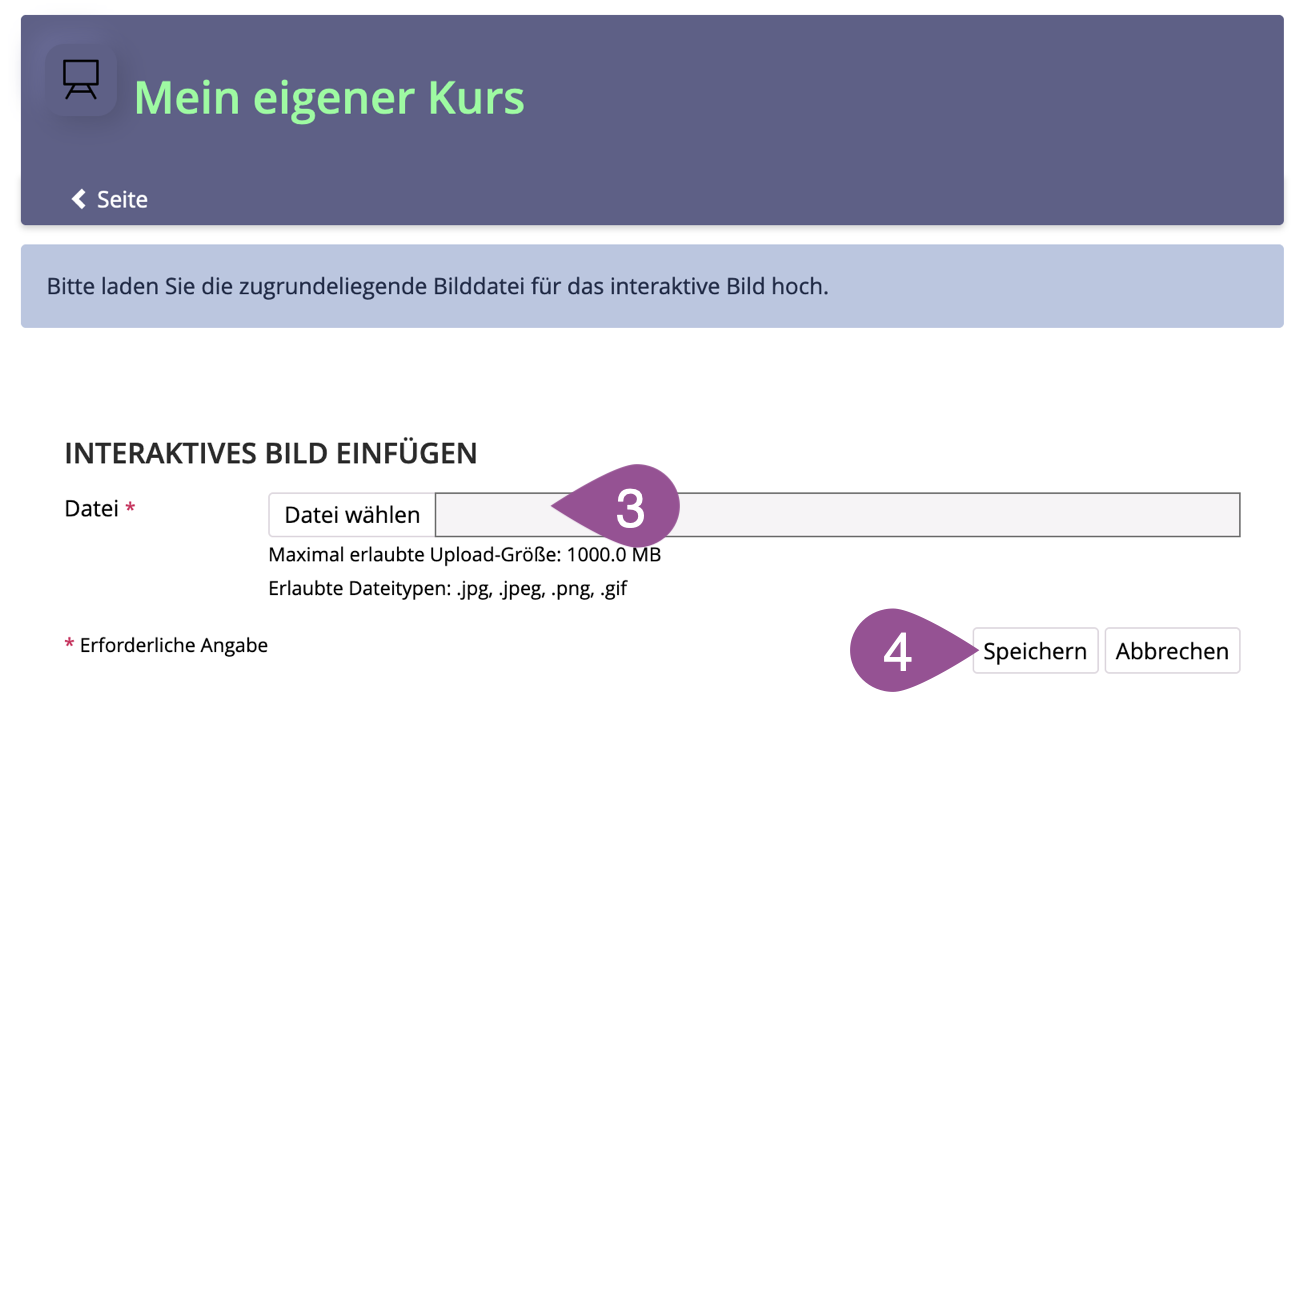
Click «Select File», choose your image and click «Save». Make sure that the image is already sized correctly for display in the interactive image. The image size cannot be adjusted afterward. | |||||||||
Click «Save». | |||||||||
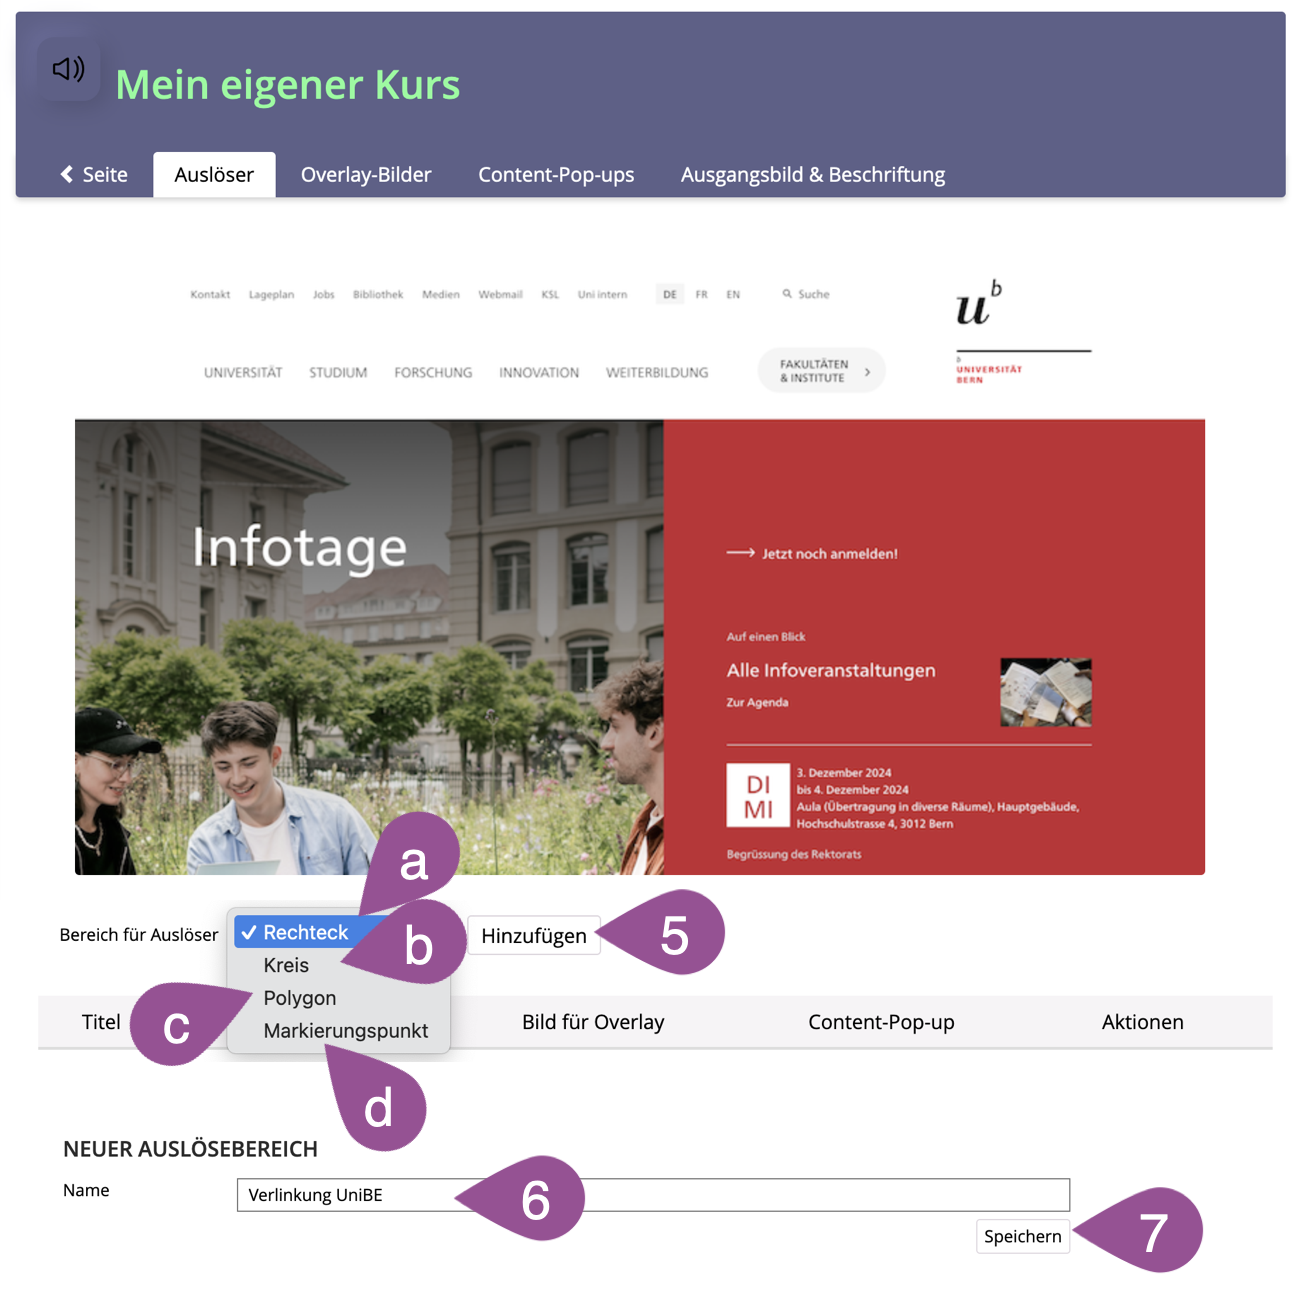
In the «Trigger» tab, select a trigger shape and click «Add».
| |||||||||
Give your trigger a «Title». | |||||||||
Click «Save». |
.
Add an overlay image
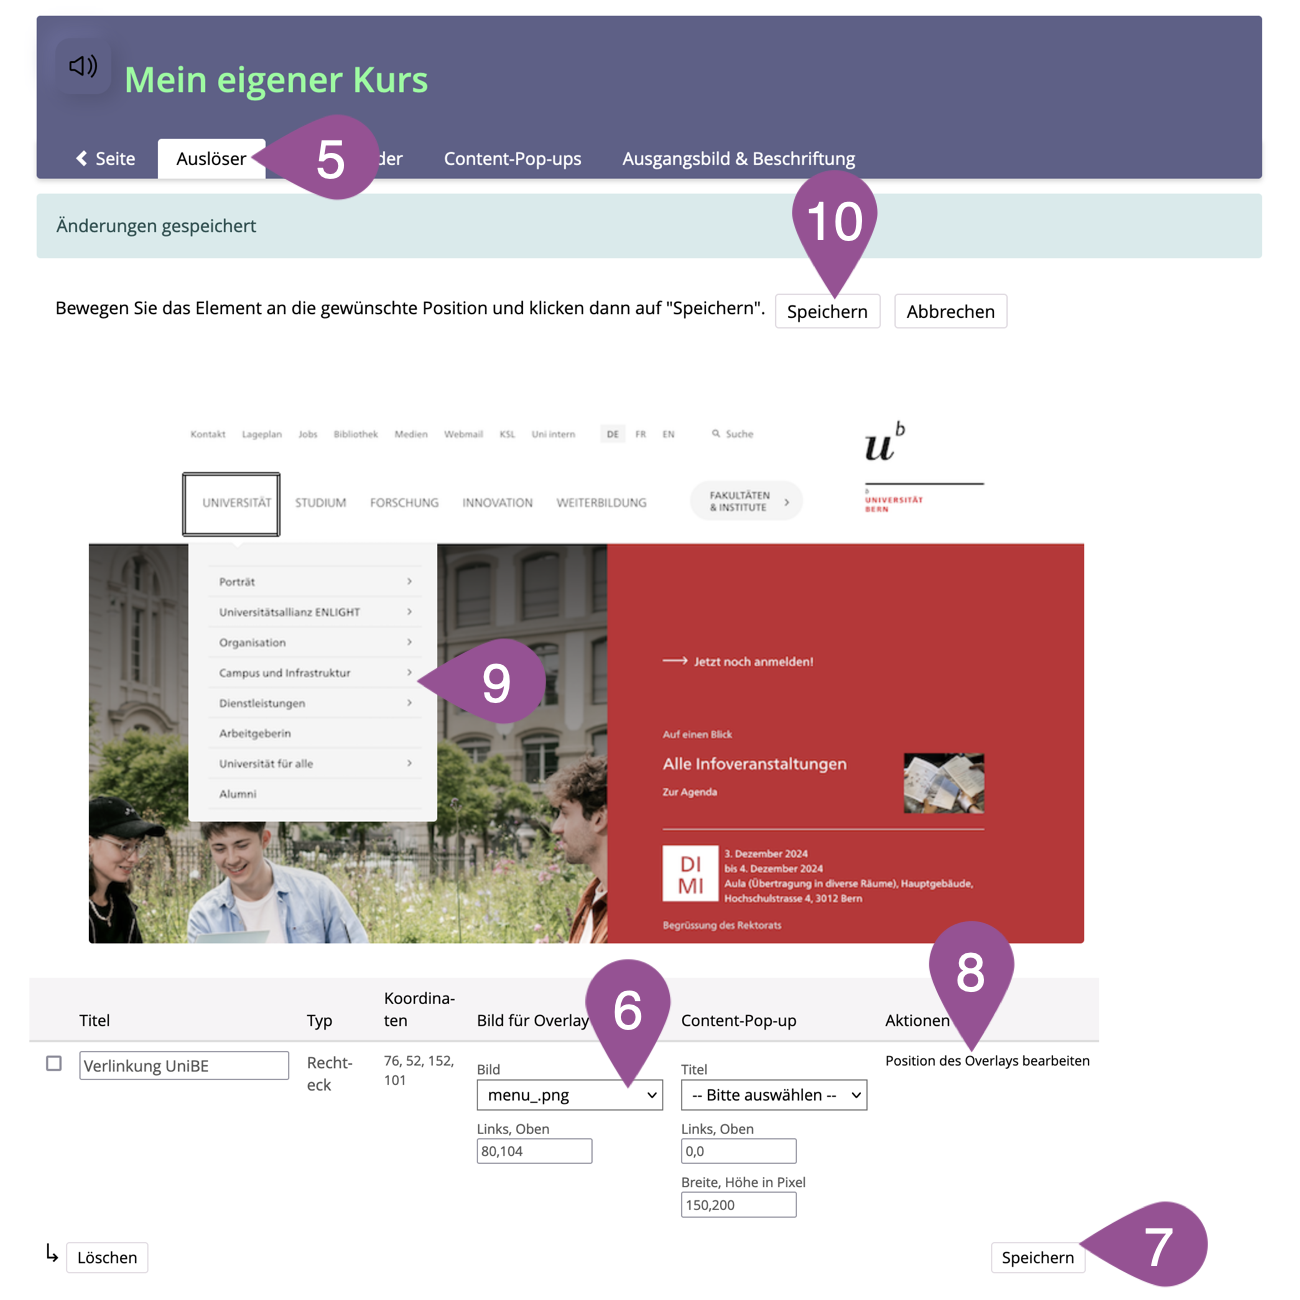
Overlay images become visible when you move the cursor over the (invisible) trigger.
If you want the trigger to bring up an overlay image, follow the steps below:
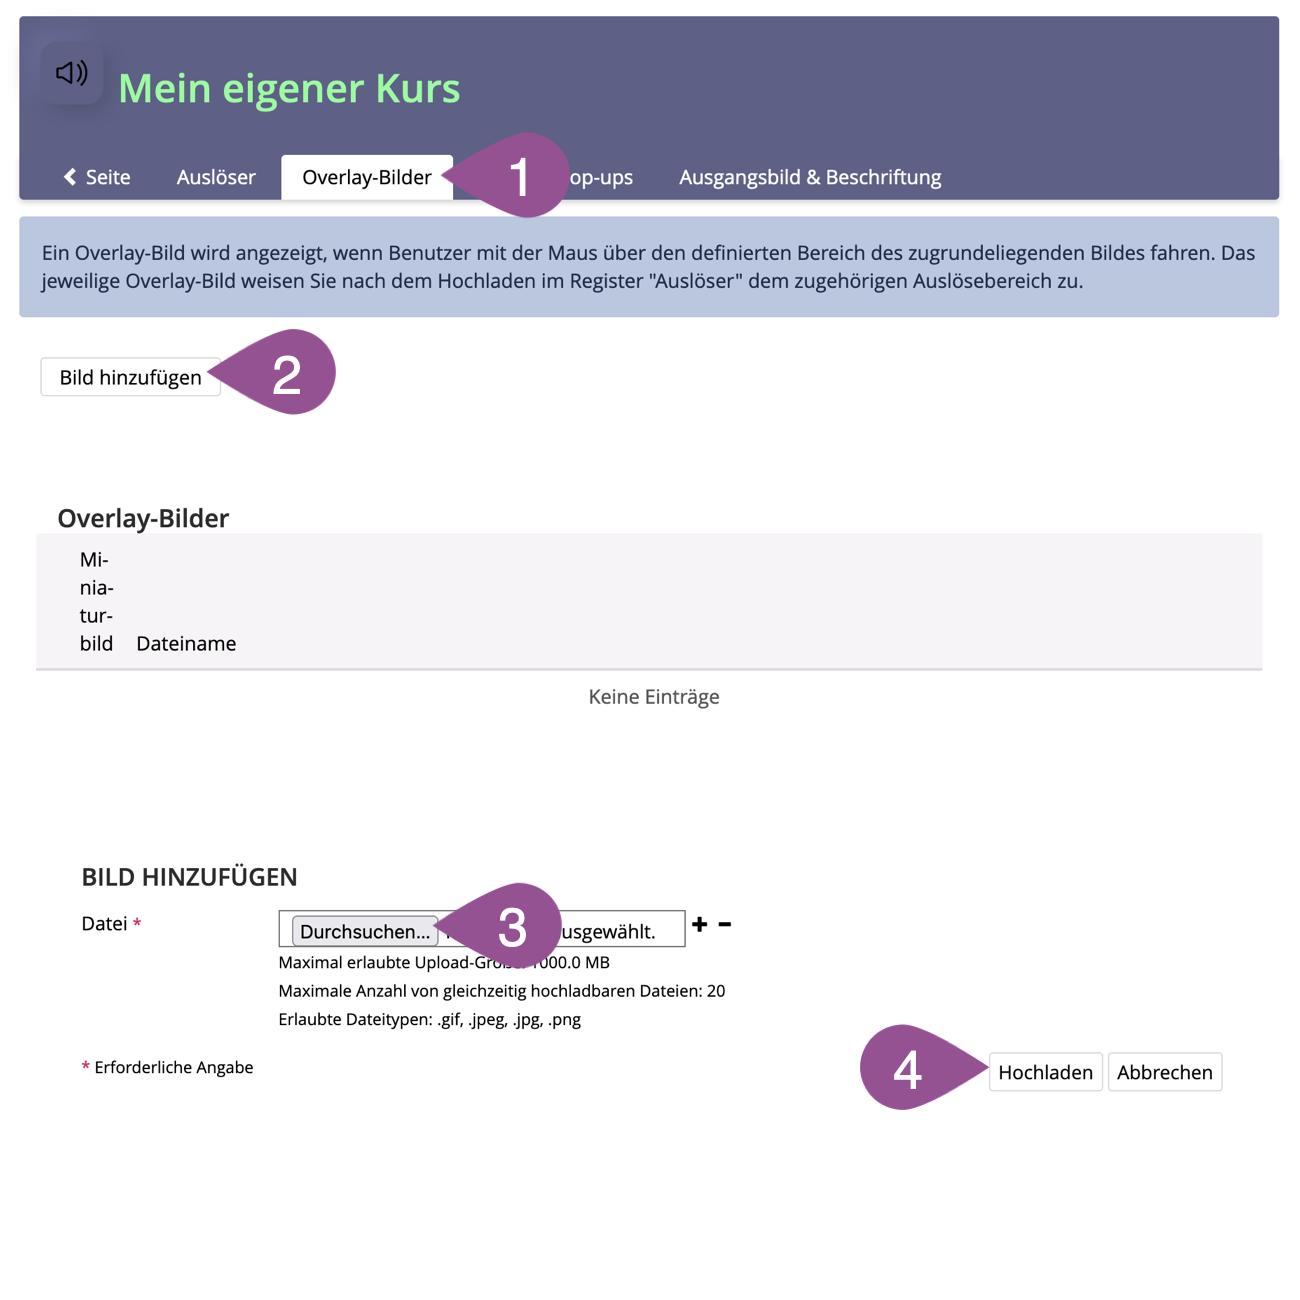
Go to the «Overlay Images» tab. | |
Click «Add Images». | |
Click «Datei auswählen» and select the image for the overlay. Make sure that the image is already sized correctly for display in the interactive image. The image size cannot be adjusted afterward. | |
Click «Upload». | |
Go back to the «Triggers» tab. | |
Select your image from the «Image» drop-down menu in the «Overlay Image» column. | |
Click «Save». | |
To adjust the position of the overlay, click «Edit Overlay Position». | |
Move the overlay to the desired location. | |
Click «Save» above the image. |
.
Add a content popup
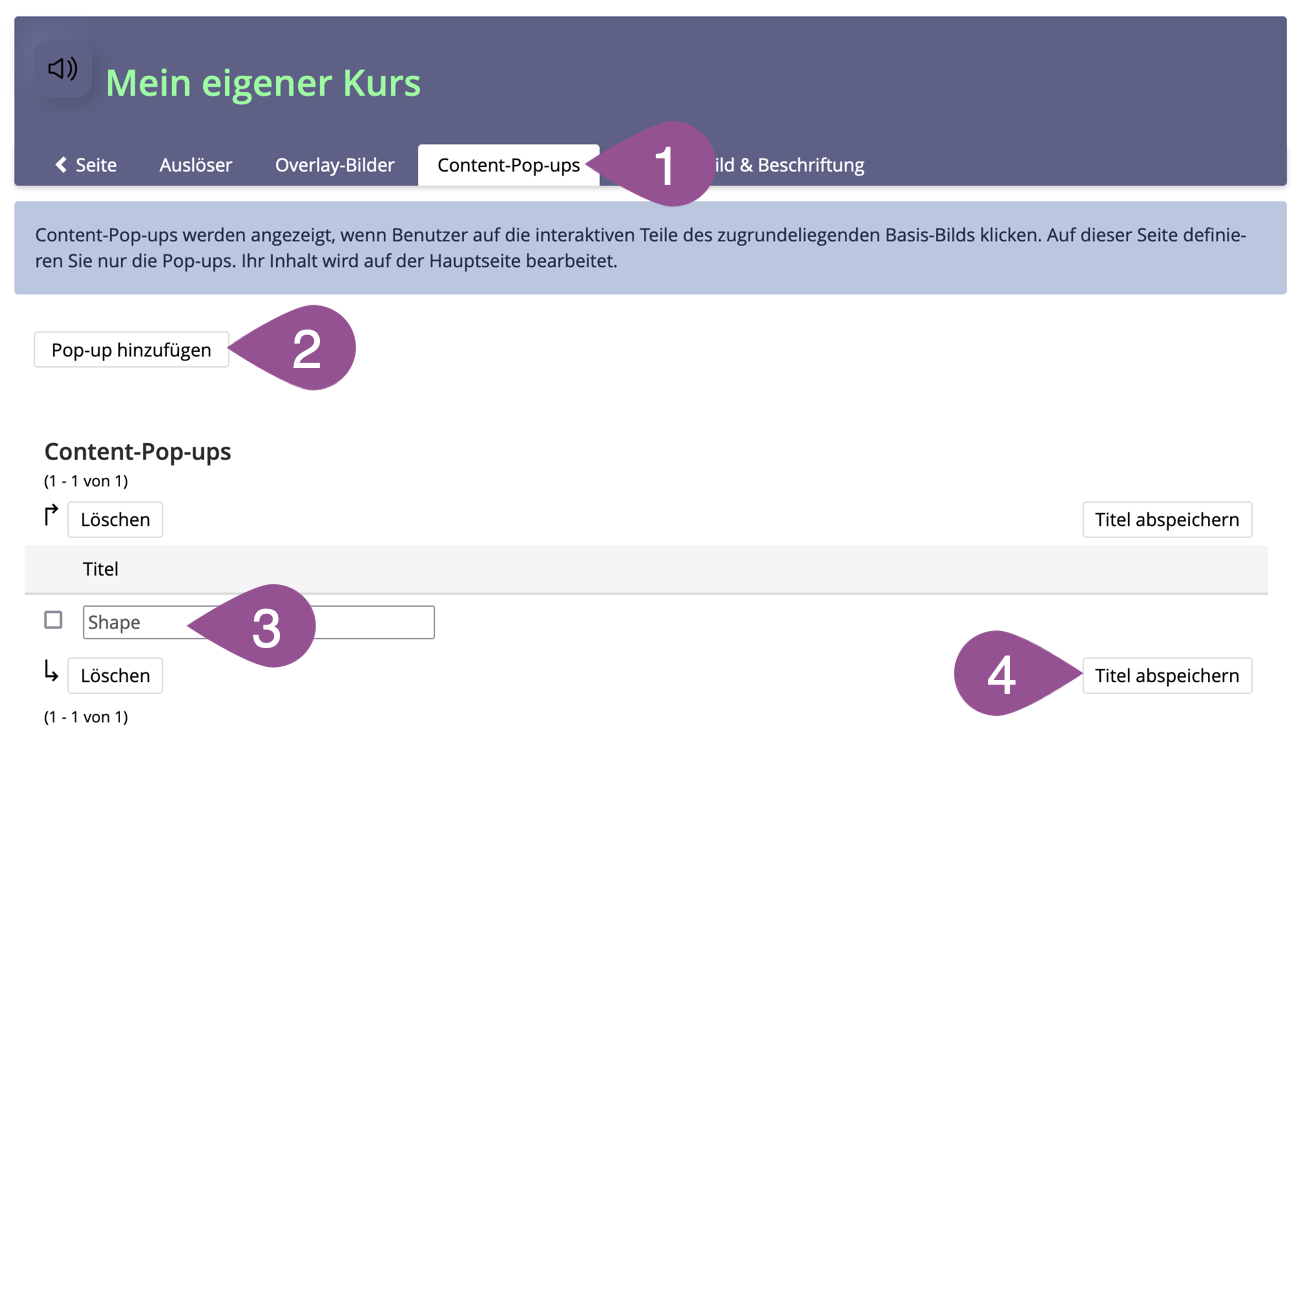
Content popups become visible when you click on the (invisible) trigger.
If you want the trigger to bring up a content popup, follow the steps below:
Go to the «Content Popups». tab. | |
Click «Add Popup». | |
Give your popup a «Title». | |
Click «Save Titles». | |
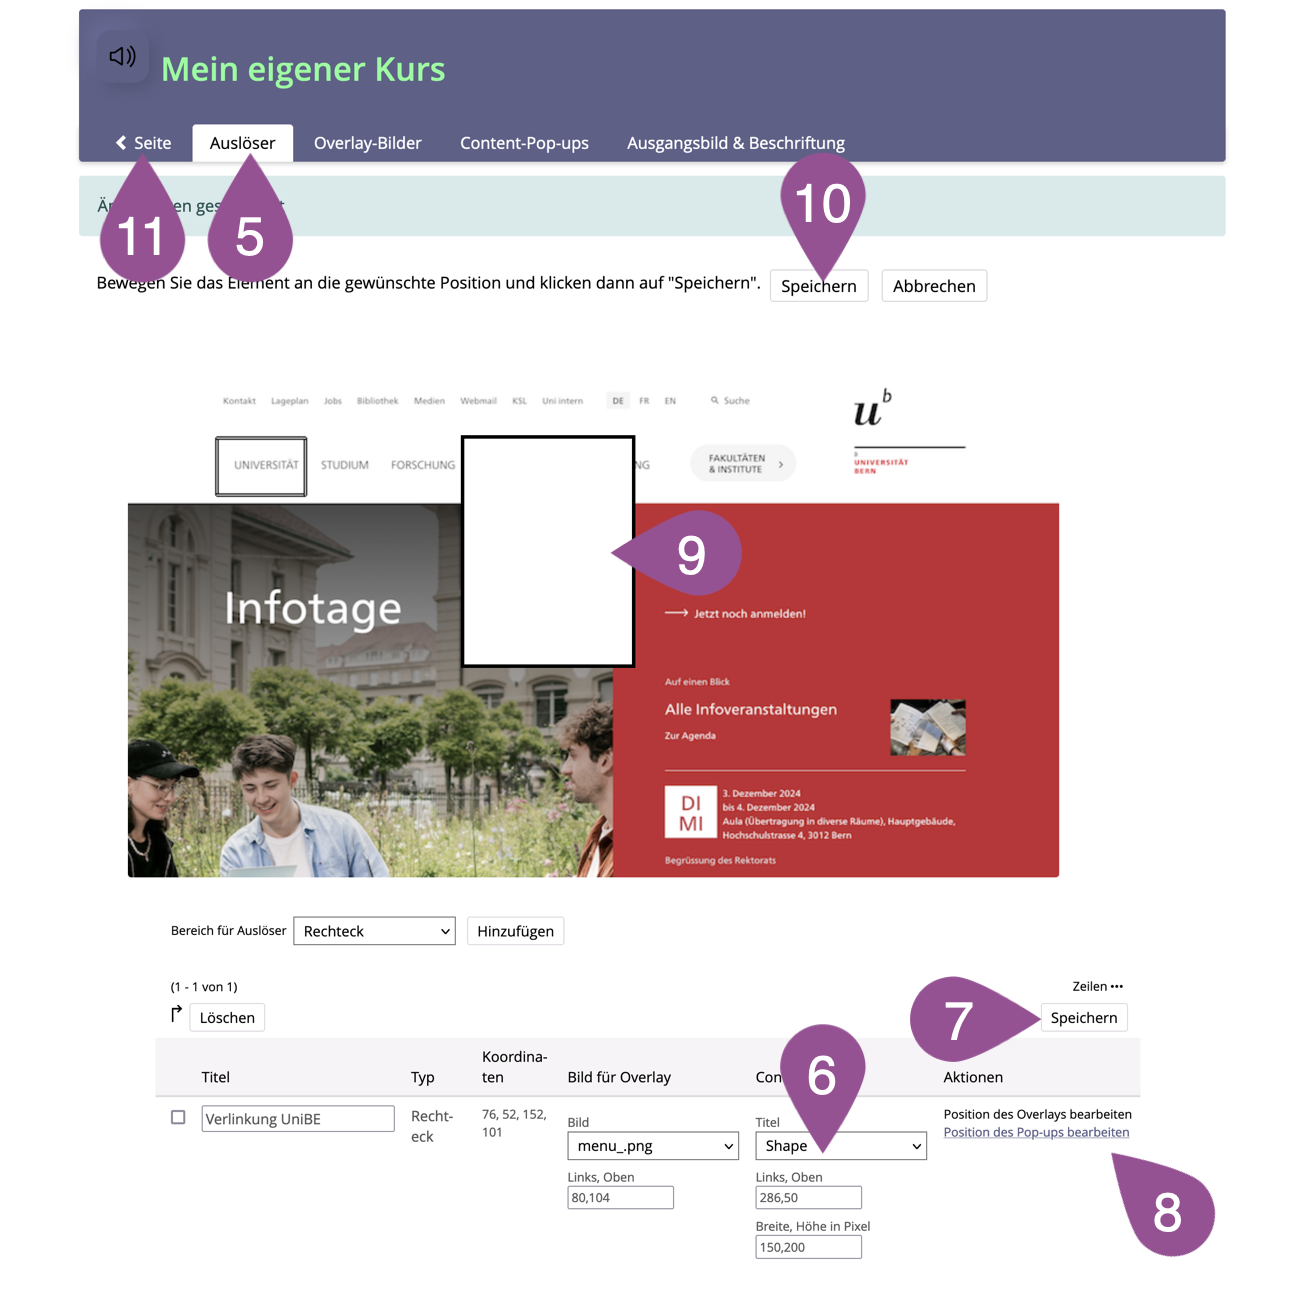
Go back to the «Triggers» tab. | |
Select your popup from the «Title» drop-down menu in the «Content Popup» column. The title is not displayed in the popup. | |
Click «Save». | |
To adjust the position of the popup, click «Edit Popup Position». | |
Move the popup to the desired location. | |
Click «Save» above the image. | |
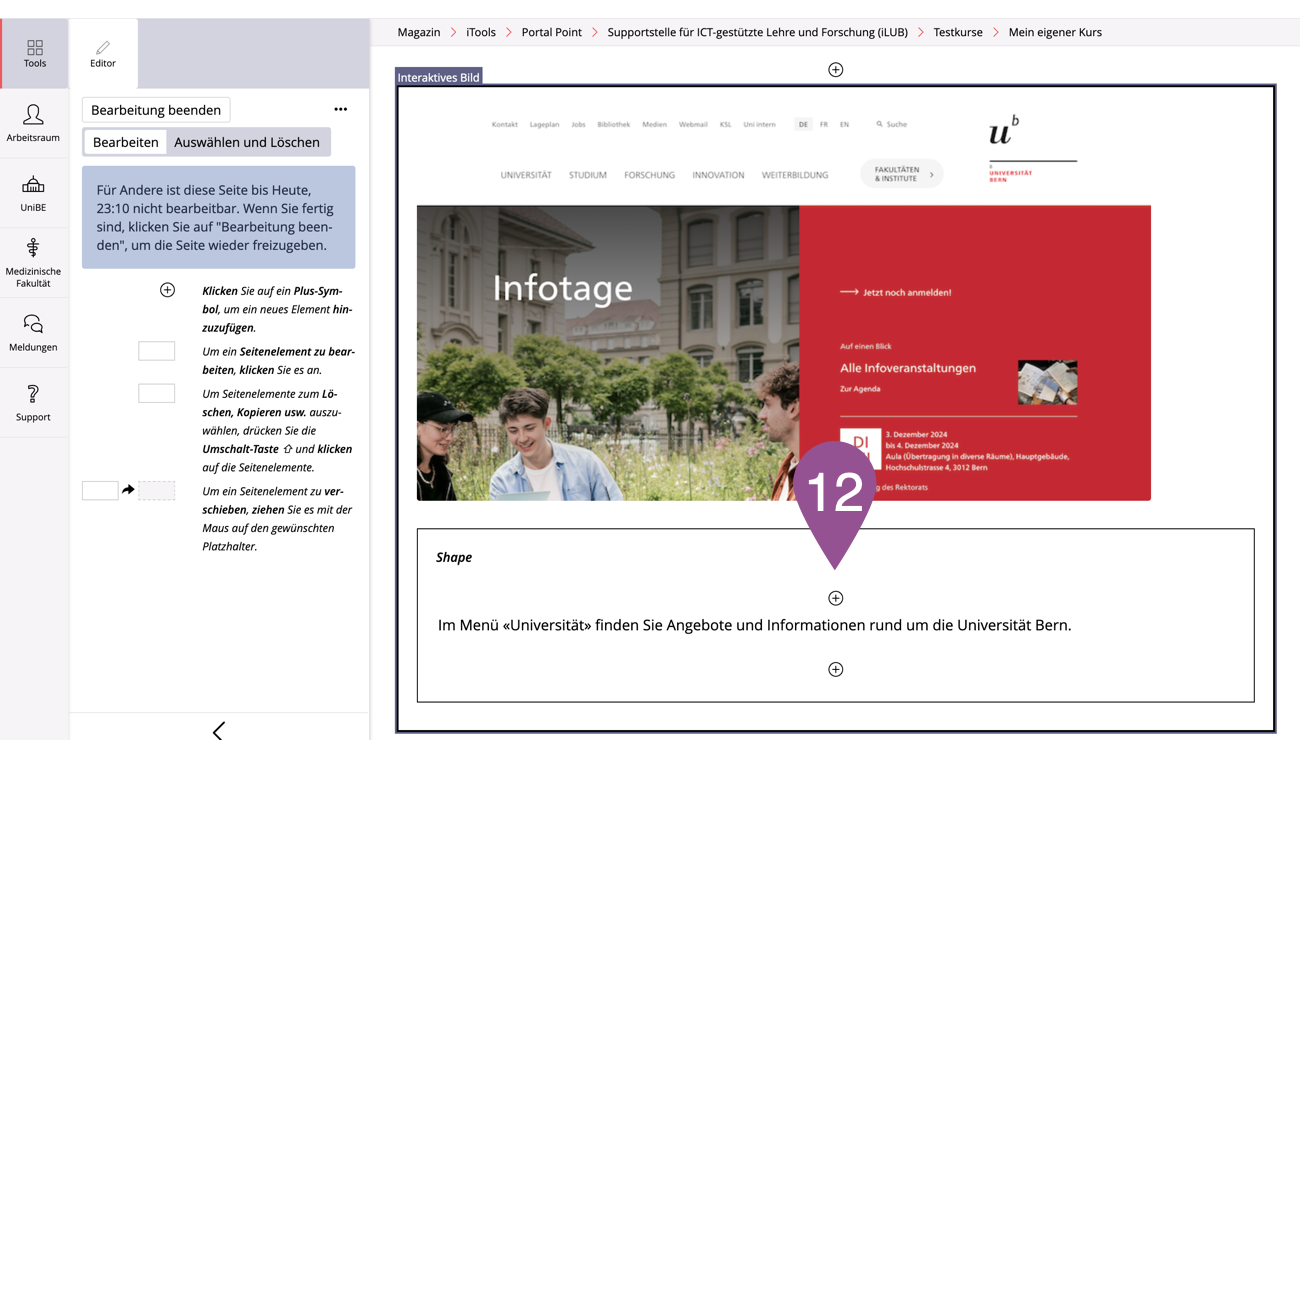
Click on «Page», to return to the page. | |
To insert content into a popup, click «+» inside the popup and select the page element or drag and drop existing elements into the popup. |
.
Item Group
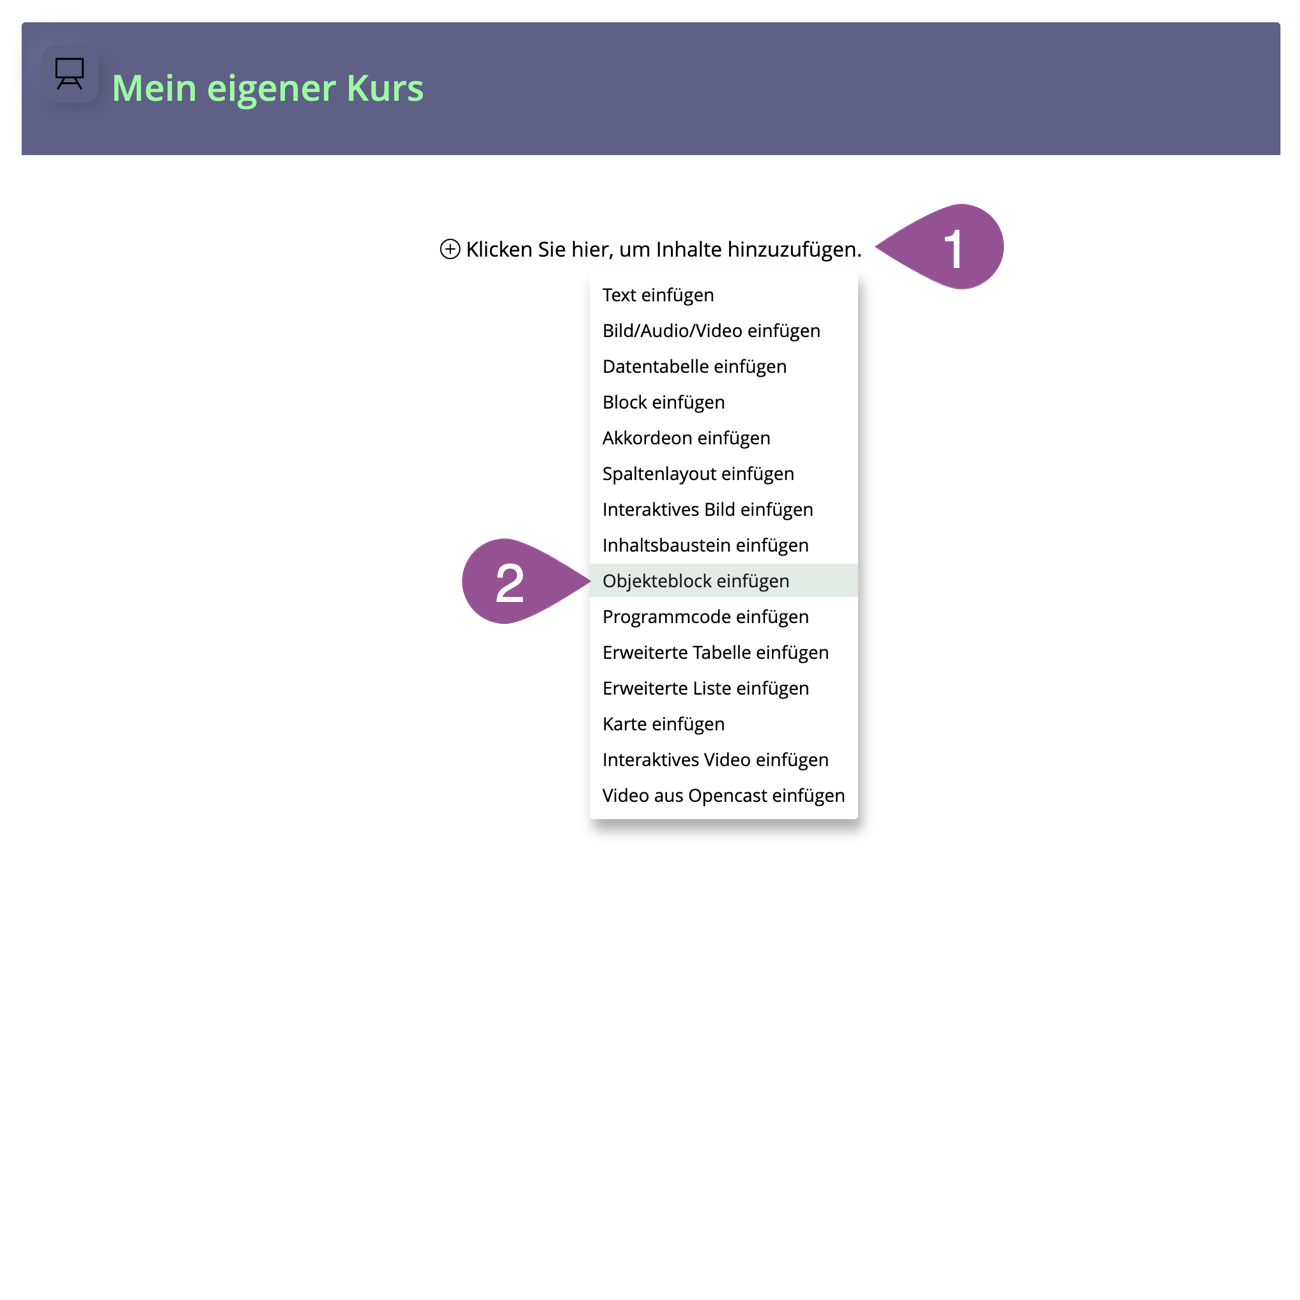
The «Item Group» element allows you to integrate an existing «Item Group» from an ILIAS course (see also Manual: Item Group) into the layout.
On the page, click on «+». | |
Select «Insert Item Group». | |
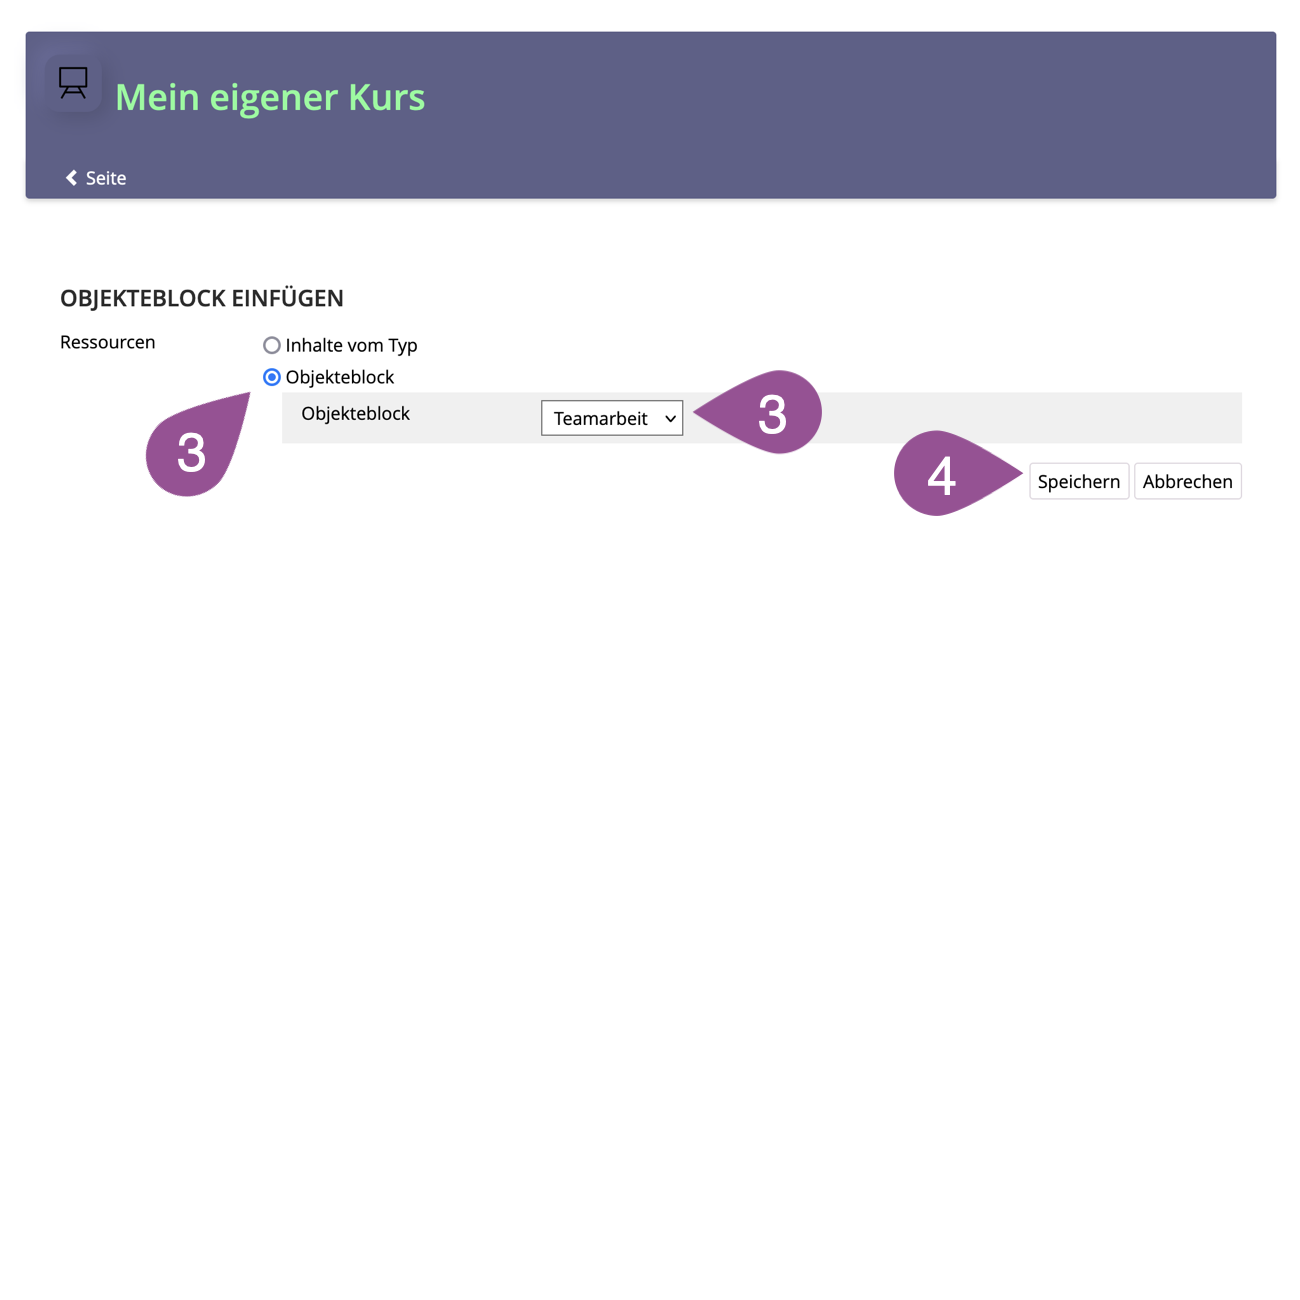
Select the «Item Group» option under «Resources» and select the «Item Group» you want to integrate from the drop-down menu. | |
Click «Save». |
The «Item Group» is now integrated in the layout. It can now no longer be sorted via manual sorting in the course, but has to be placed in the desired position here in the layout.
.
Interactive Video
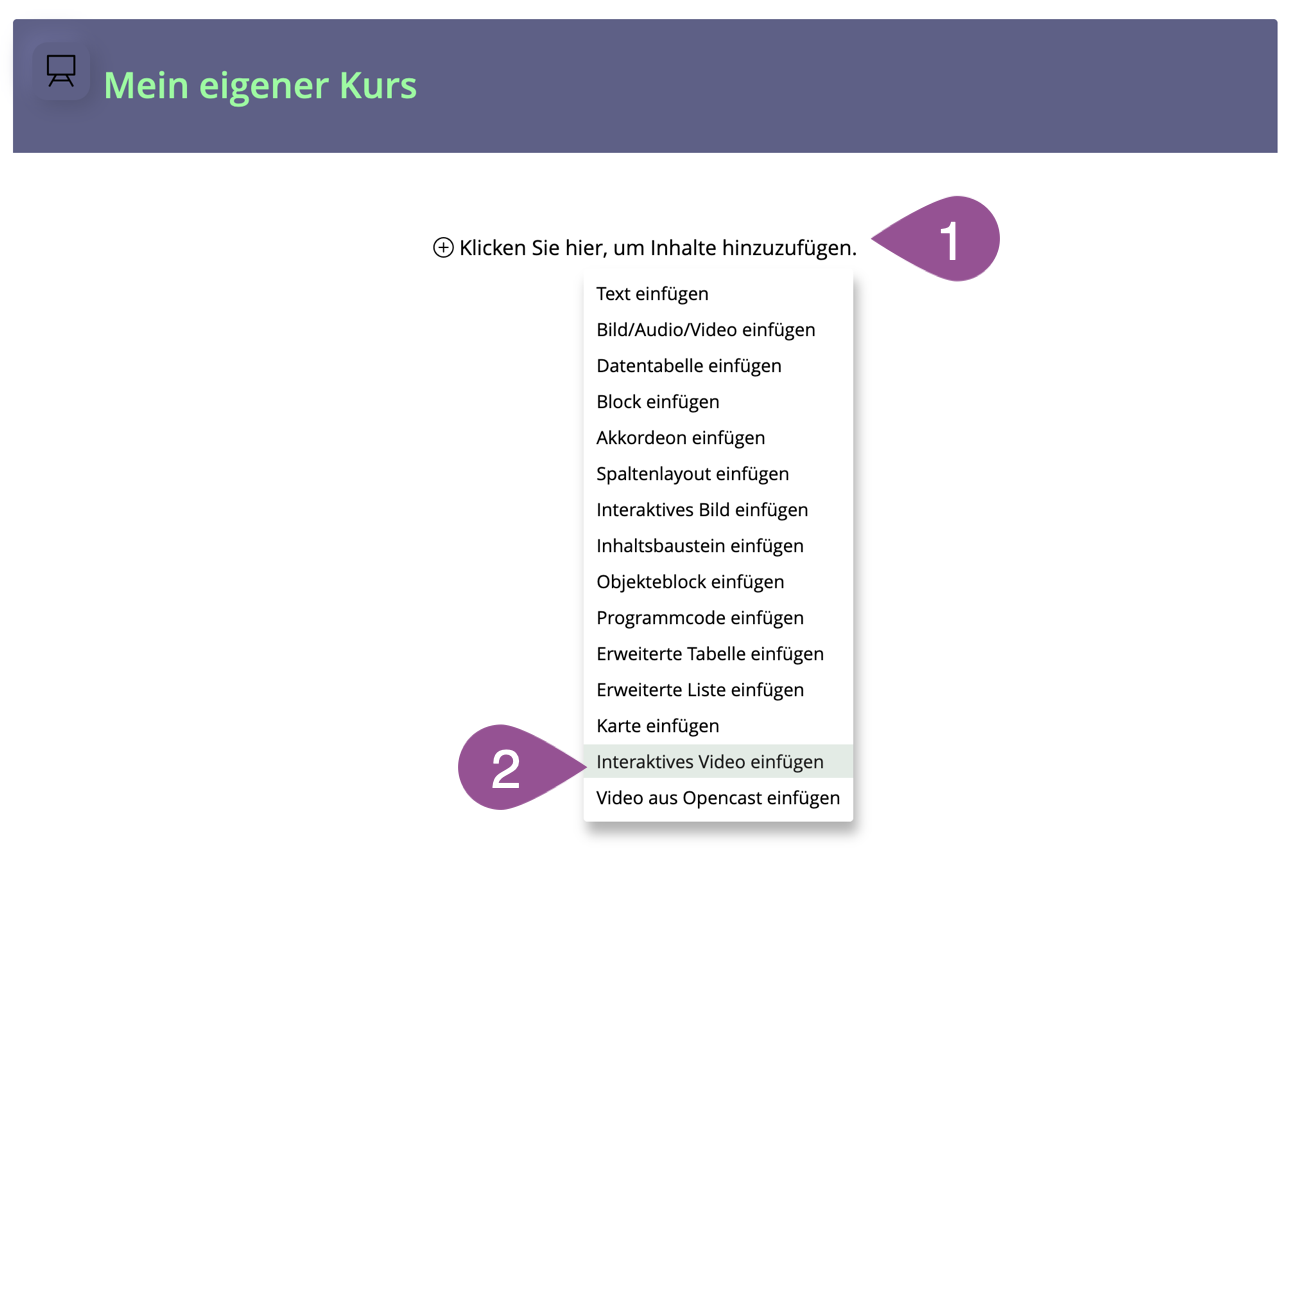
The «Interactive Video» element allows you to integrate an already existing «Interactive Video» from an ILIAS course (see also Manual: Interactive Video) into the layout.
On the page, click on «+». | |||||
Select «Insert InteractiveVideo Reference». | |||||
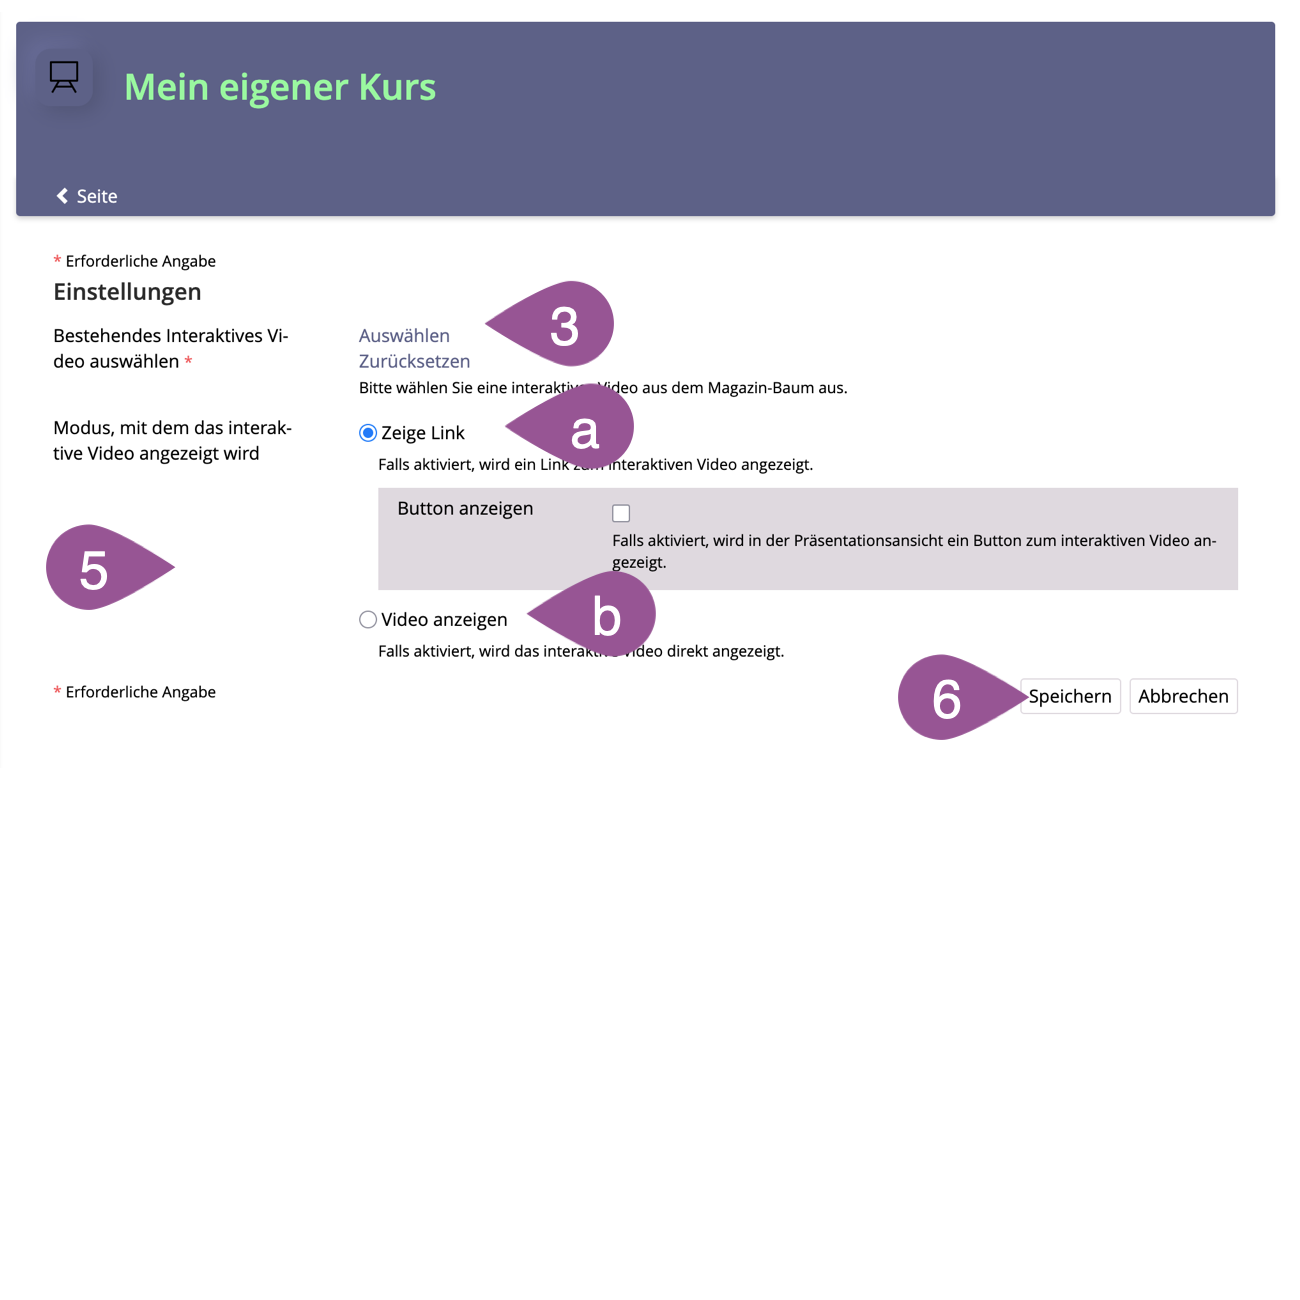
Click «Select» and choose the «Interactive Video» you want from the tree structure. | |||||
Click «Select». | |||||
Choose how you want the video to appear on the page.
| |||||
Click «Save». |
.
Opencast Video
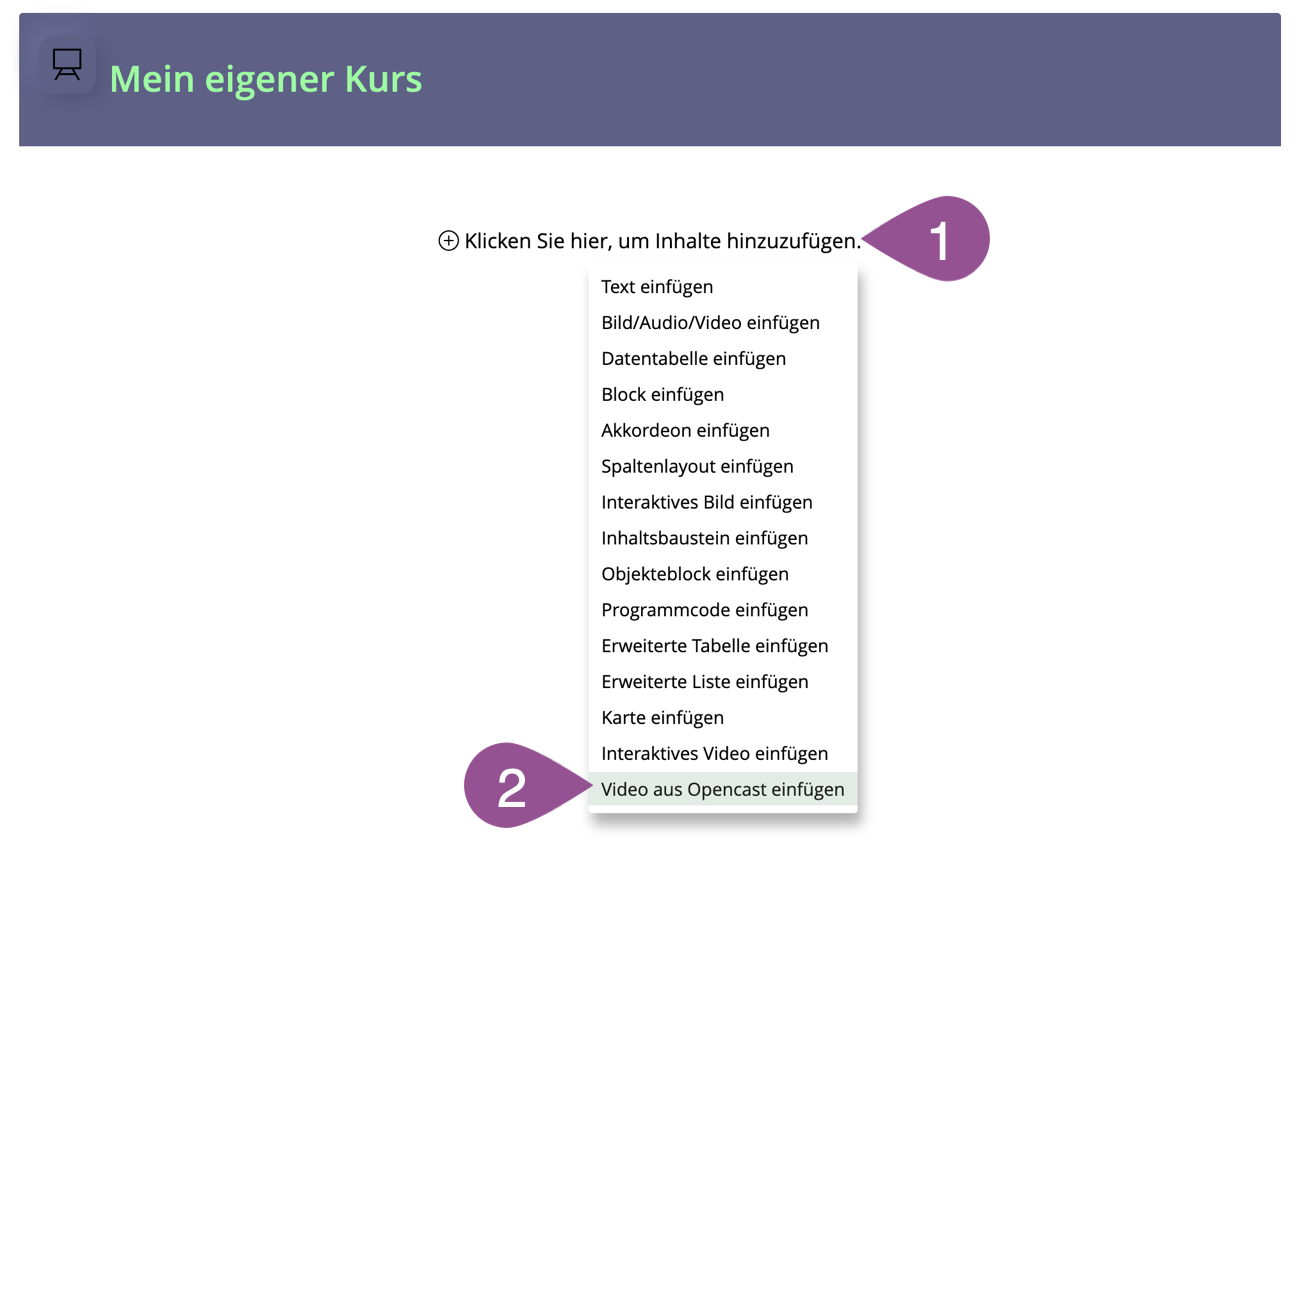
The «Opencast Video» element allows you to integrate videos uploaded to an «Opencast Series» (see also Manual: Opencast Serie) into the layout.
On the page, click on «+». | |
Select «Insert Opencast Video». | |
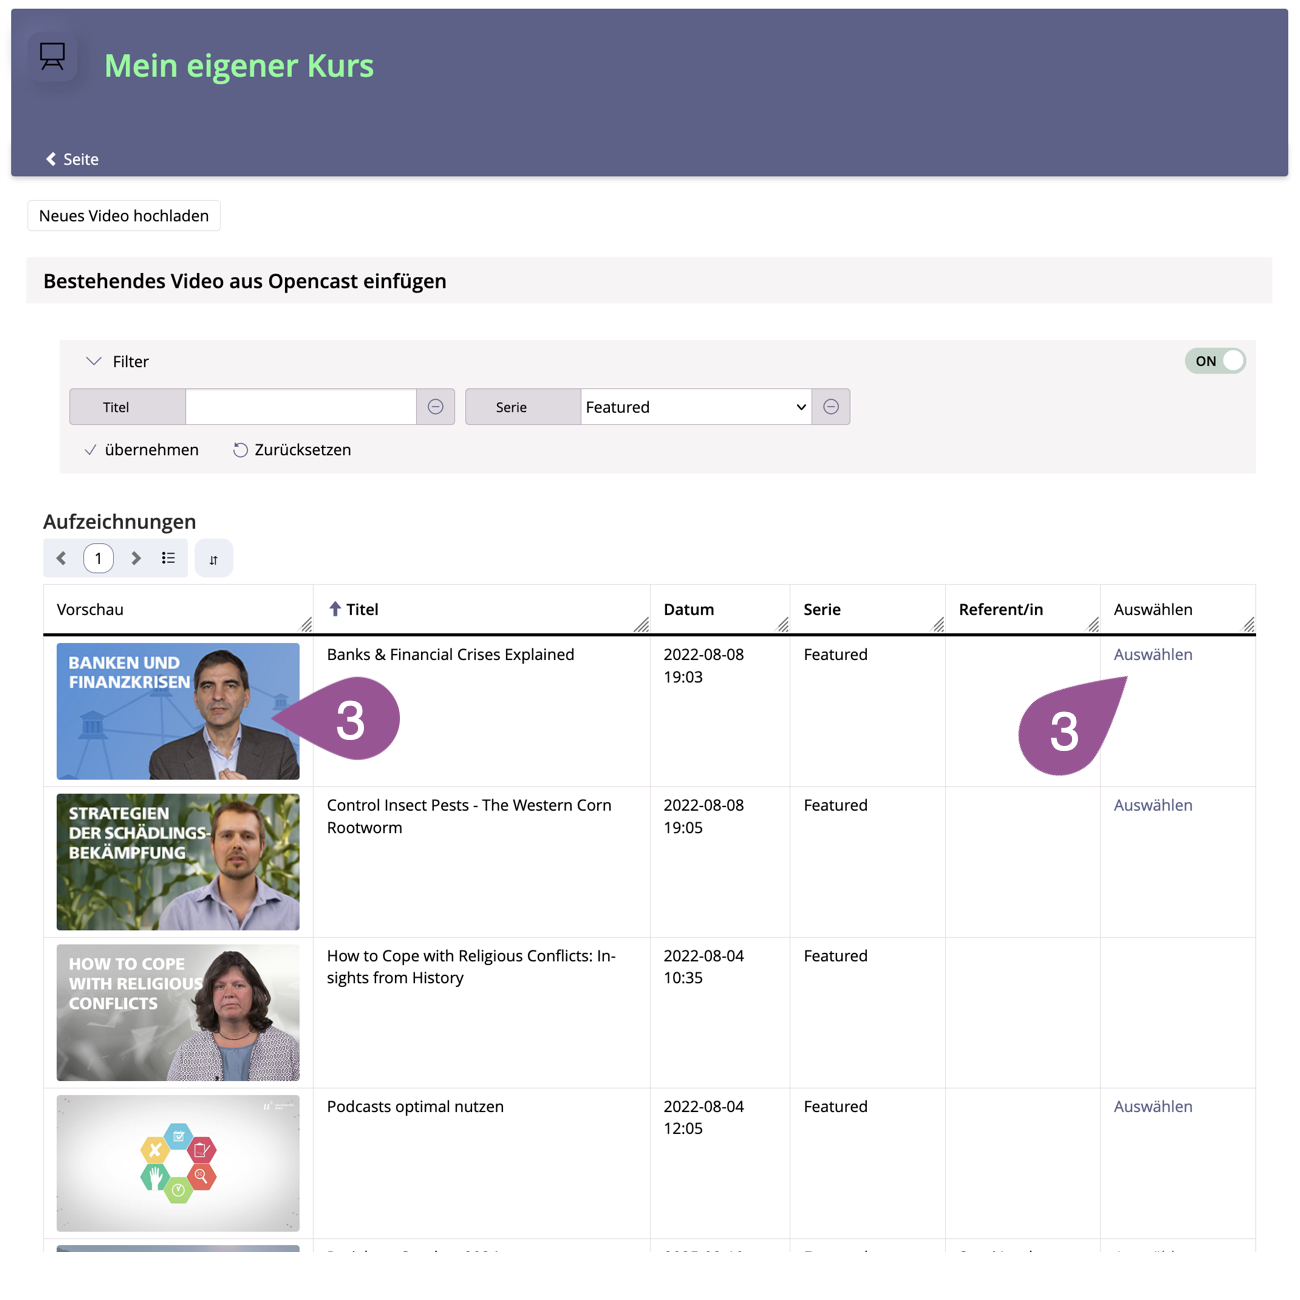
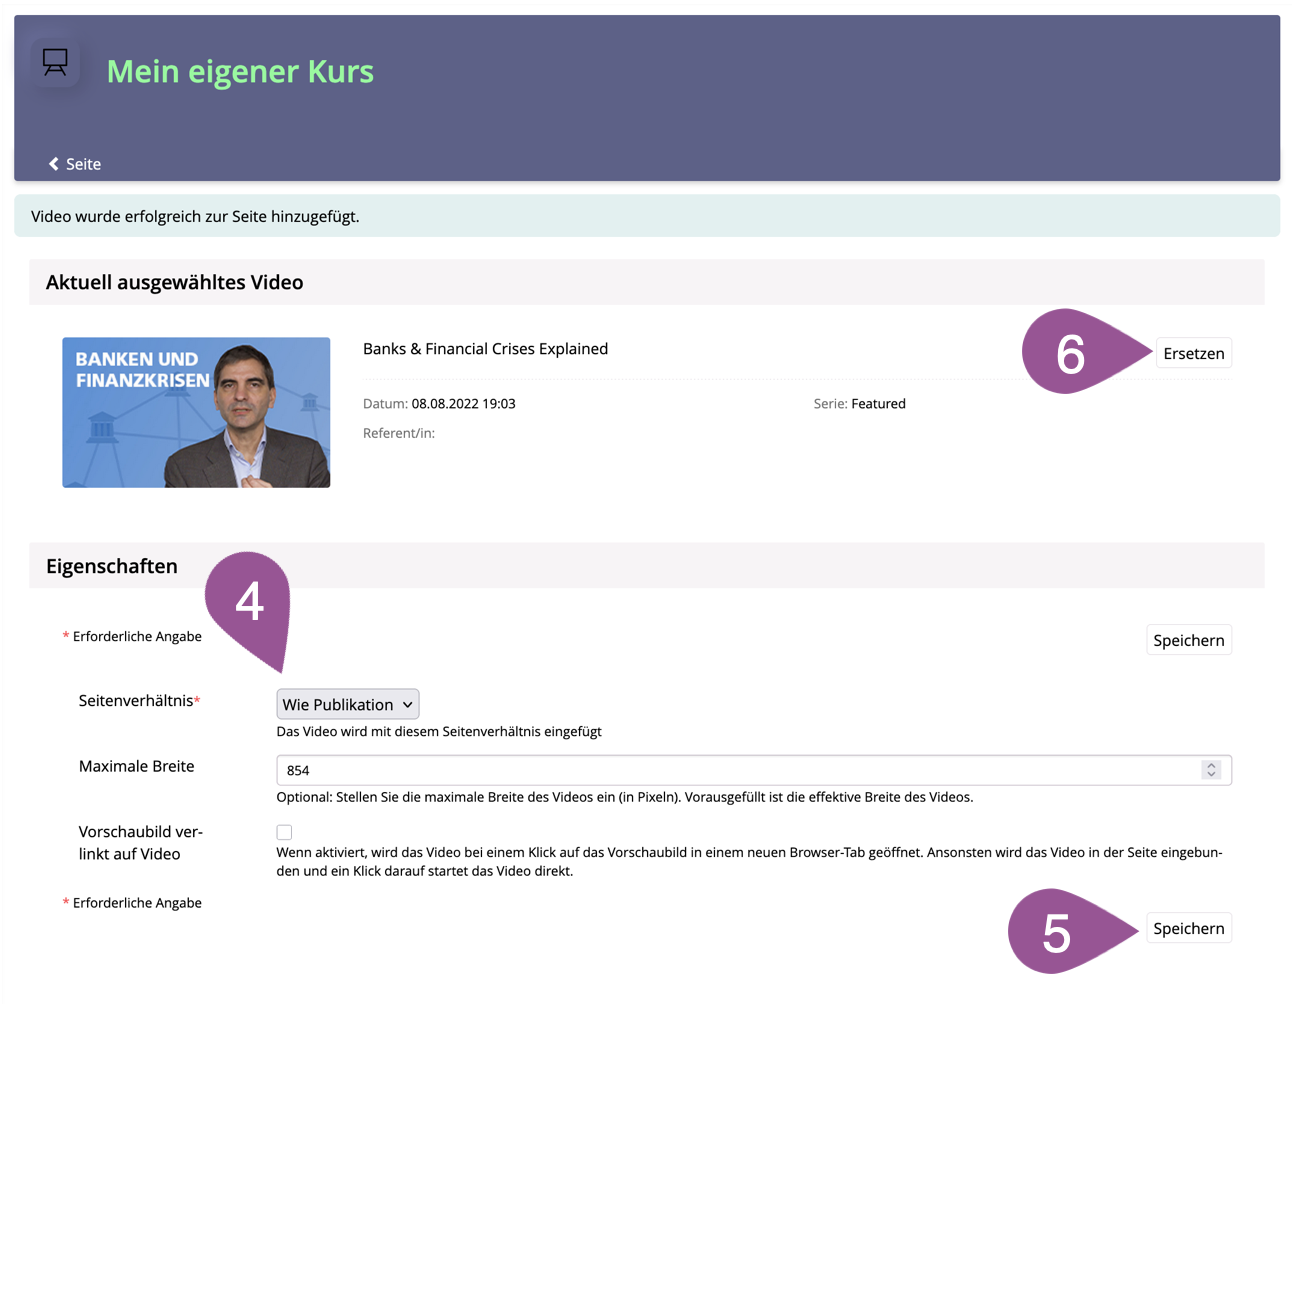
Click on the video you want to integrate to select it. The video will be added directly to the page. You can open the edit mode by left-clicking on the integrated video. | |
In the edit mode, If necessary, you can adjust the maximum size of the video and set it to fit the size of the screen (responsive). | |
Click «Save». |
.
3. Copy, delete & deactivate content
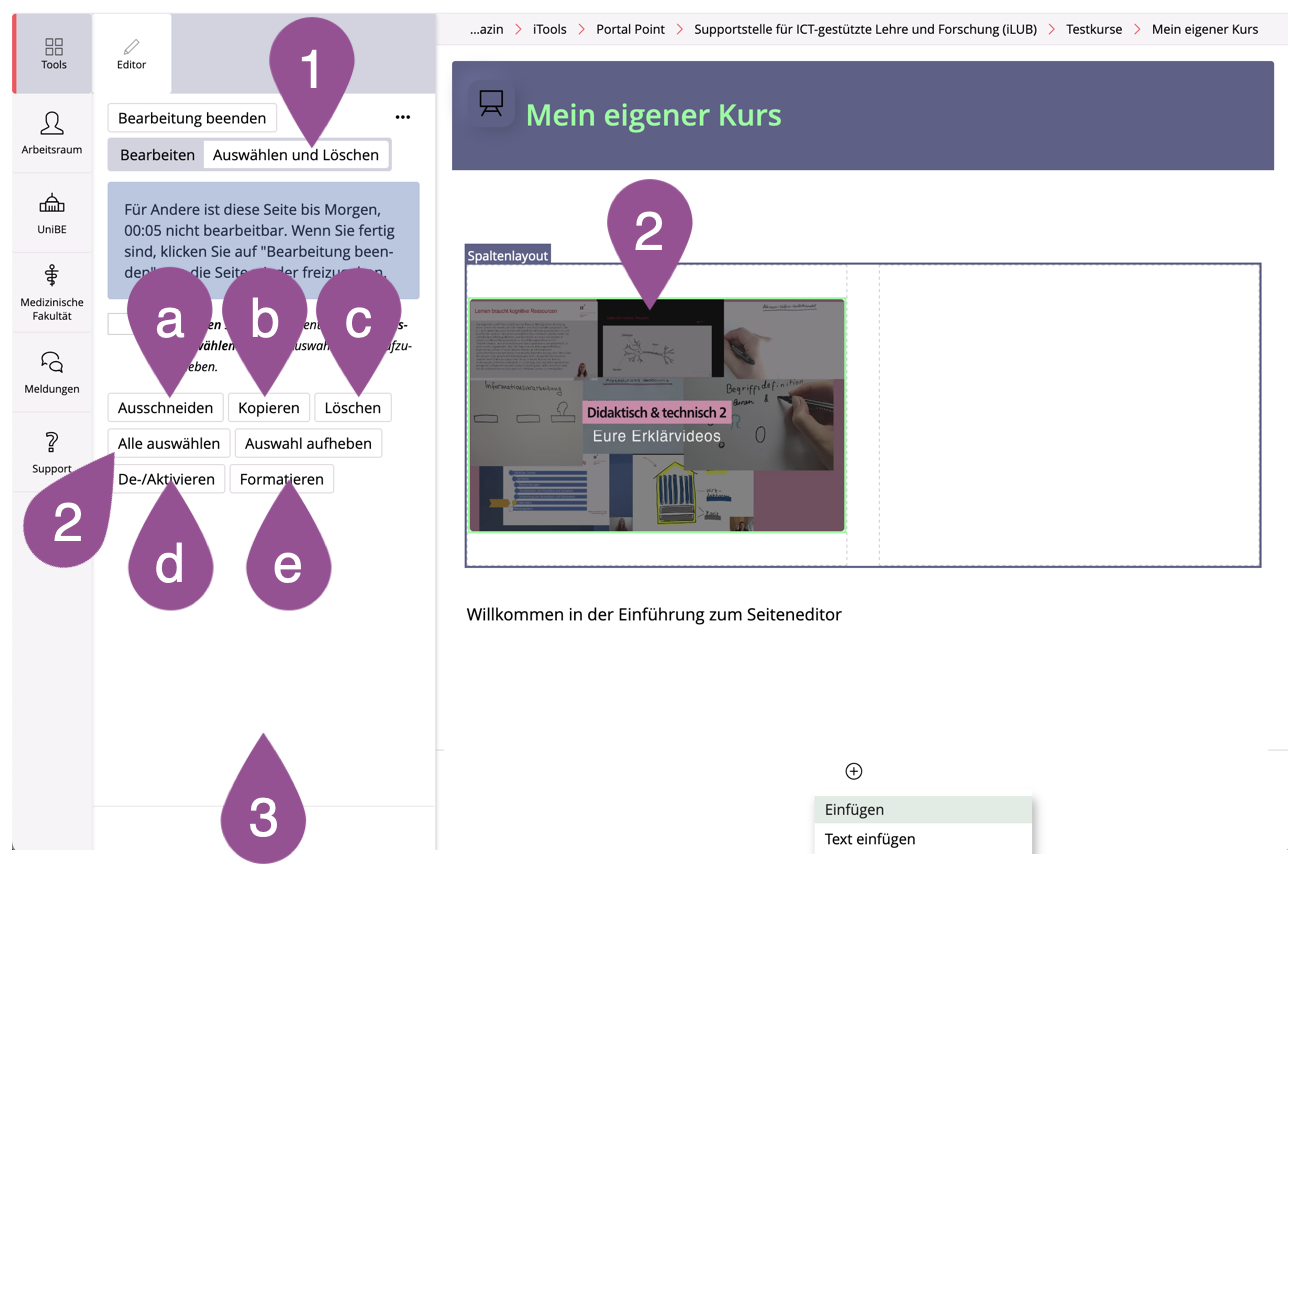
In the page editor, click «Selecting and Deleting». | |||||||||||
Select the page elements you want to delete. | |||||||||||
Select the appropriate action:
|
.
4. Set up & use a customized style
.
Set up a style sheet
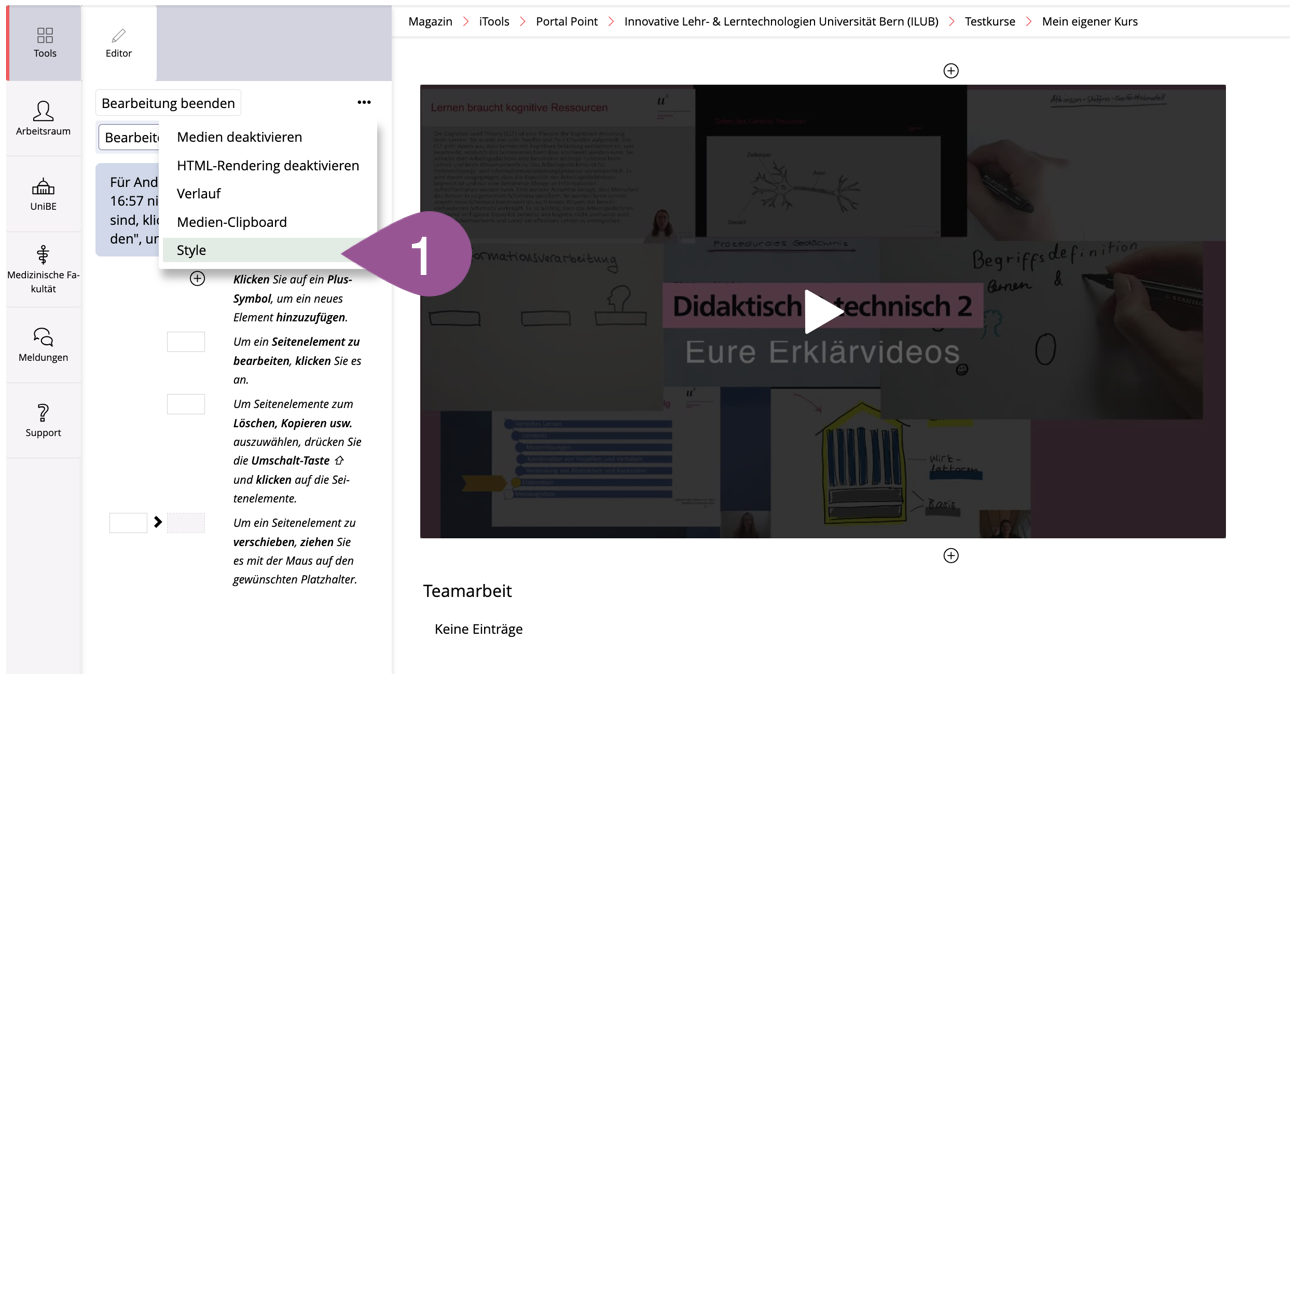
Open the actions menu and select «Style». | |||||||
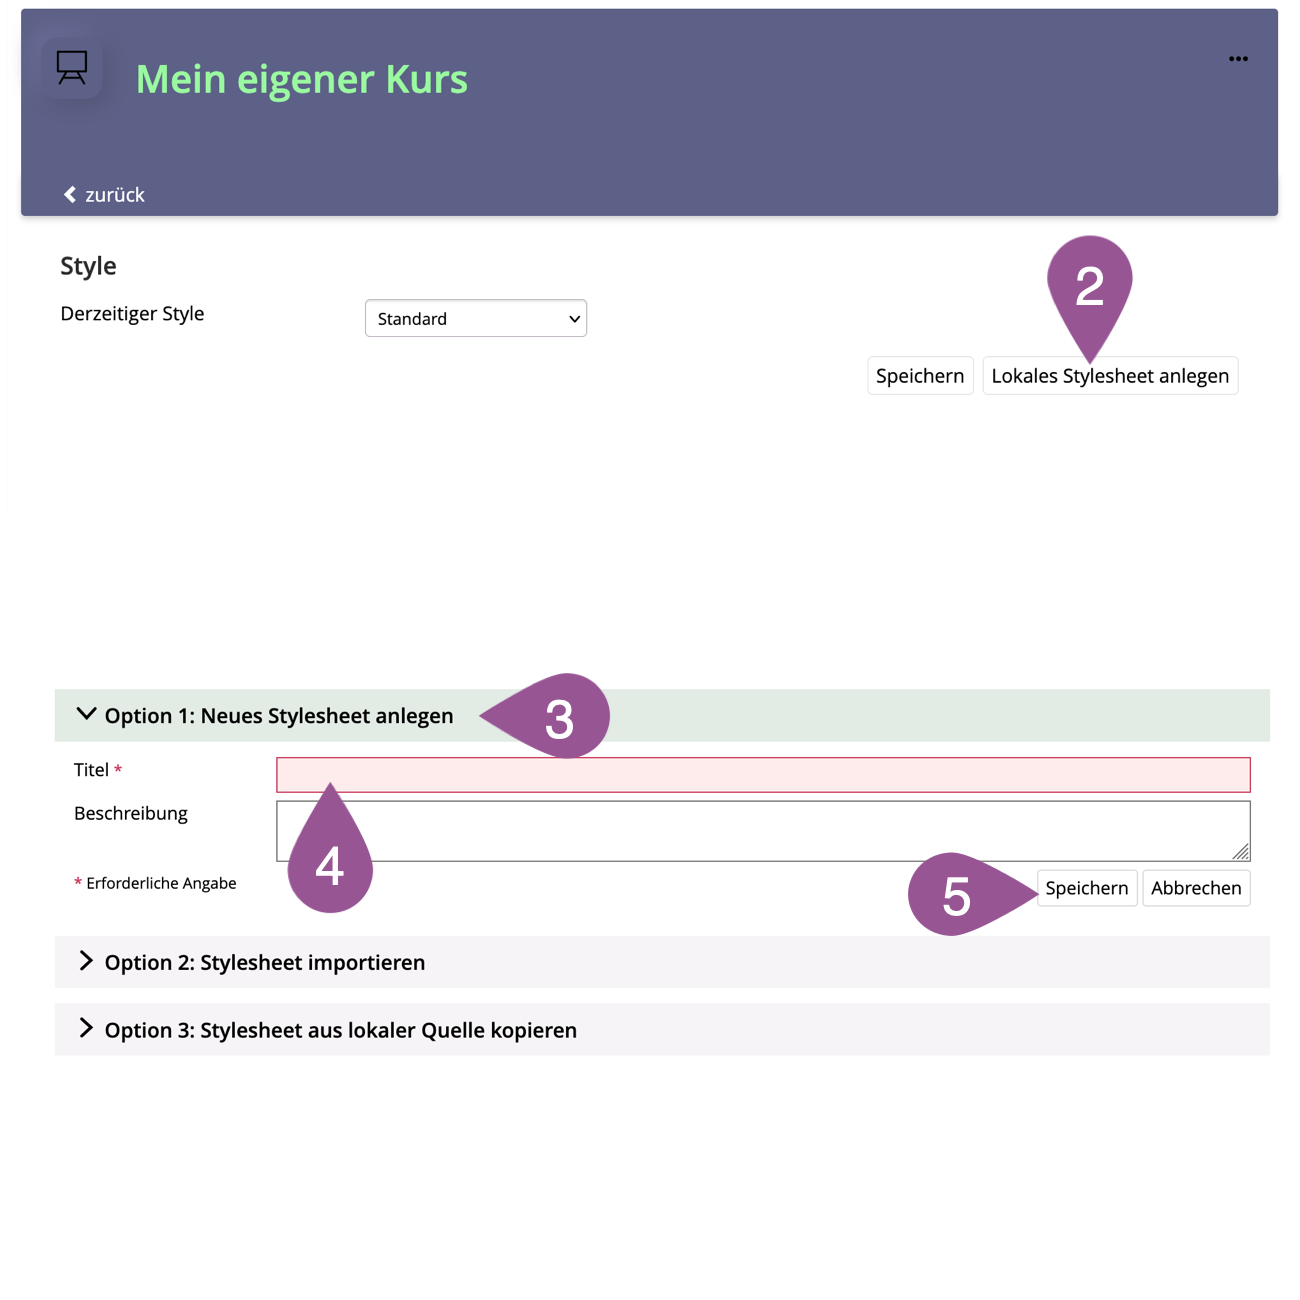
Click «Create Individual Style». | |||||||
Select option 1: «Create new Style». | |||||||
Give your style a «Title». | |||||||
Click «Save». | |||||||
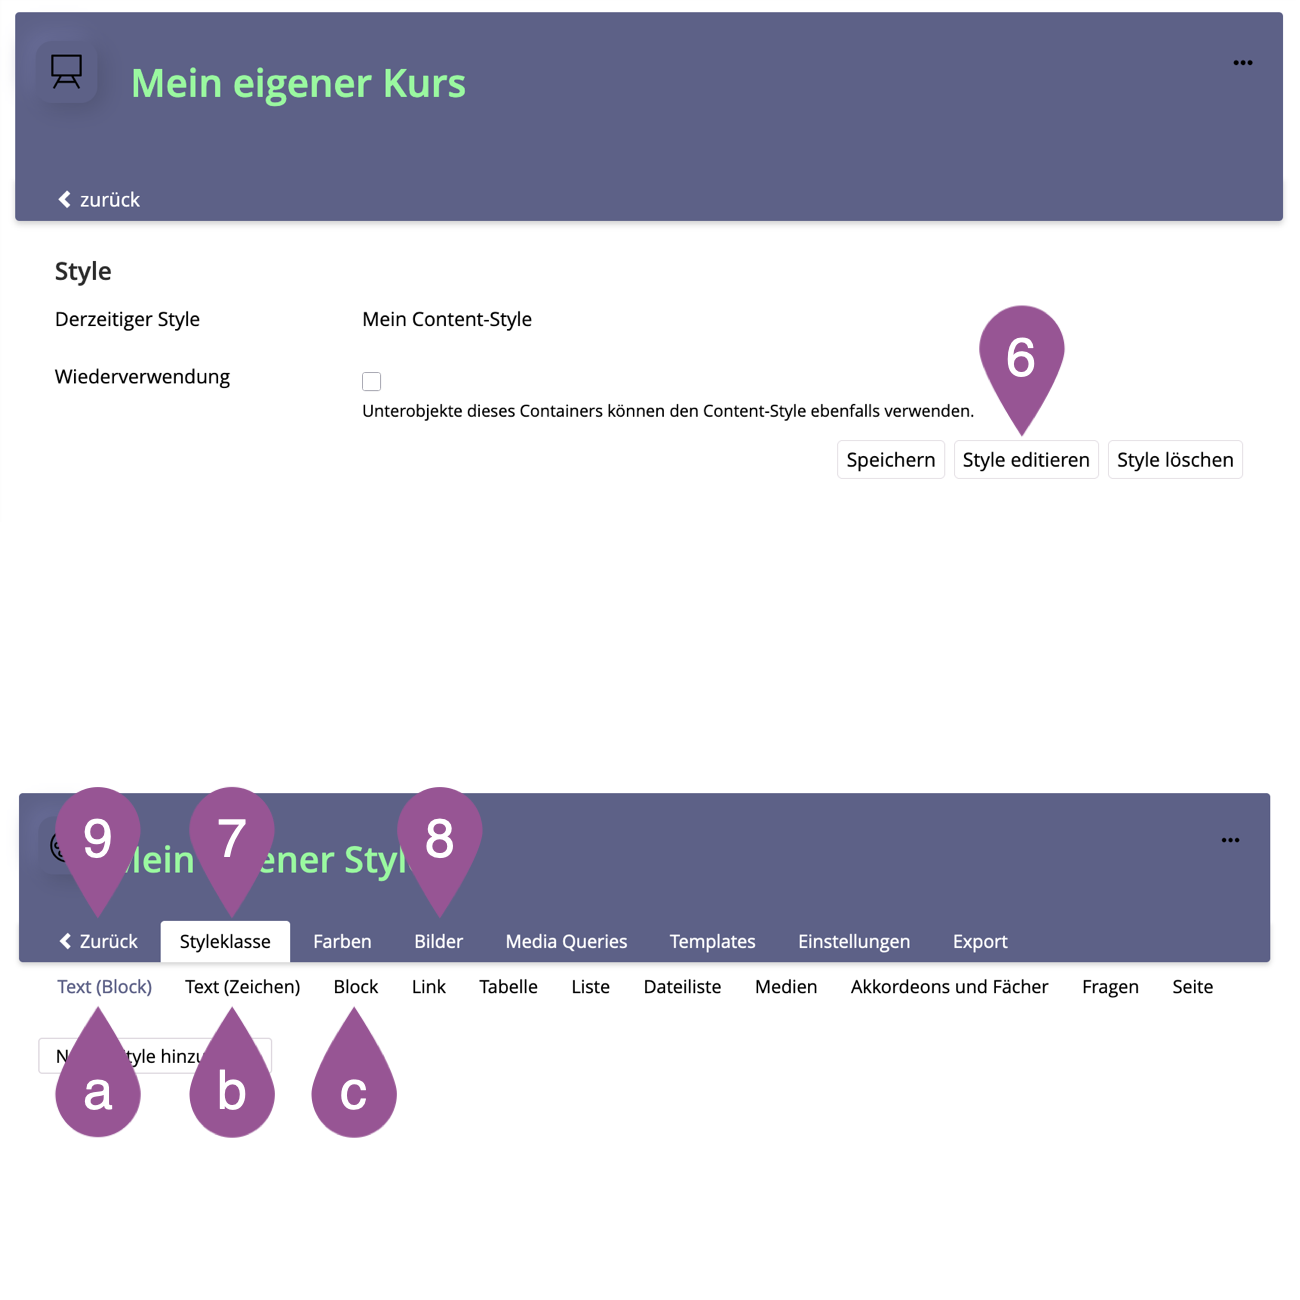
Click on «Edit style». | |||||||
In the «Style Classes» tab, you can edit or create various formats:
| |||||||
In the «Images» tab, you can upload images you want to include in style classes for sections. | |||||||
Click «Back», to return to the page. | |||||||
To edit the style sheet later on, open the actions menu, select «Style» and click «Edit Style». |
.
Apply style to subordinate objects
Styles can be inherited from parent containers to sub-objects so that the individual stylesheet of a course, for example, can be applied to the objects it contains (folders, categories, groups, wikis, learning modules, etc.). Adjustments are only made in one place - in this case, at the course level. This allows a consistent design within a container.
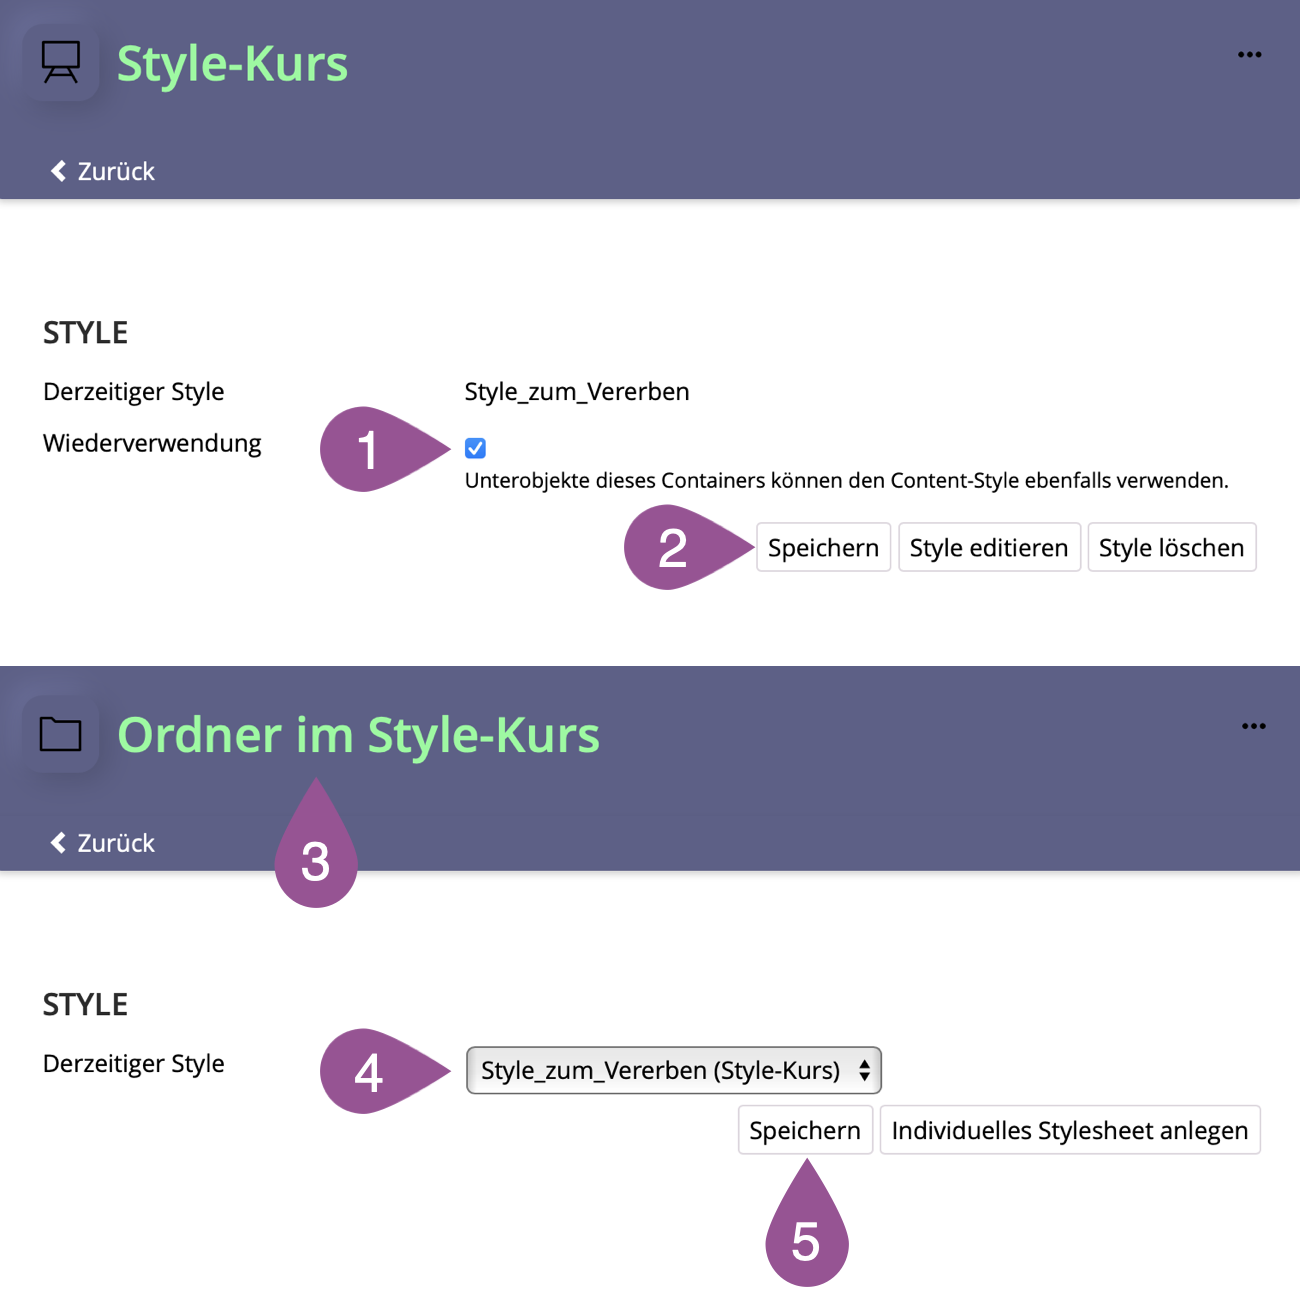
To reuse the style sheet, first navigate to the style settings of the parent object and then proceed as follows:
Activate the «Re-use» option. | |
Click «Save». | |
Navigate to the style settings of the subordinate object. | |
Select the style of the parent container from the drop-down menu. | |
Click «Save». |
Wiederholen Sie den Prozess ggf. für alle vorhandenen Unterobjekte, die Sie mit dem alten Style designed haben.
.
5. View editing history and restore version
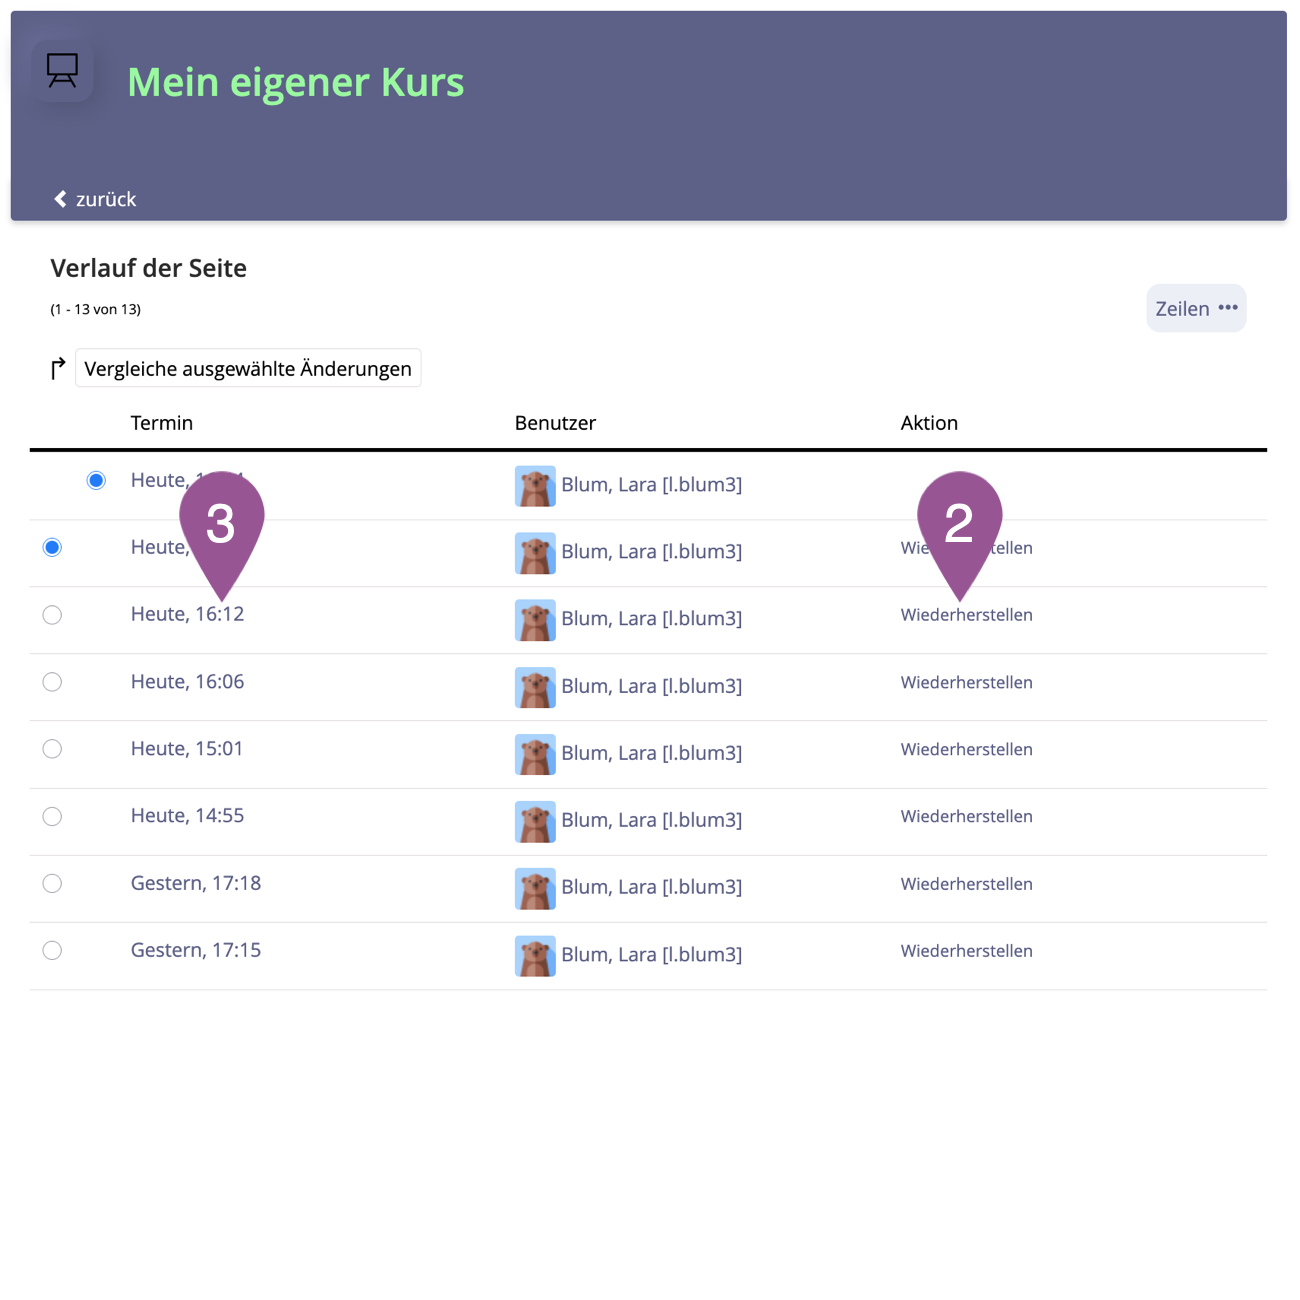
Each time you edit a page, it is saved in an editing history. This allows you to restore an earlier version of your page at any time, for example, if you accidentally deleted elements. To restore an earlier version, follow the steps below:
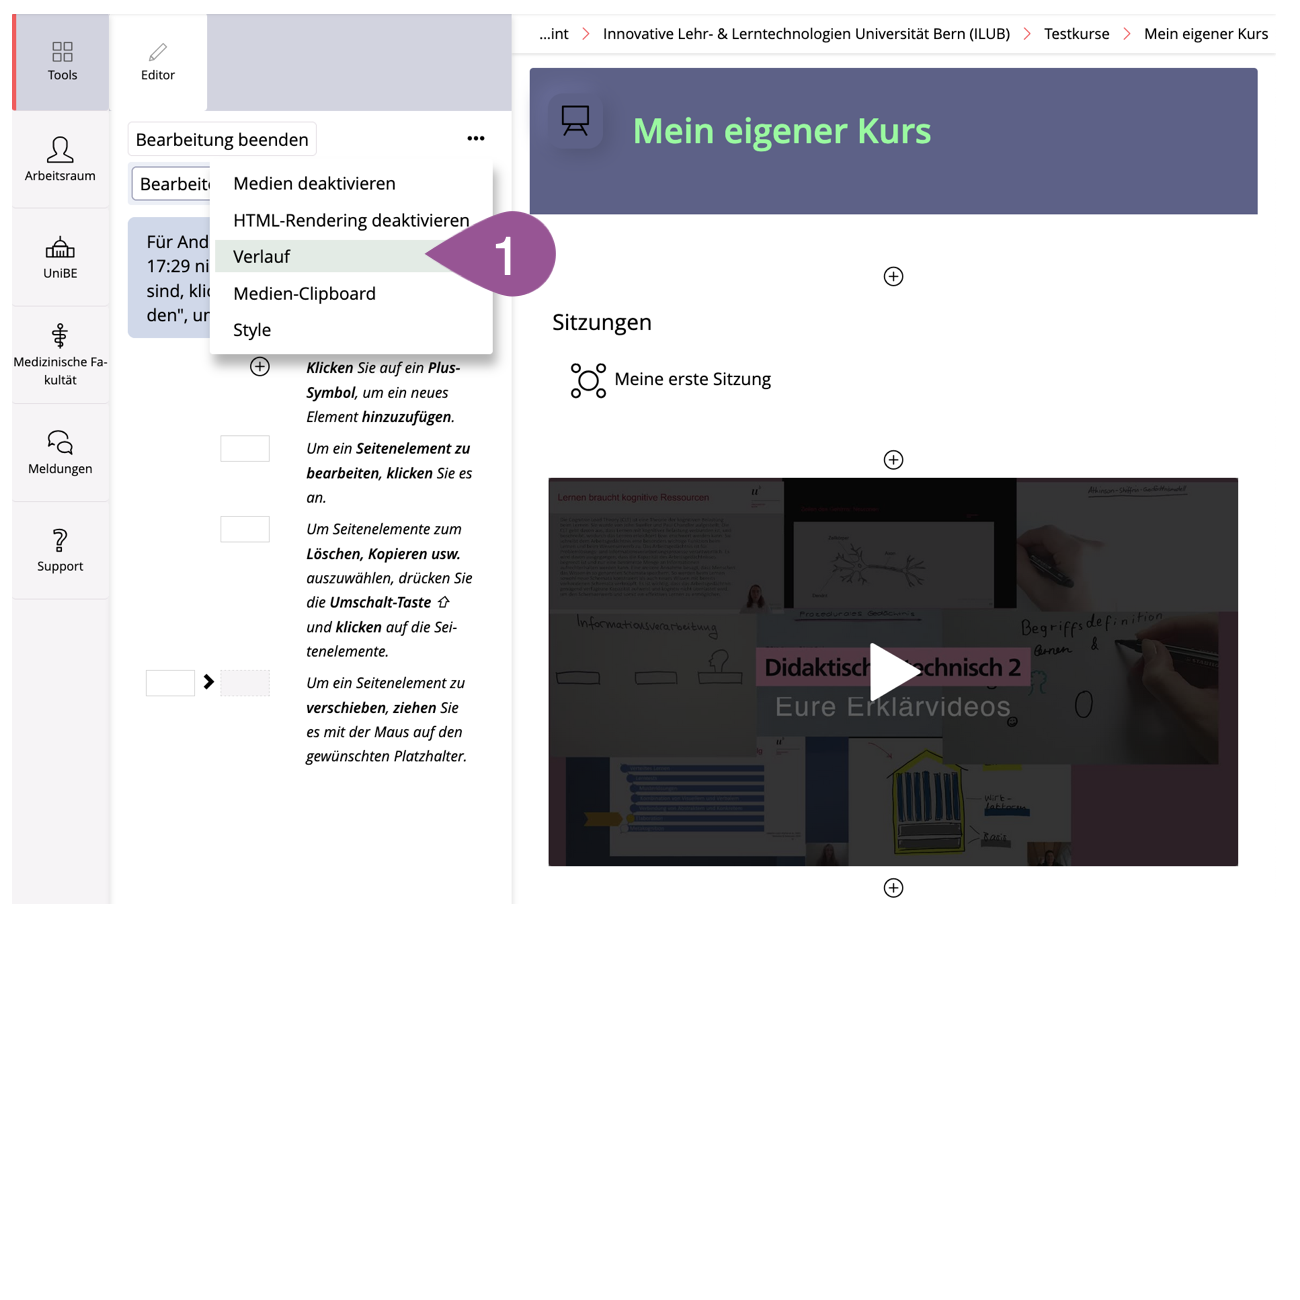
Open the actions menu and select «History». | |||||
If you know exactly which version you want to revert to, you can click «Rollback» for the corresponding version in the «Action» column. | |||||
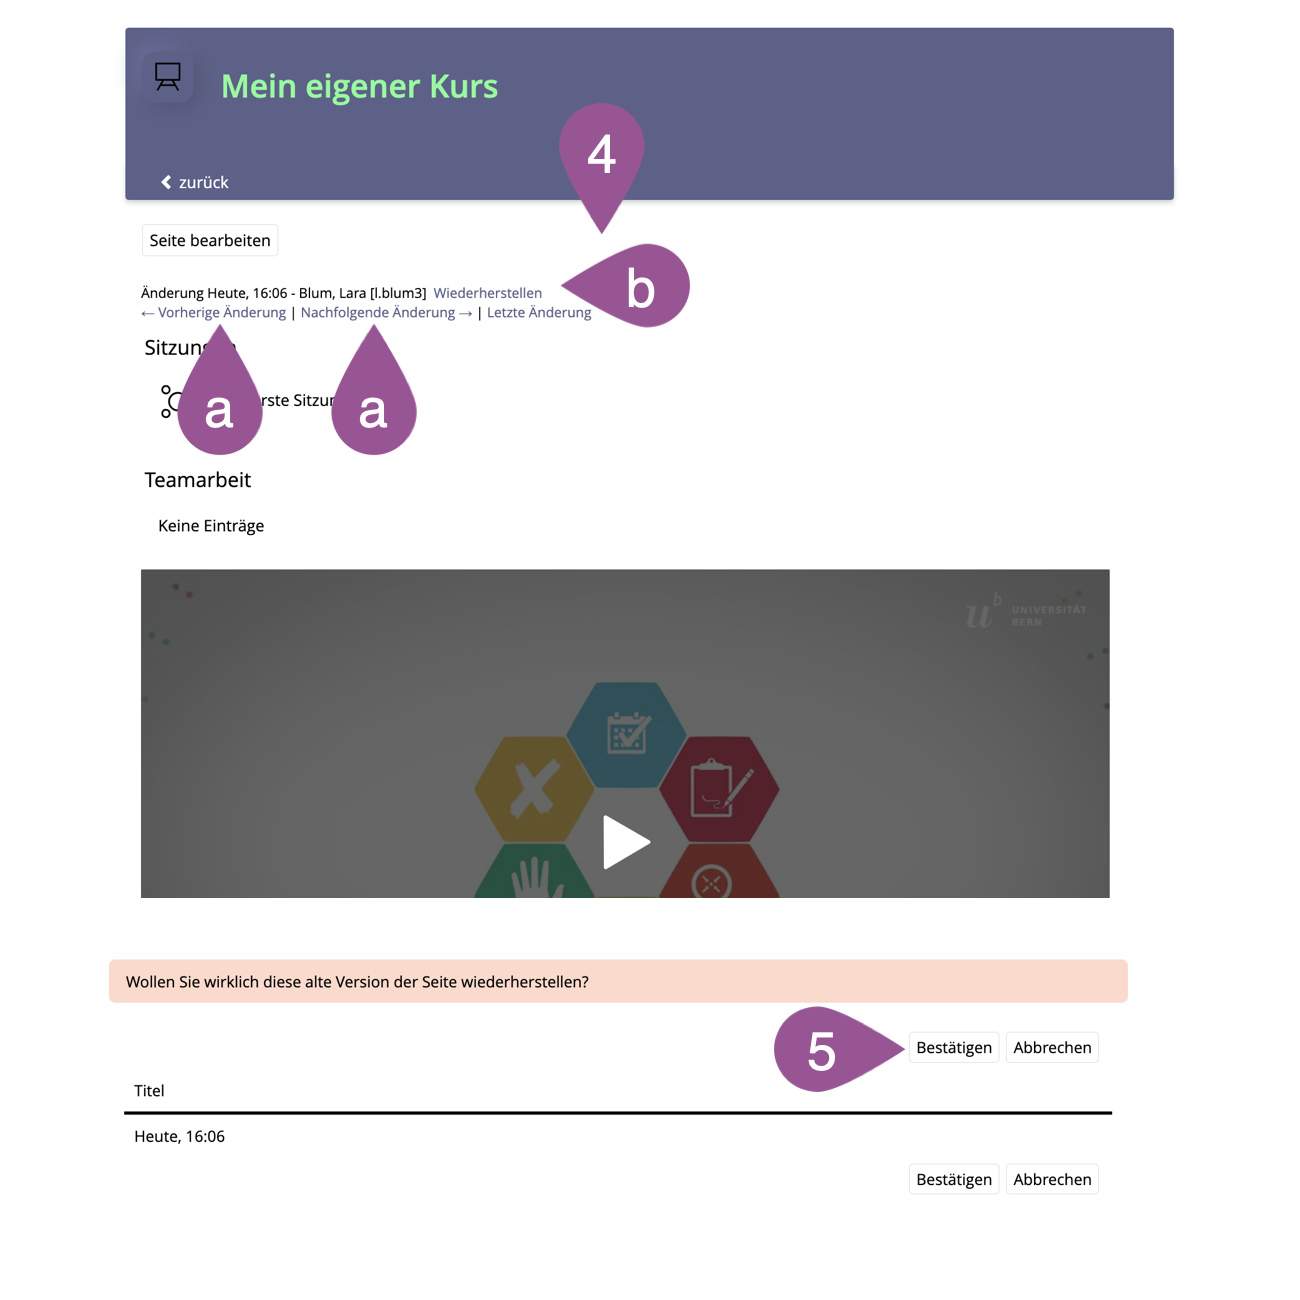
If you are not sure which version you want to restore, click on the «Date» for the version you suspect. | |||||
You will see a preview of this version.
| |||||
Click «Confirm». |
.
6. Copy page design and content to other environments
If you want to copy your page design to another environment, e.g., a new ILIAS course, you can do so in 2-3 steps. These have to be done in the order described below.
.
Step 1: Copy and paste layout
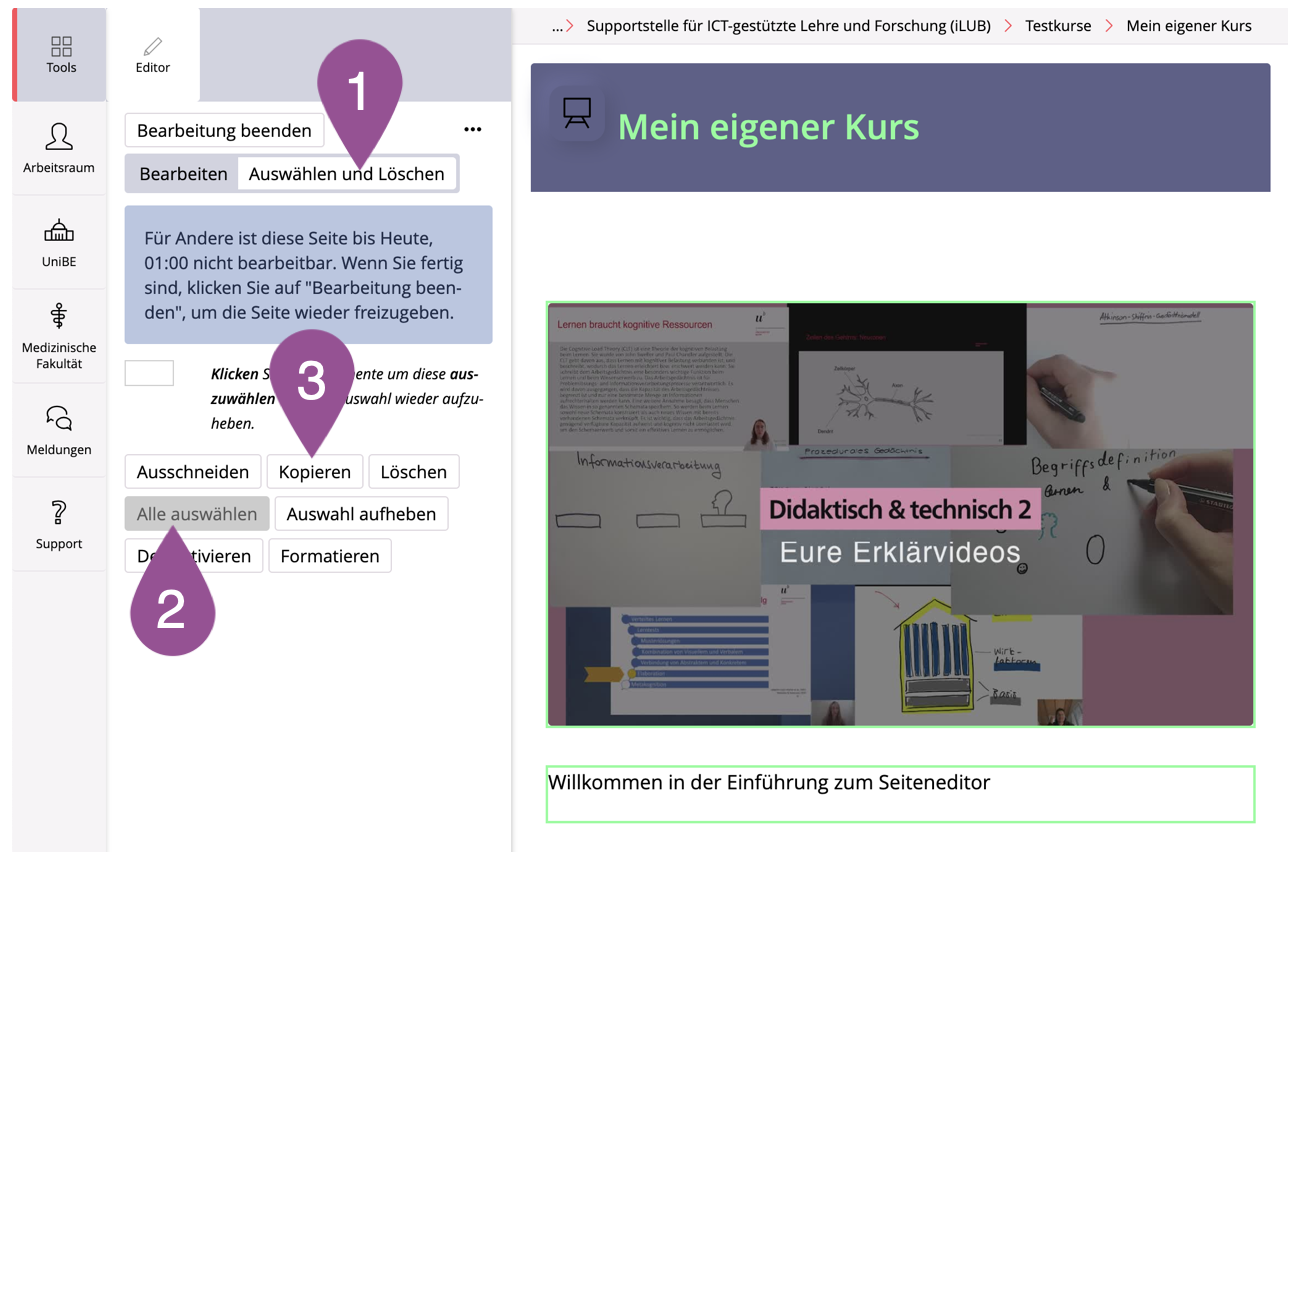
In the previous course, open the page editor and click «Selecting and Deleting». | |
Click «Select All». | |
Click «Copy». | |
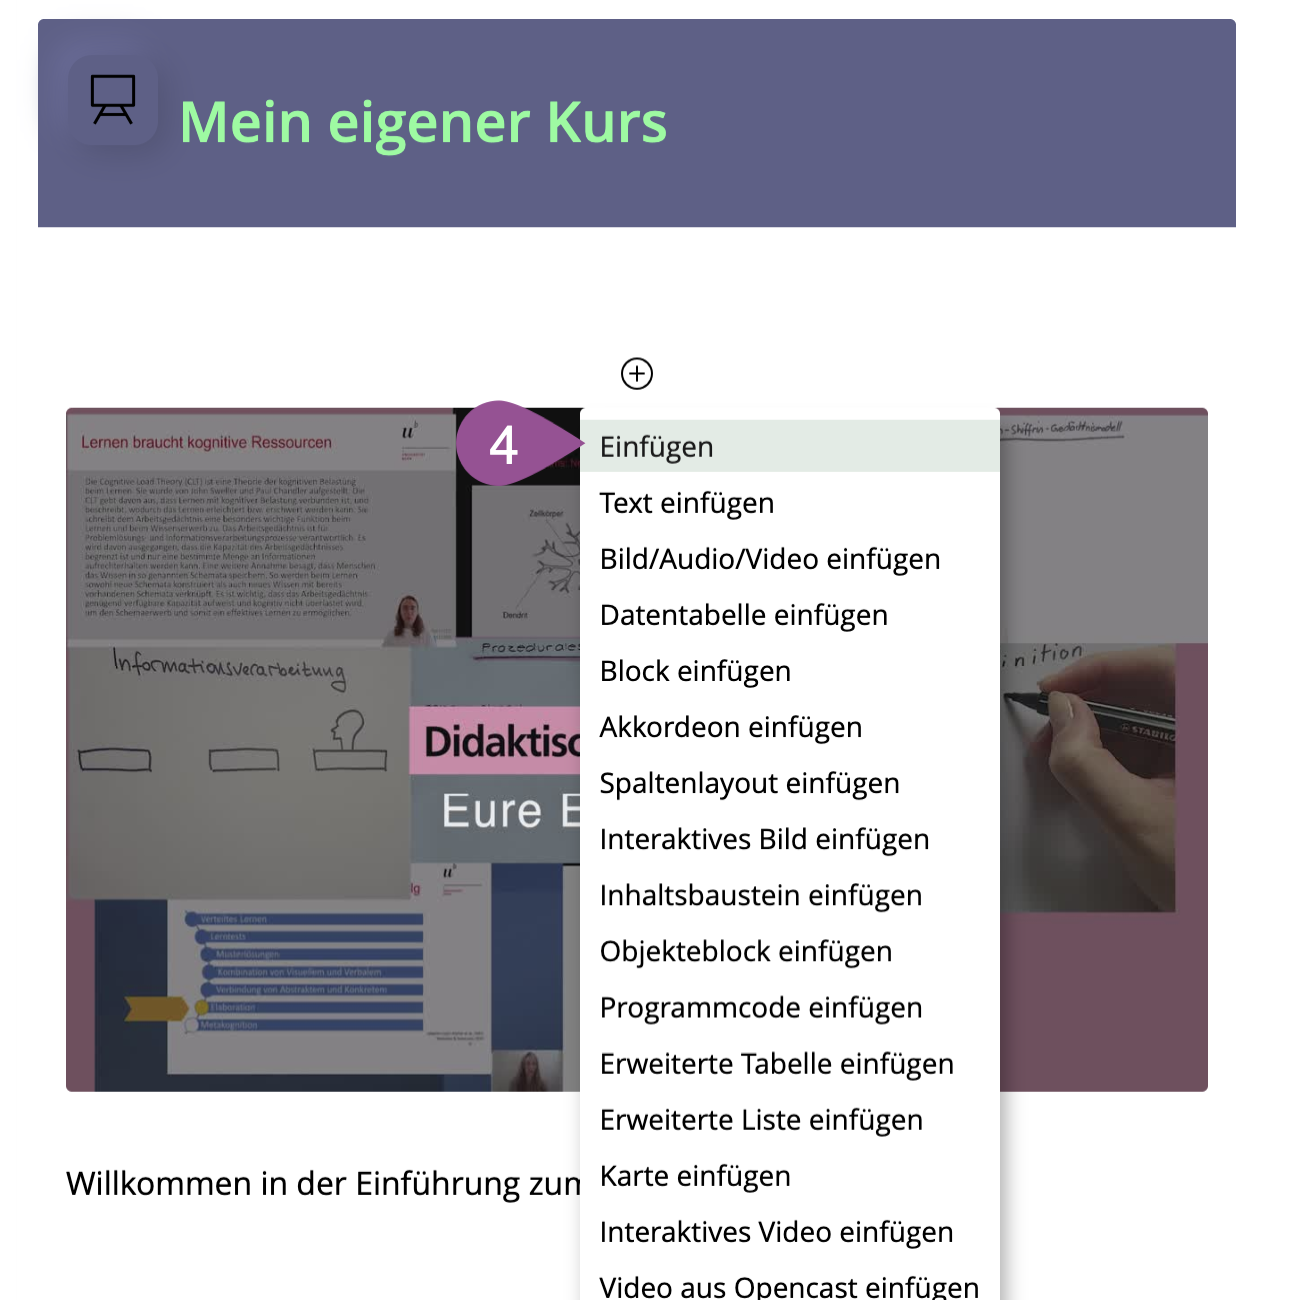
Go to the new course. Click «Customize Page». Click «+» and select «Paste» at the very top. |
.
Step 2: Copy style (if applicable)
If a custom style has been created for the existing page (see 4. Customize Style), it has to be copied. If the default ILIAS style has been used for the page, you can skip this second step and continue with Step 3: Copy & paste ILIAS items.
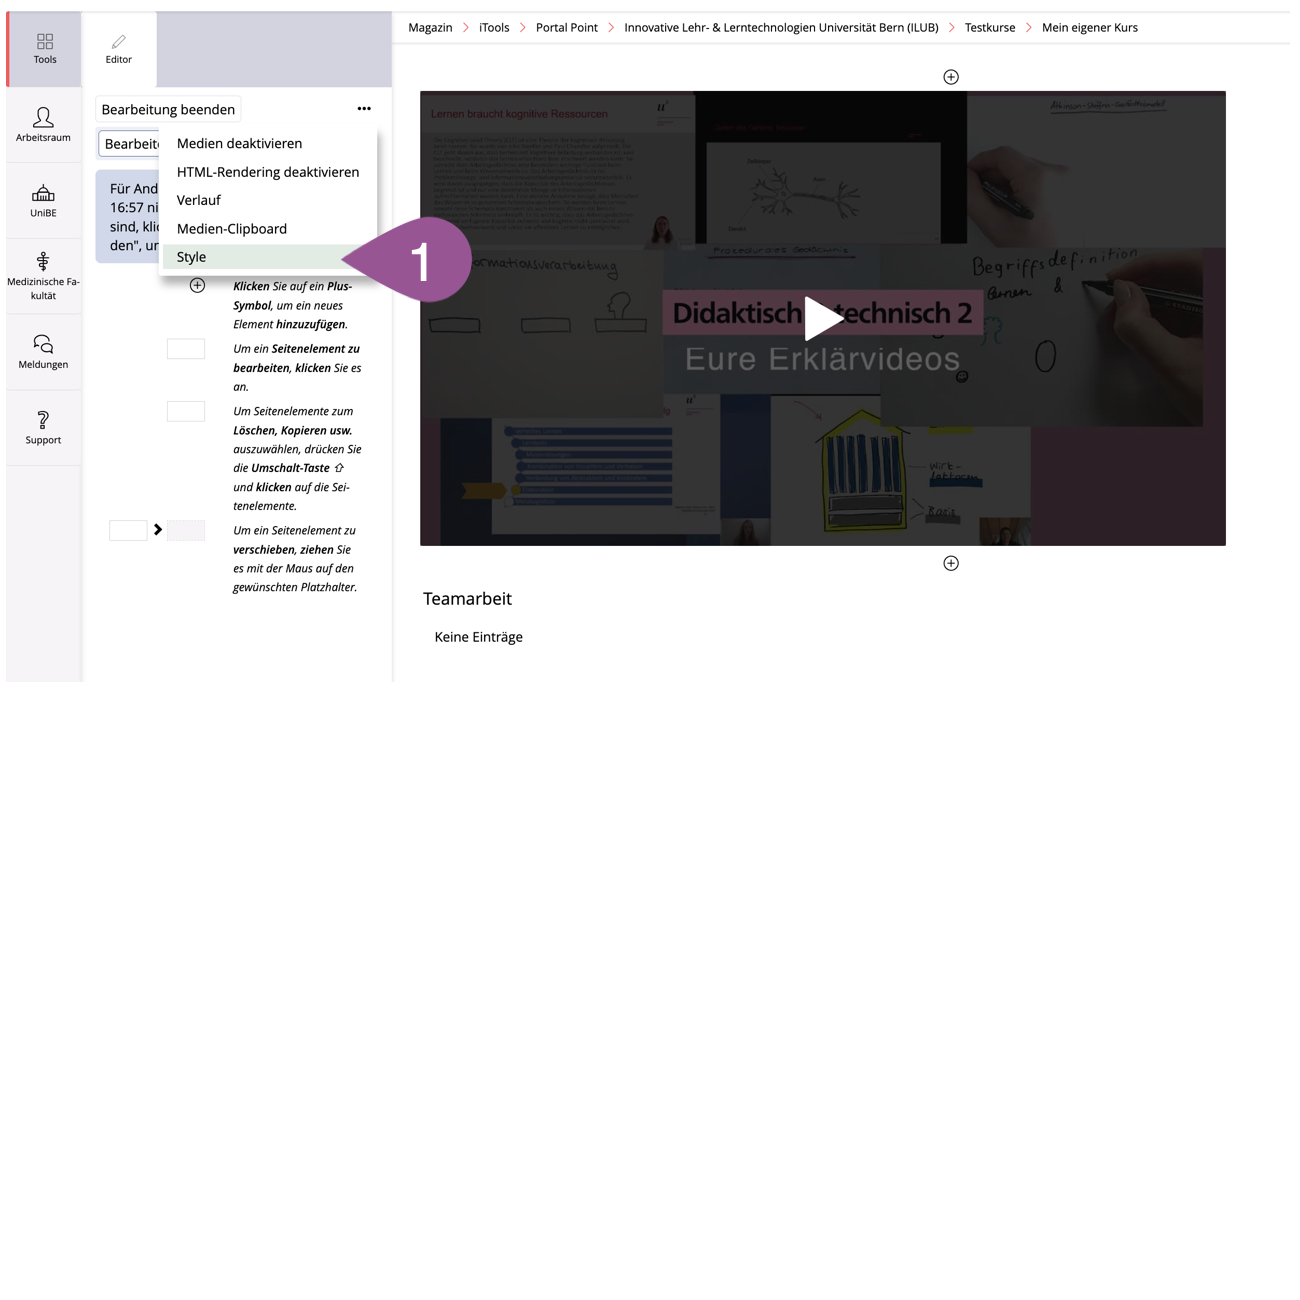
In the previous course, launch the page editor. Open the actions menu and select «Style». | |
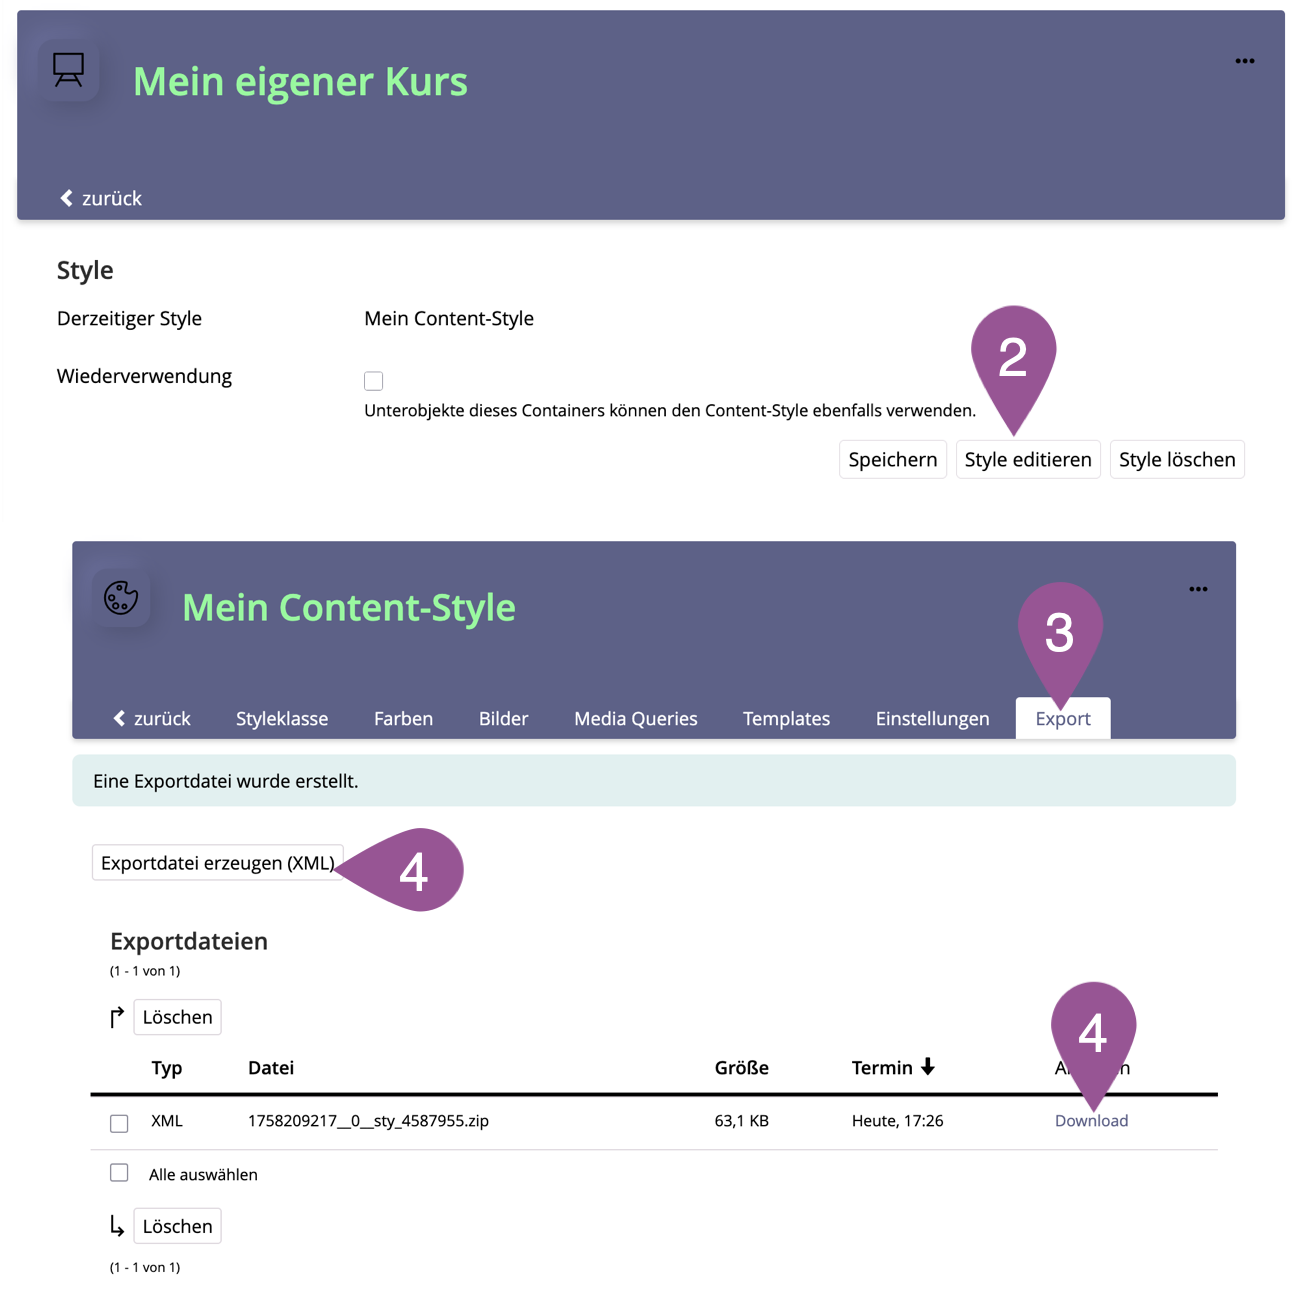
Click «Edit Style». | |
Go to the «Export» tab. | |
Click «Create Export File (XML)» and click «Download». A zip file will be downloaded. The zip file must not be unzipped, and the title of the file must not be changed. | |
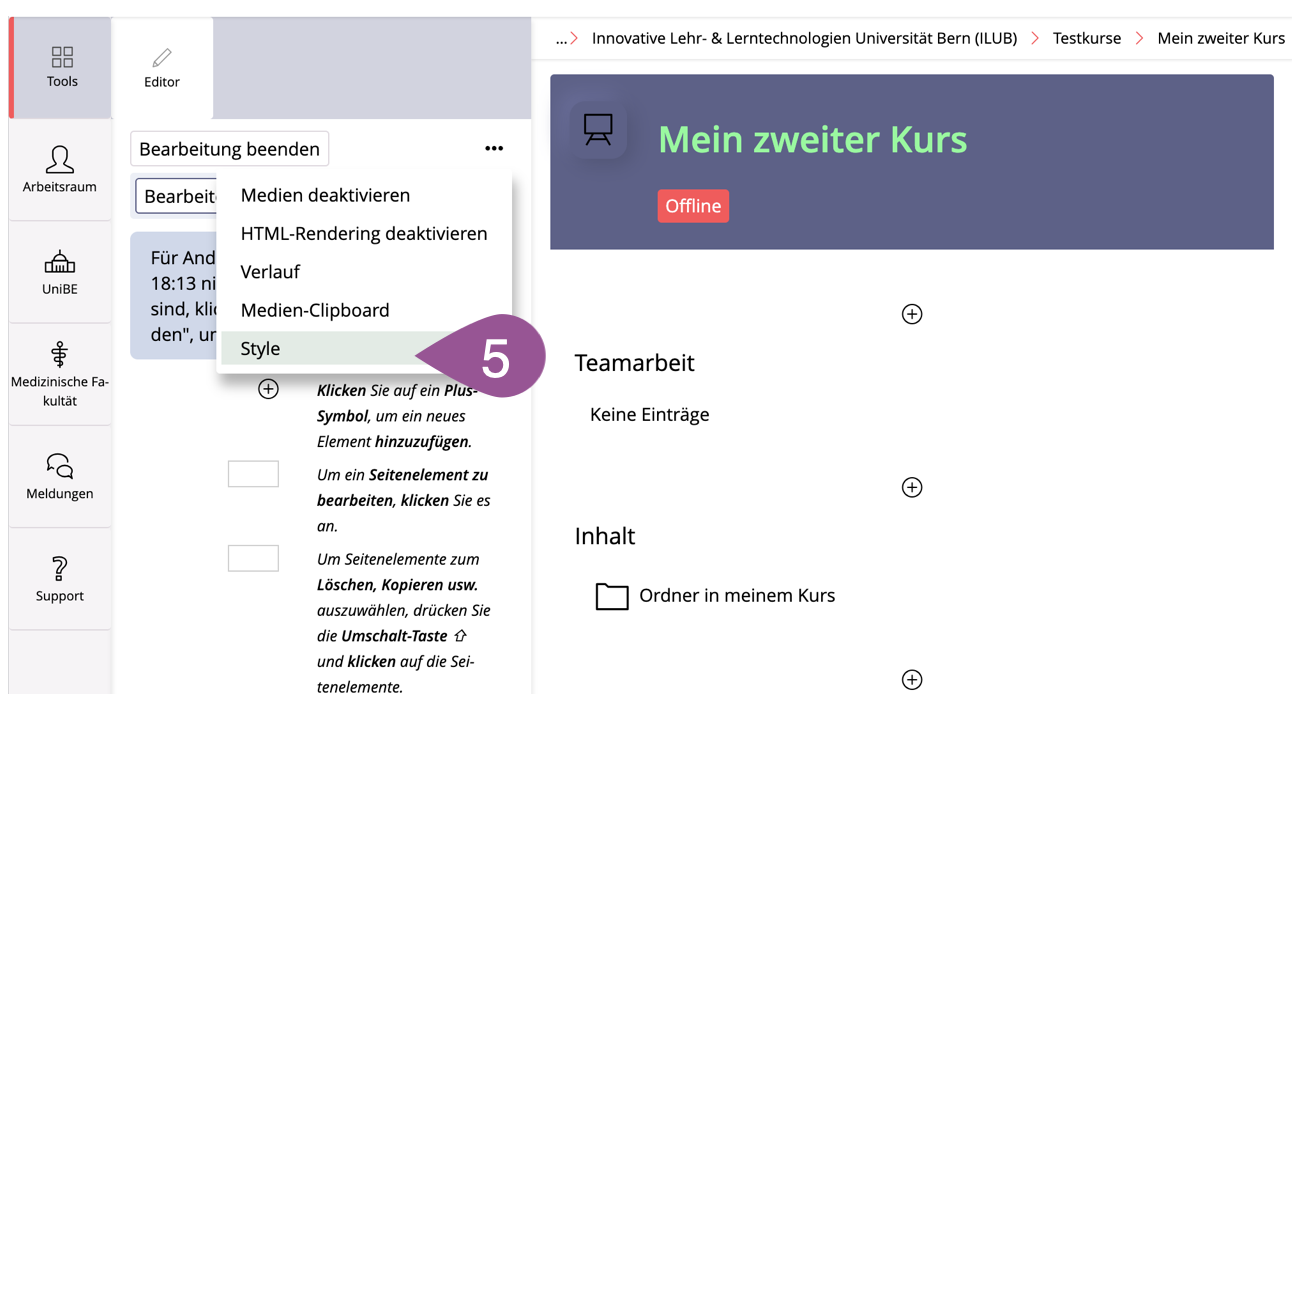
In the new course, launch the page editor. Open the actions menu and select «Style». | |
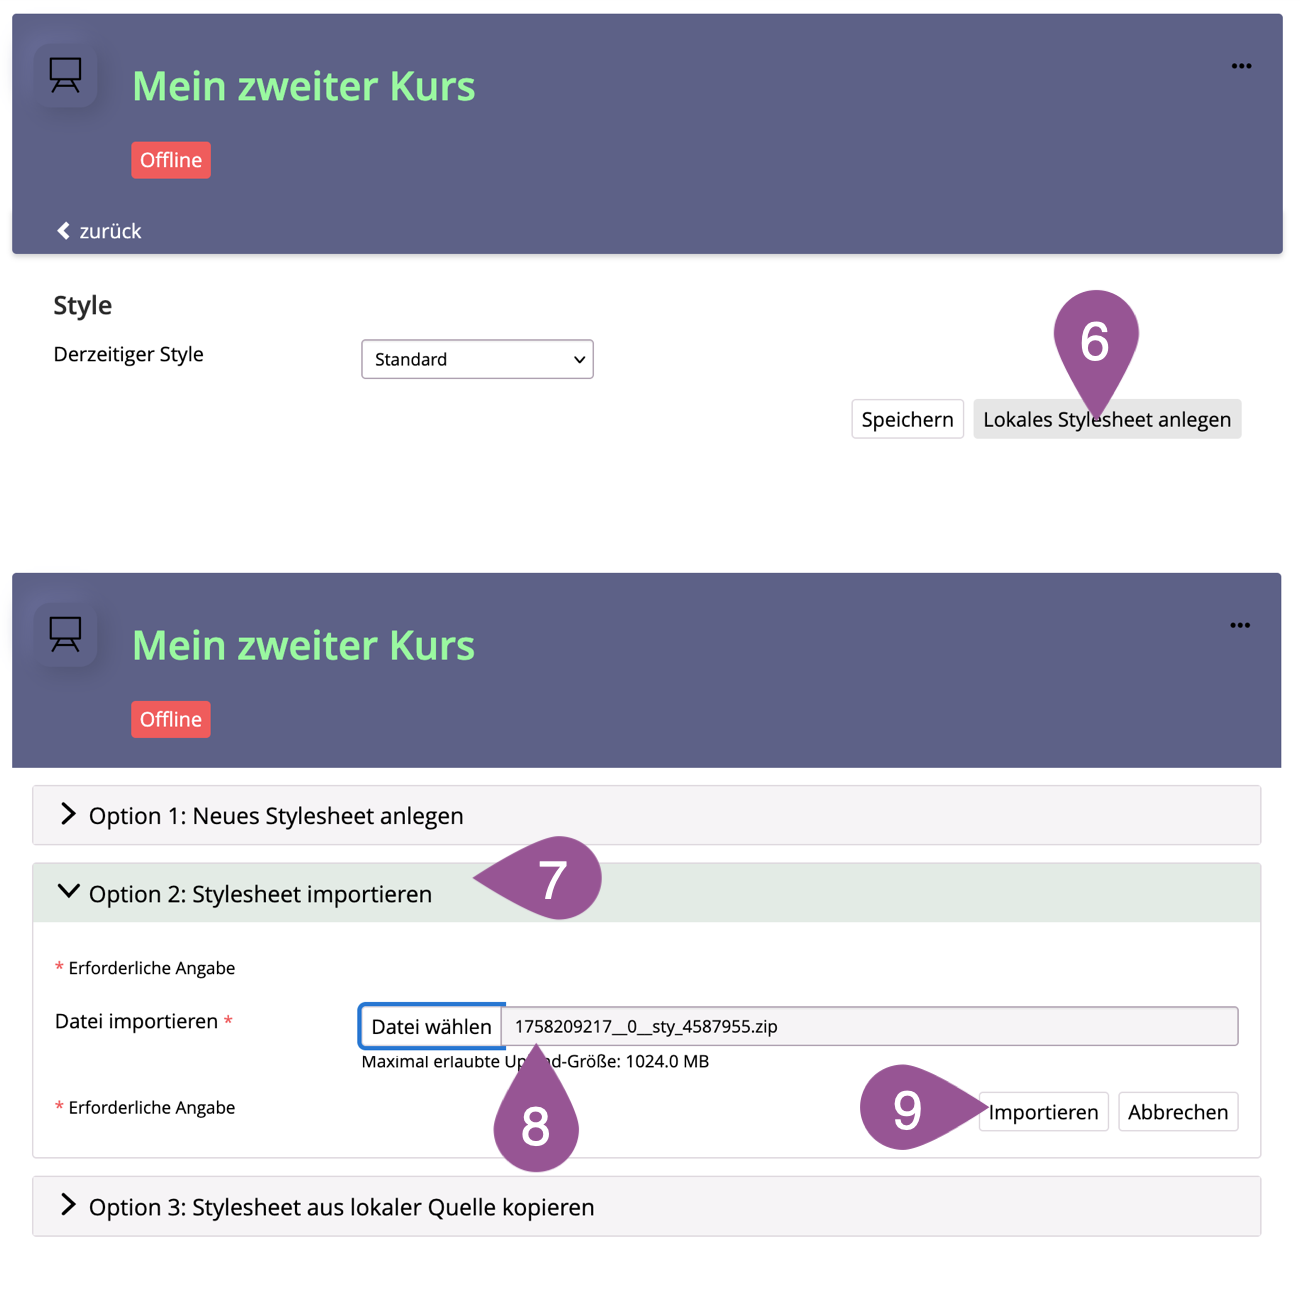
Click «Create Individual Style». | |
Select option 2: «Import Style». | |
Click «Select File» and select the zip file you downloaded earlier. | |
Click «Import». |
.
Step 3: Copy & paste ILIAS items
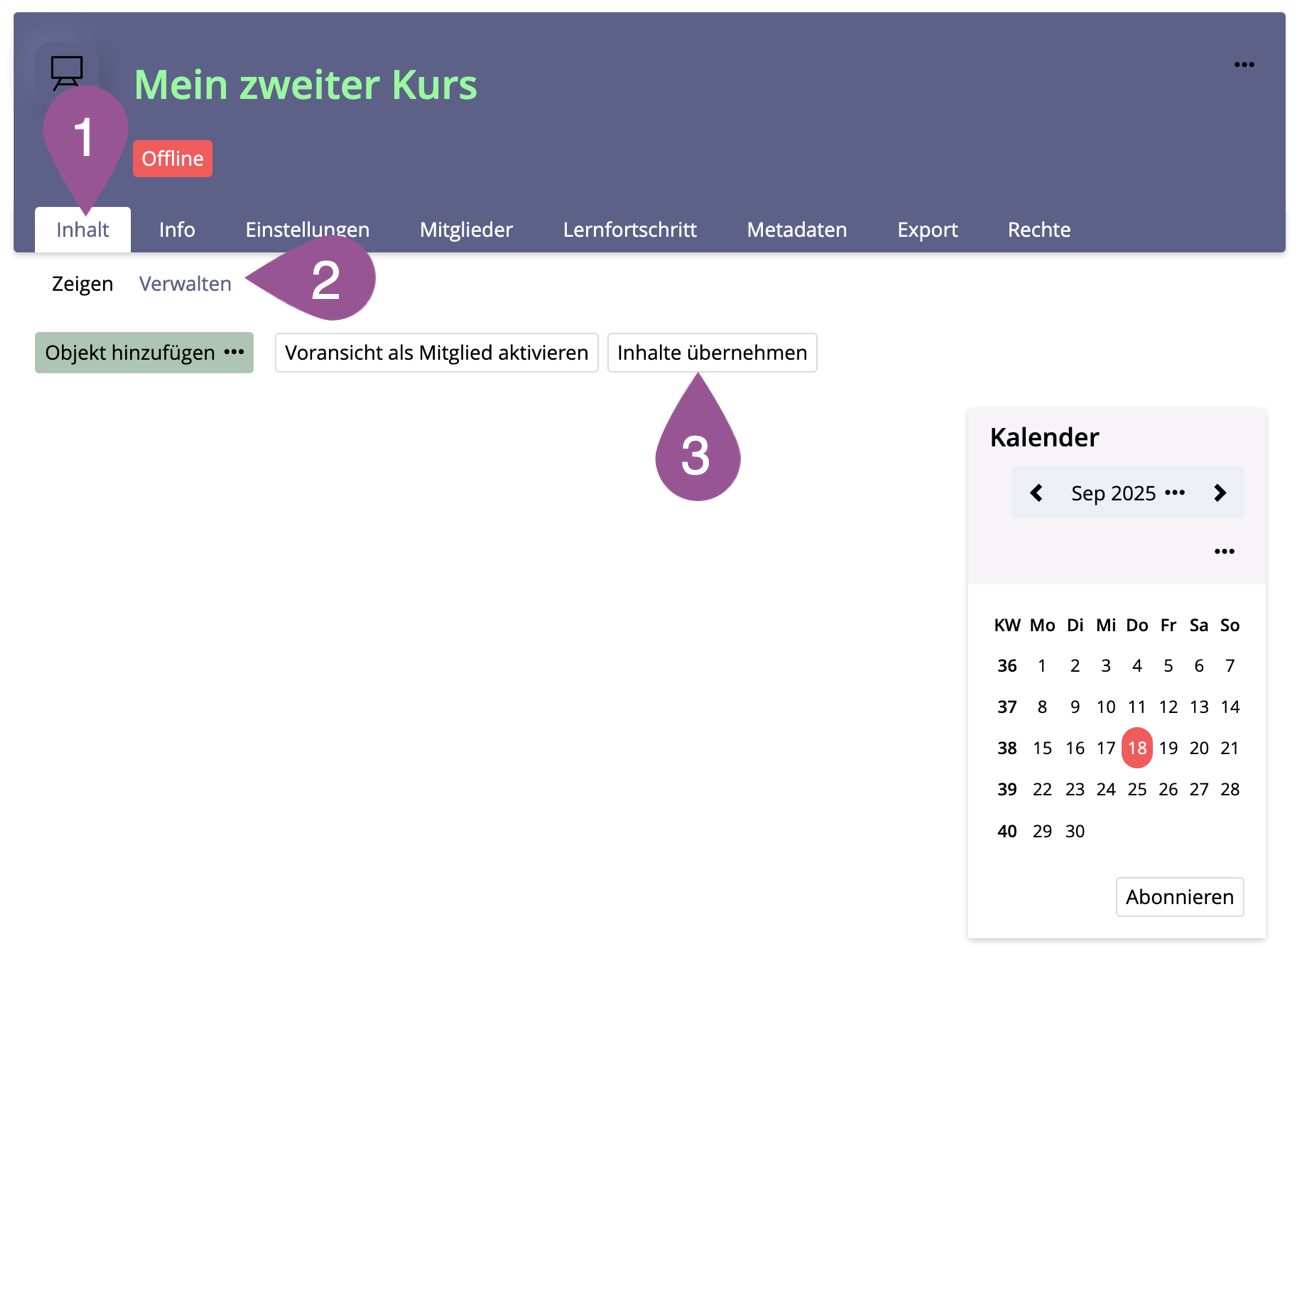
In the new course, go to the «Content» tab. | |
Click «Manage». | |
Click «Adopt Content». | |
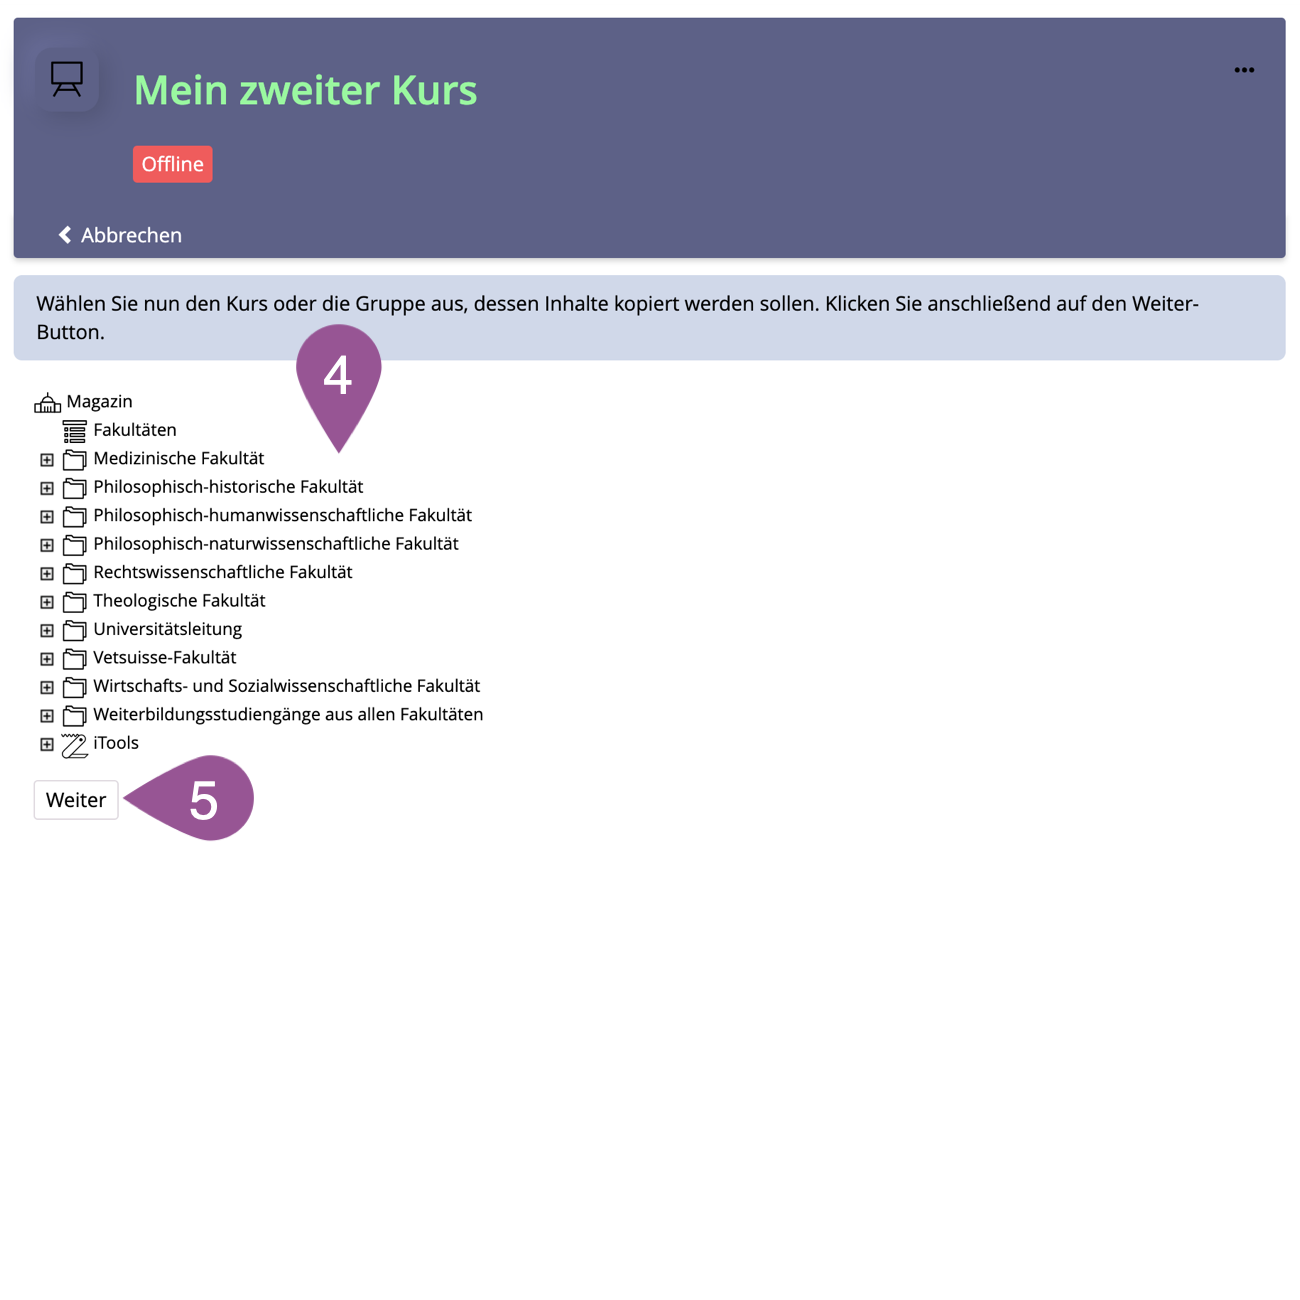
From the tree structure, select the previous course you want to transfer content from. | |
Click «Continue». | |
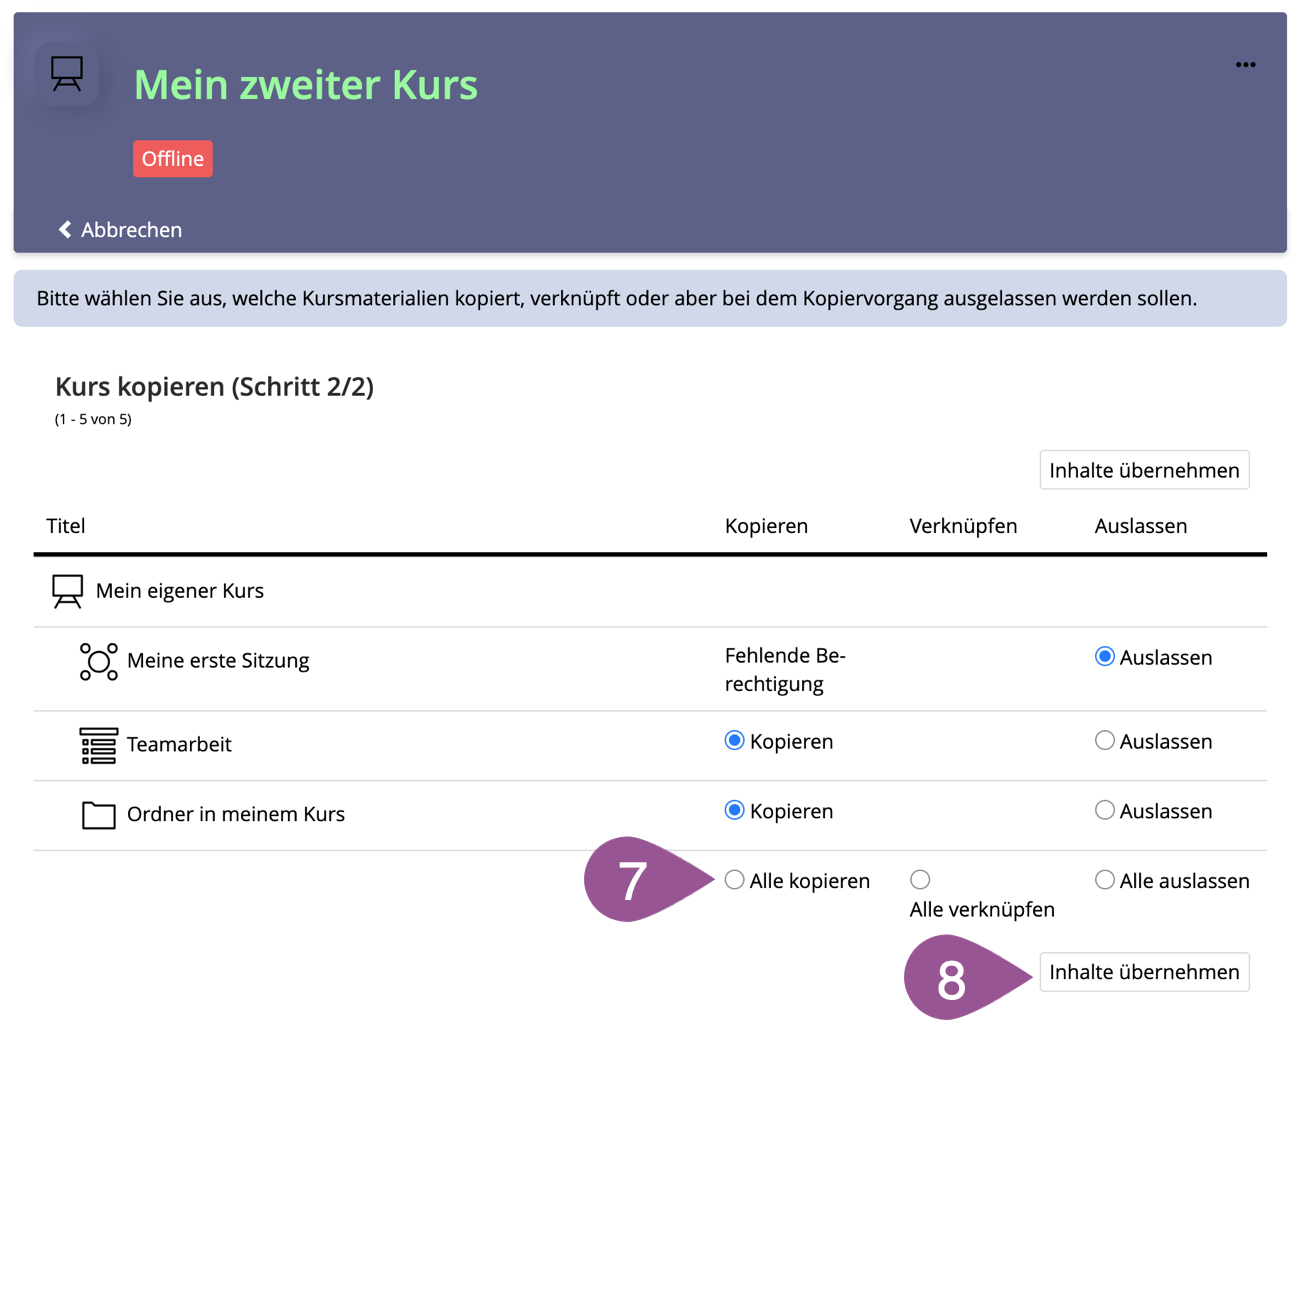
Select «Copy all». | |
Click «Adopt Content». |
.
7. Design examples
The following page will give you an idea of the design options offered by the page editor:
Zuletzt geändert: 10. Feb 2026, 13:15, Inniger, Samuel [s.inniger1]
