ILIAS Support (English)
Reiter
Manual: Self-evaluation
Deutsch | English
Manual: Self-evaluation

1. Create a self-evaluation
2. Adjust settings
3. Add question blocks, master data blocks & questions
3.1 Define question blocks & master data blocks
3.2 Add questions to a question block
3.3 Add questions to a master data block
4. Define feedback
5. Conducting a self-evaluation
6. View & manage results
7. Application scenarios
.
1. Create a self-evaluation
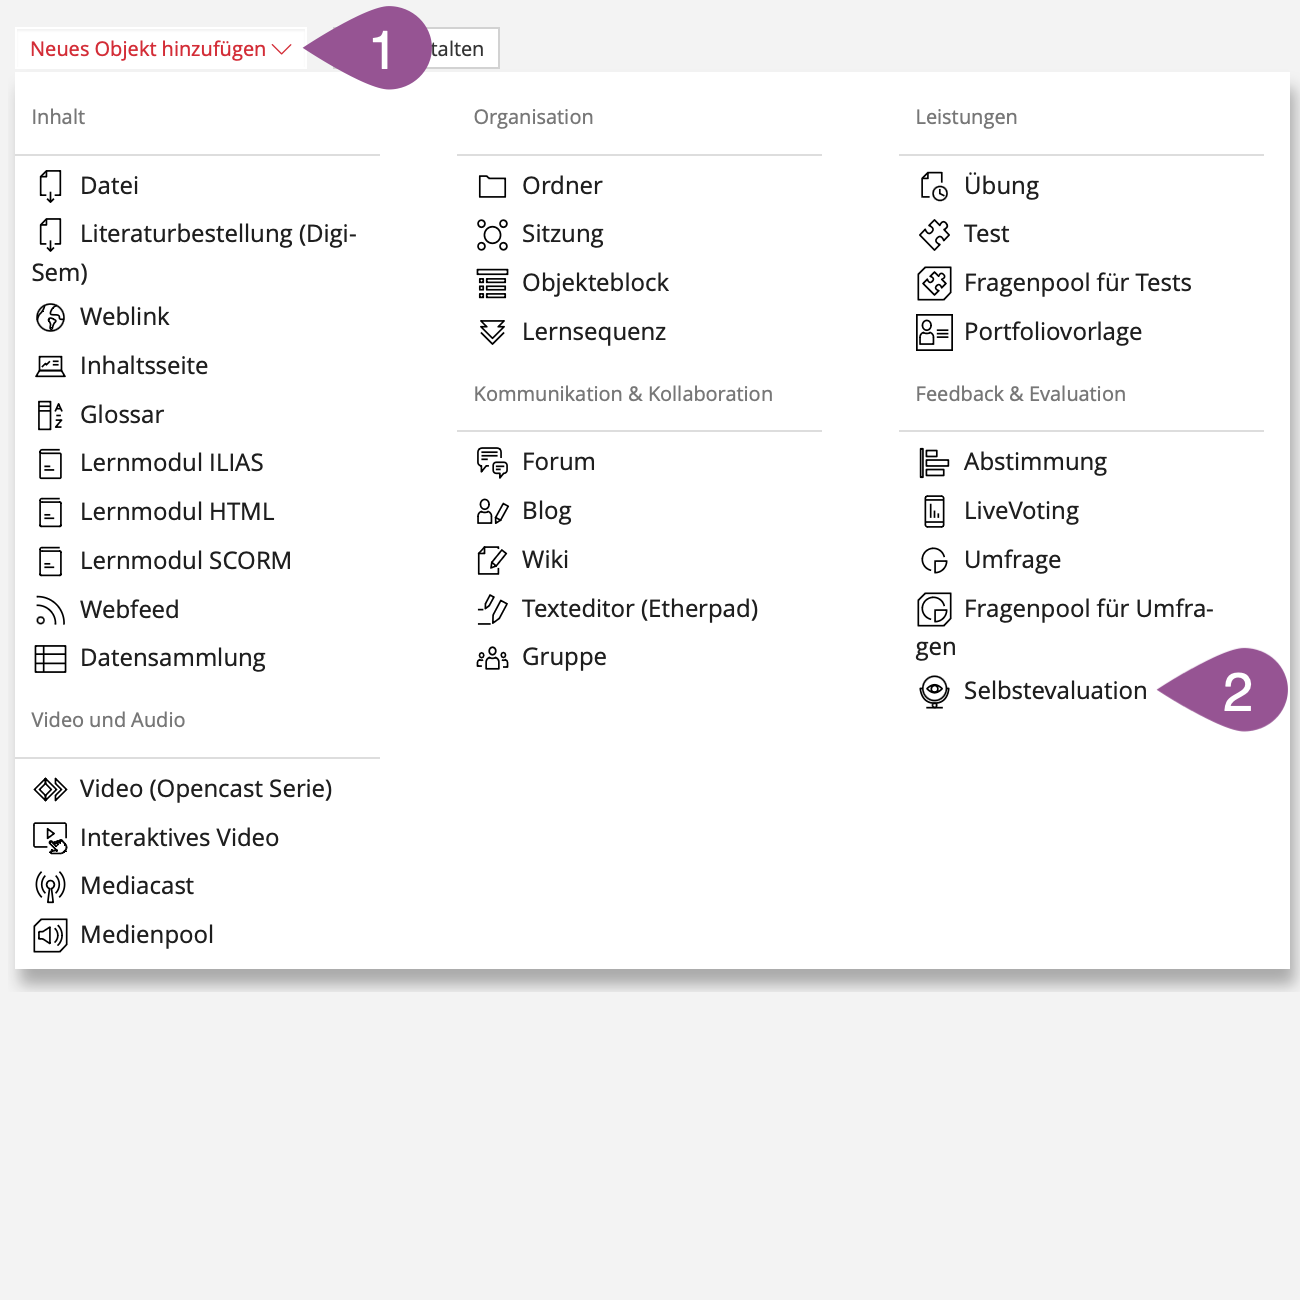
Click on «Add New Item». | |
Select «Selbstevaluation». | |
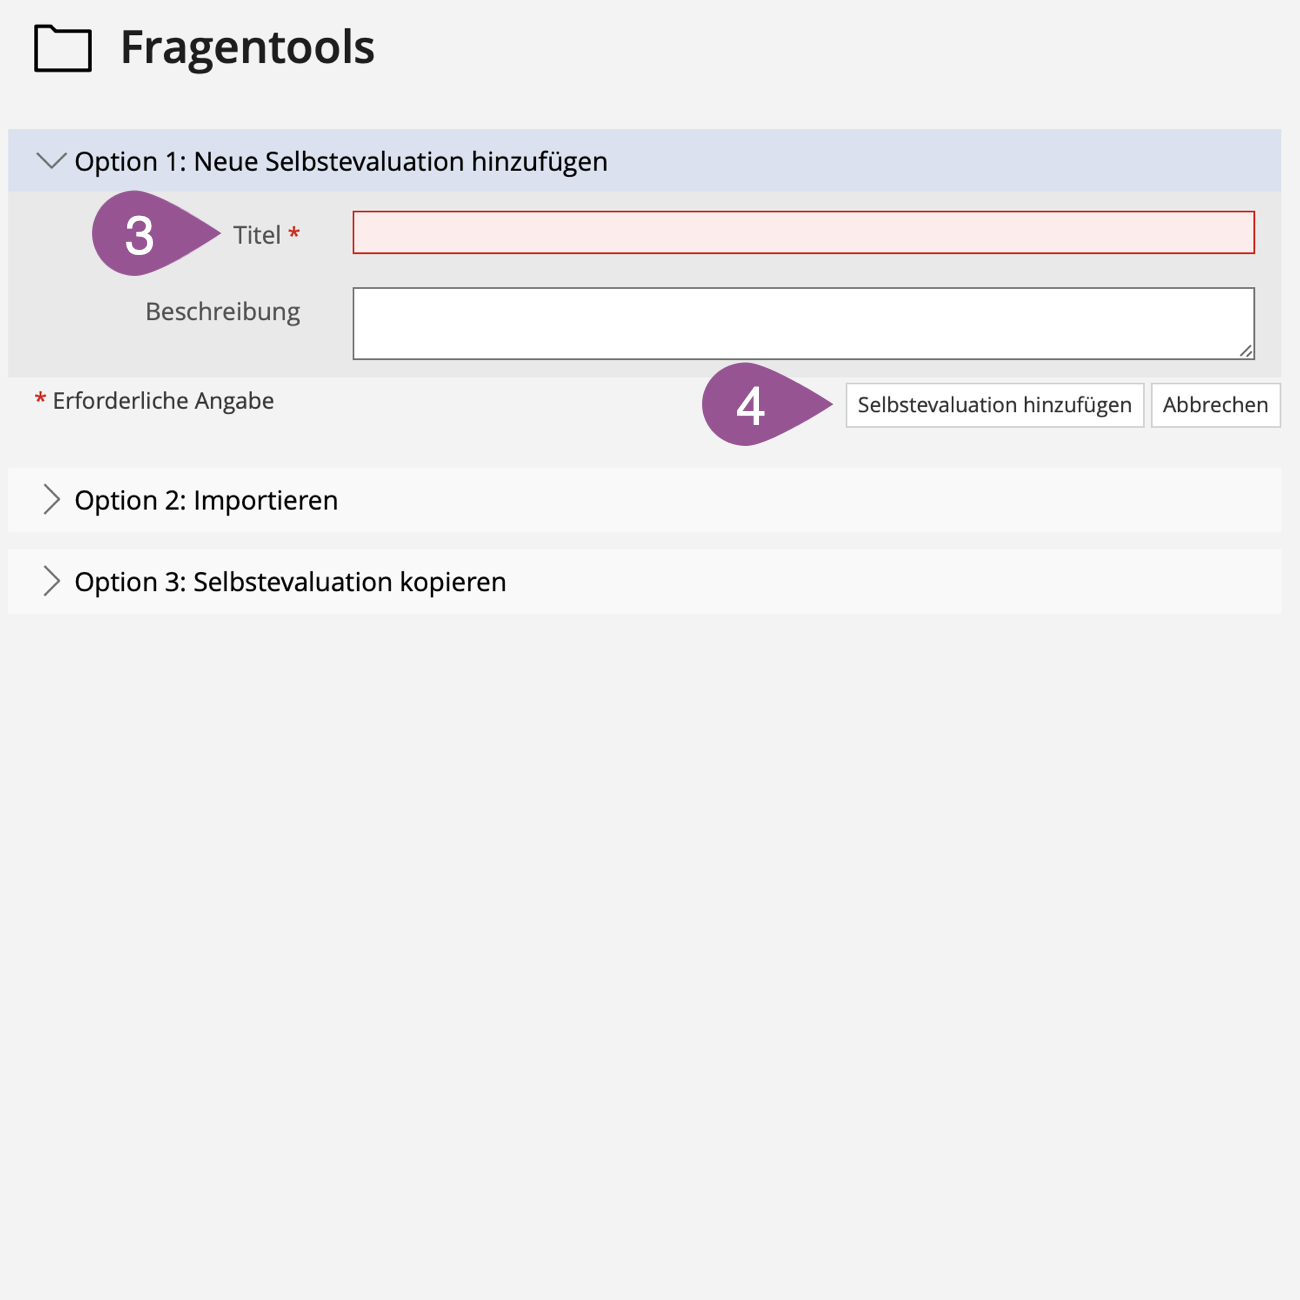
Give the self-evaluation a «Title». | |
Click «Selbstevaluation hinzufügen». |
.
2. Adjust settings
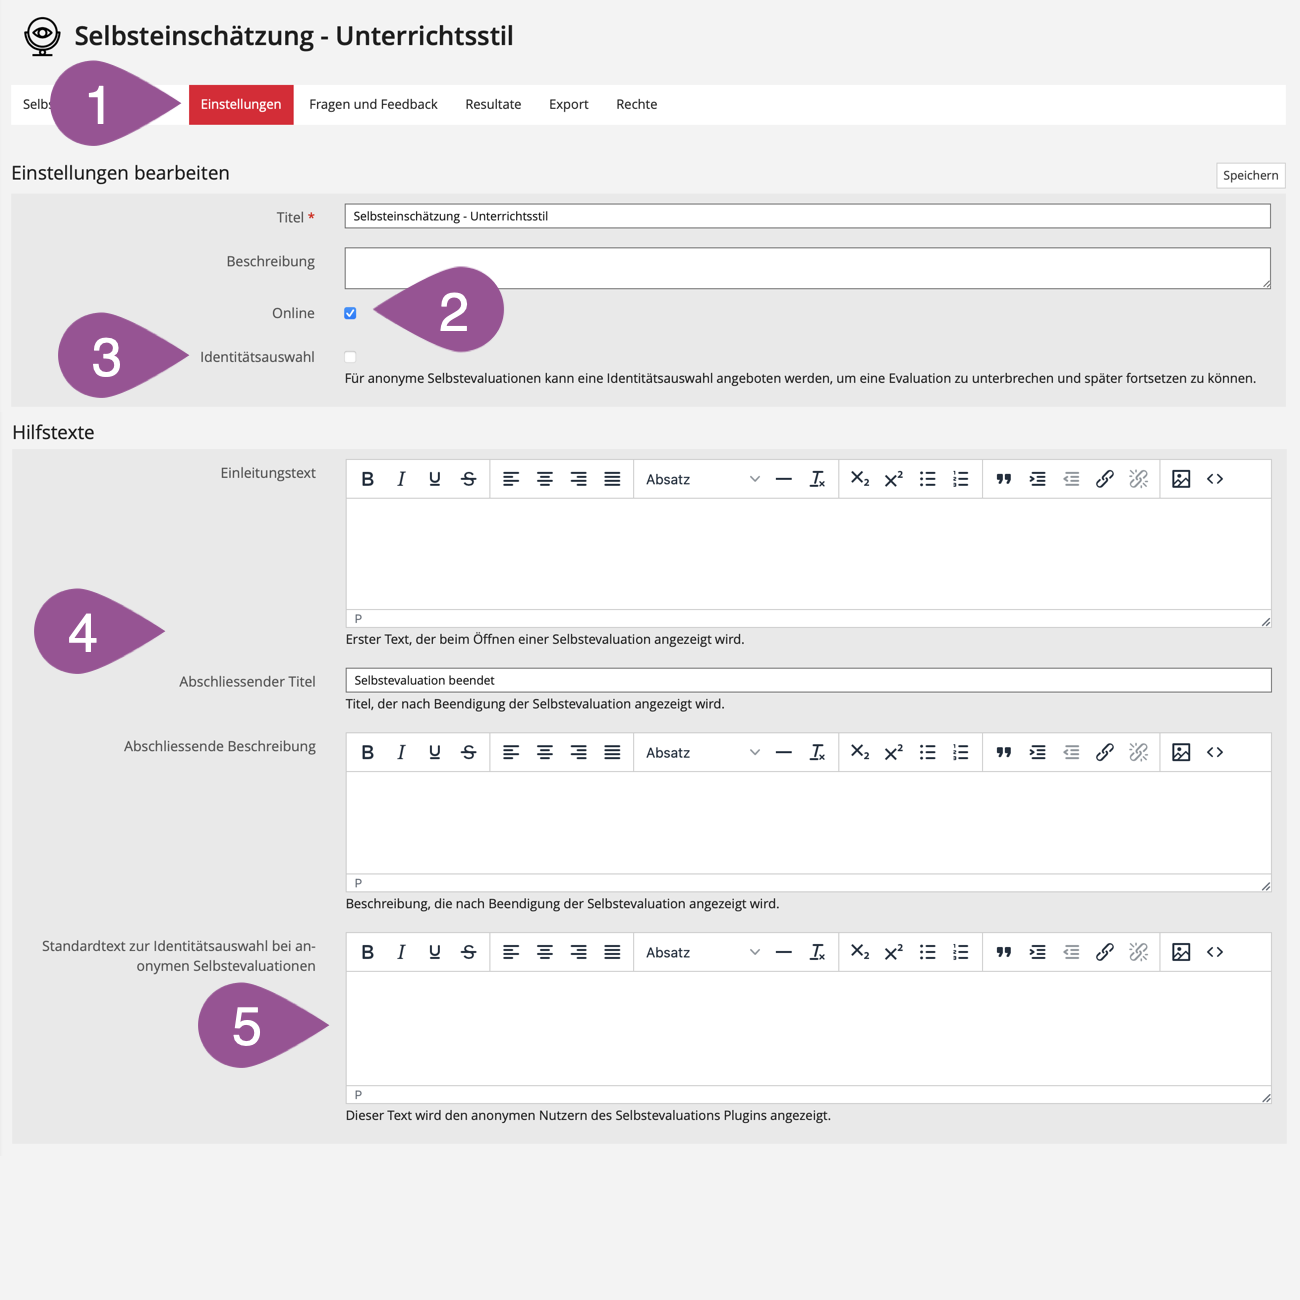
Go to the «Einstellungen» tab. | |
If «Online», the self-evaluation is visible and accessible to others. | |
If «Identitätsauswahl» is checked, an identification code is generated for anonymous participants before starting the self-evaluation. With this code, they can pause the self-evaluation and continue it later. A self-evaluation can only be conducted anonymously if it is located in a public area of ILIAS (e.g., iTools), and the permissions of the self-evaluation are adjusted accordingly. To remain anonymous, participants must not be logged into ILIAS. Otherwise, they can be identified by their login name in the results. | |
You can enter an introductory and a concluding text that will be shown before the start or after the completion of the self-evaluation, respectively. | |
If you have activated the «Identitätsauswahl» (see point 3), you can enter an explanatory text that will be shown to anonymous participants. | |
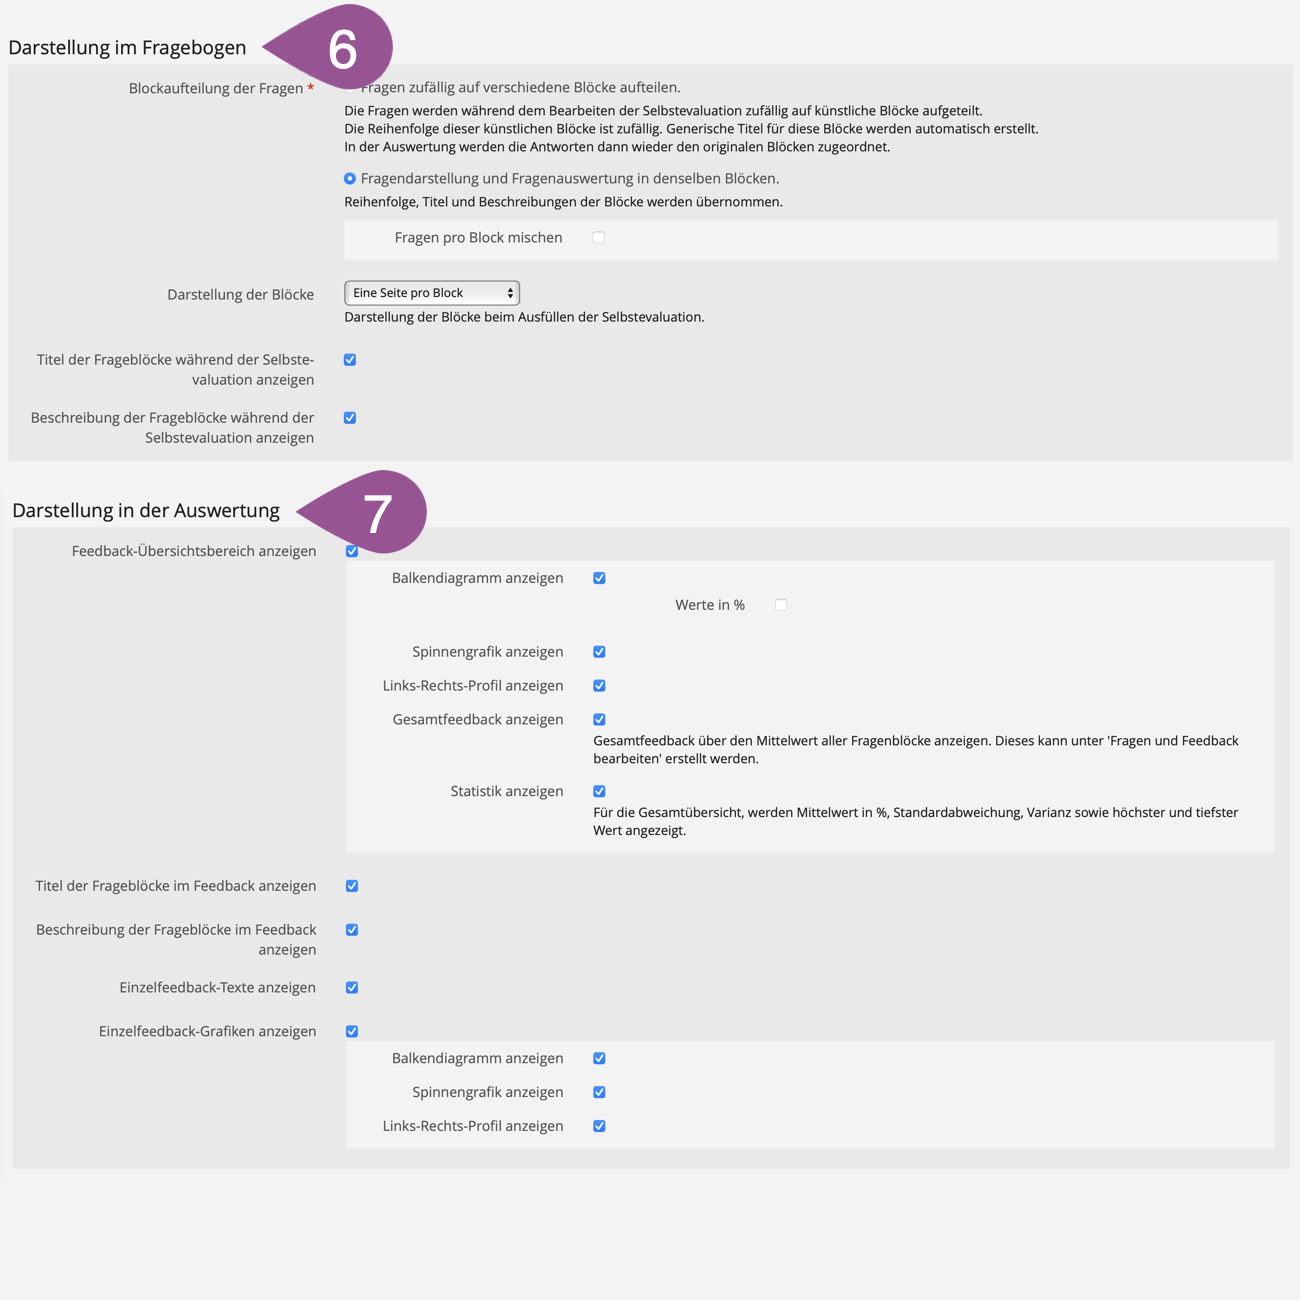
Select how the questions and question blocks (see 3. Add question blocks, master data blocks & questions) should be divided and displayed. | |
Select how the feedback (see 4. Define feedback) should be displayed. | |
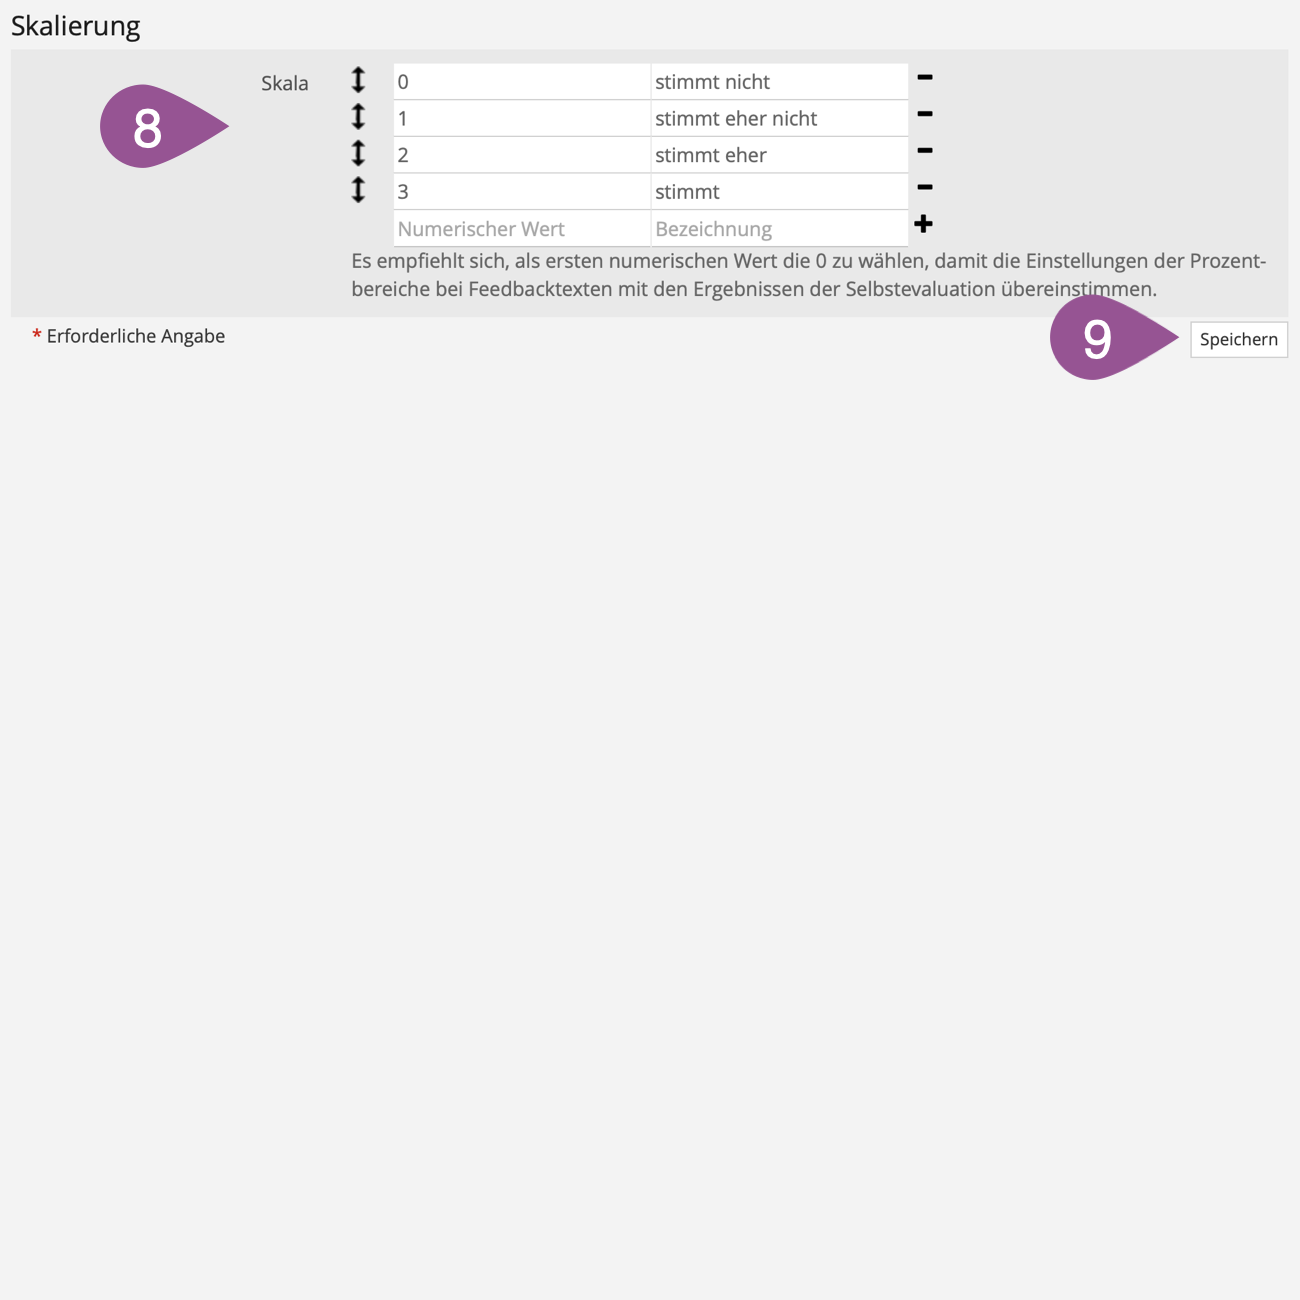
Enter the rating scale for answering all included questions (see 3. Add question blocks, master data blocks & questions). Start the scale (numerical value) with 0 rather than the commonly used 1. This way, the feedback (percentage ranges) that is provided later will be correct. | |
Save your settings. |
.
3. Add question blocks, master data blocks & questions
Before adding questions to the self-evaluation, you have to define at least one question block or one master data block. Afterward, you can add your questions to the question block or to the master data block.
.
Define question blocks & master data blocks
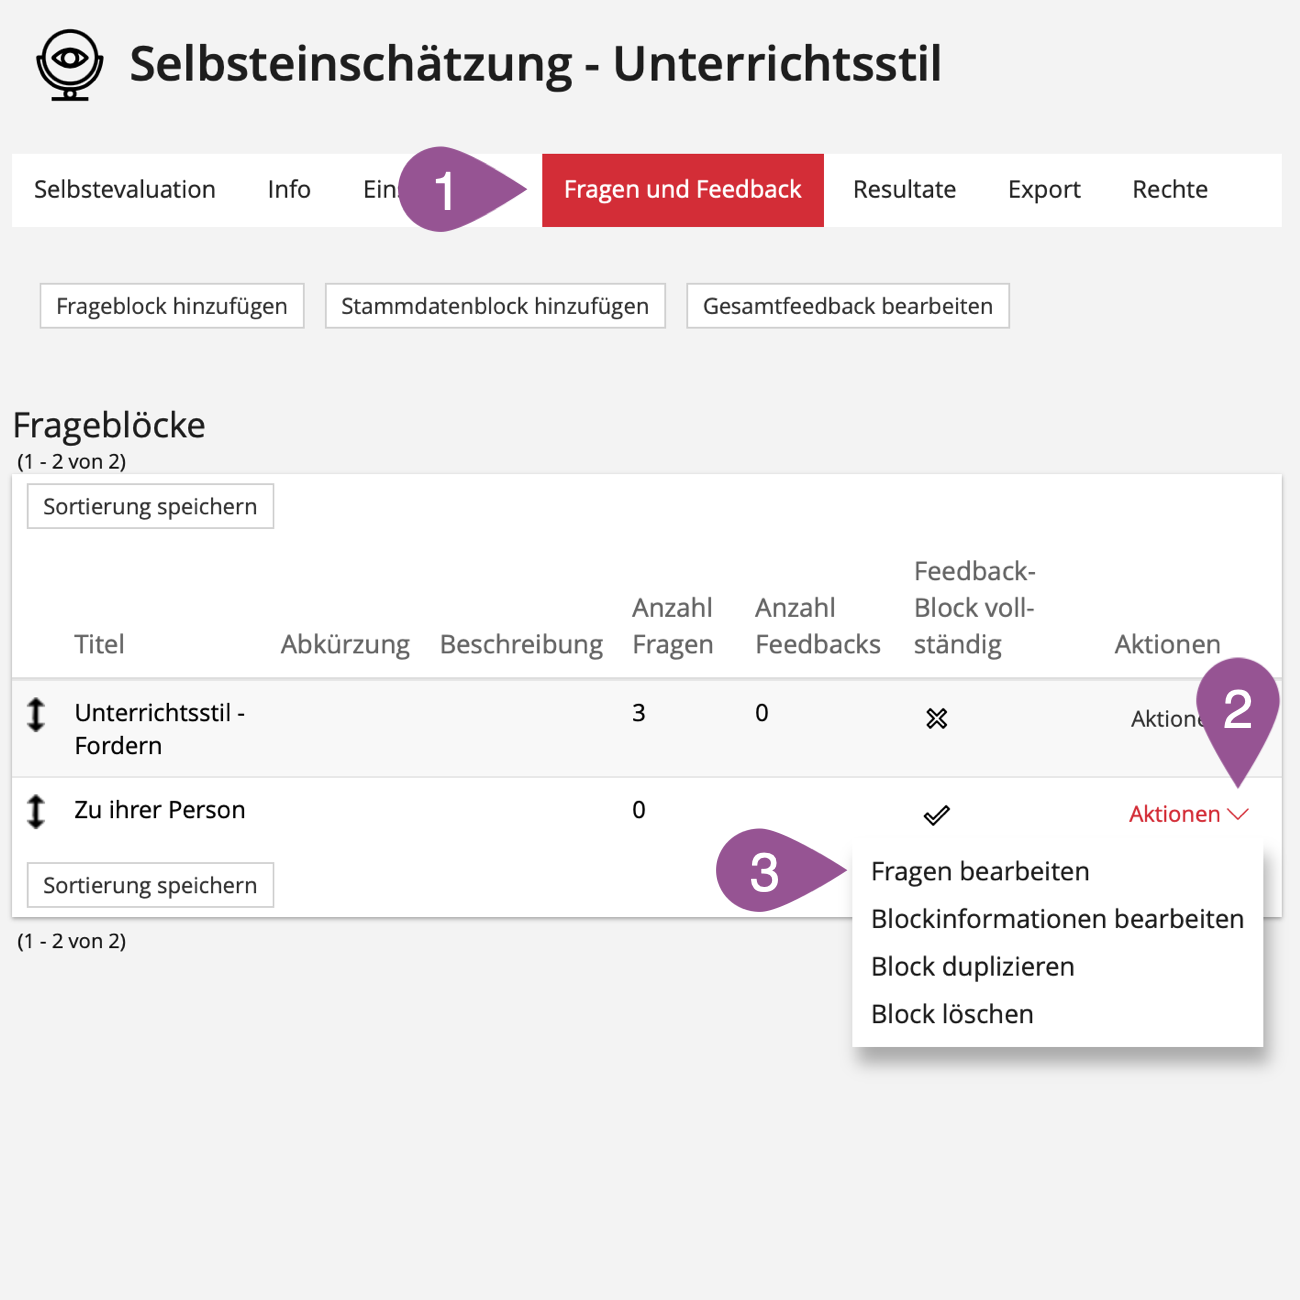
You can add questions to both question blocks and master data blocks. Questions in question blocks are answered using the scale defined in the settings (see 2. Adjust settings). Individual answer options can be defined for questions in the master data block. Answers to questions from the master data block are not included in the analysis of the self-evaluation, which is why they are particularly suitable for collecting additional information about the persons completing the questionnaire, e.g., demographic variables (gender, age, marital status, etc.).
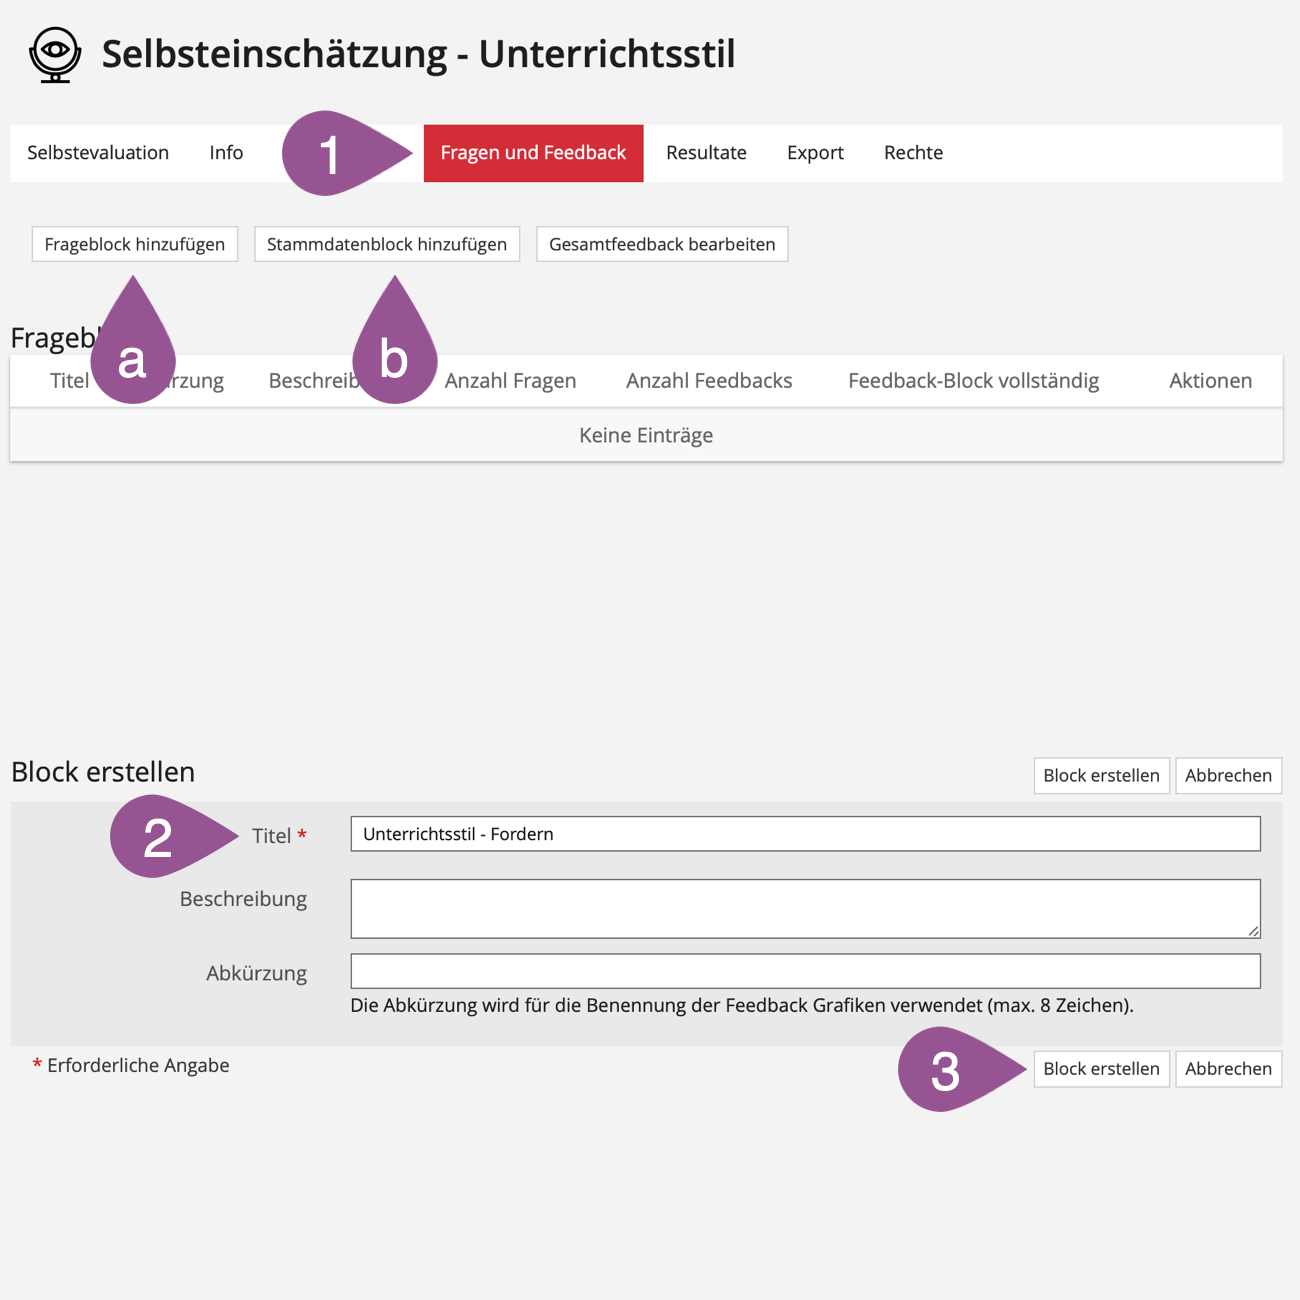
Go to the «Fragen und Feedback» tab.
| |||||
Give the block a title. | |||||
Click «Block erstellen». |
.
Add questions to a question block
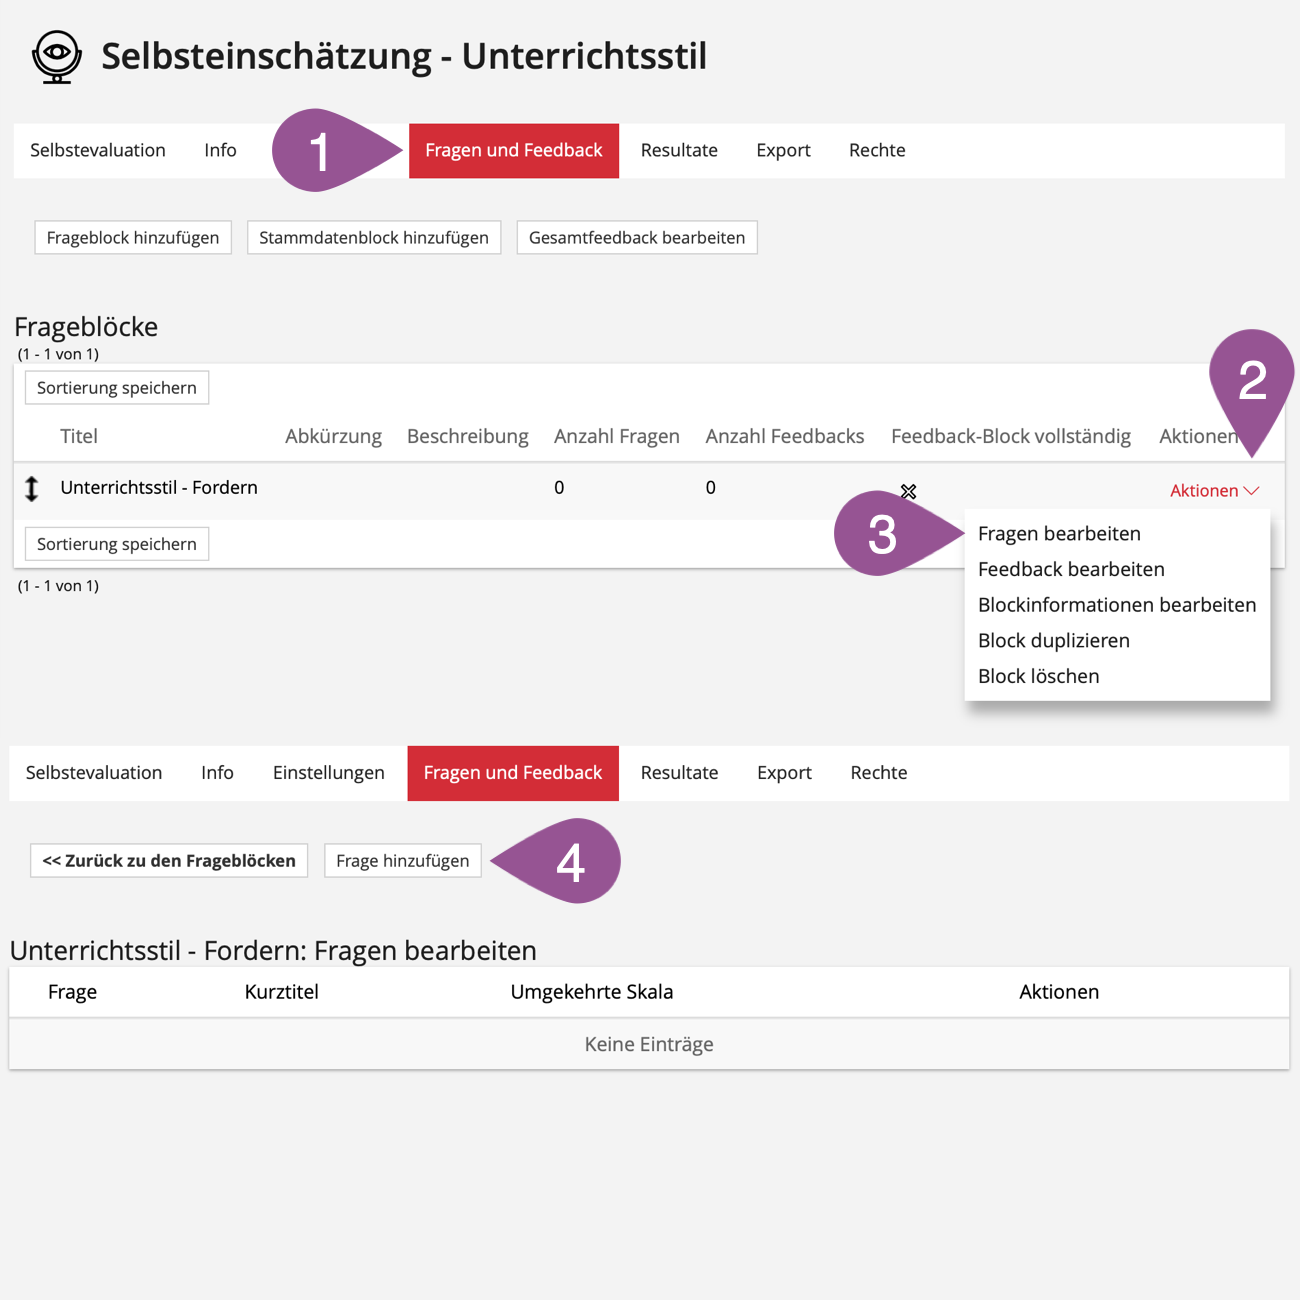
Go to the «Fragen und Feedback» tab. | |
Open the actions menu of the question block. | |
Select «Fragen bearbeiten». | |
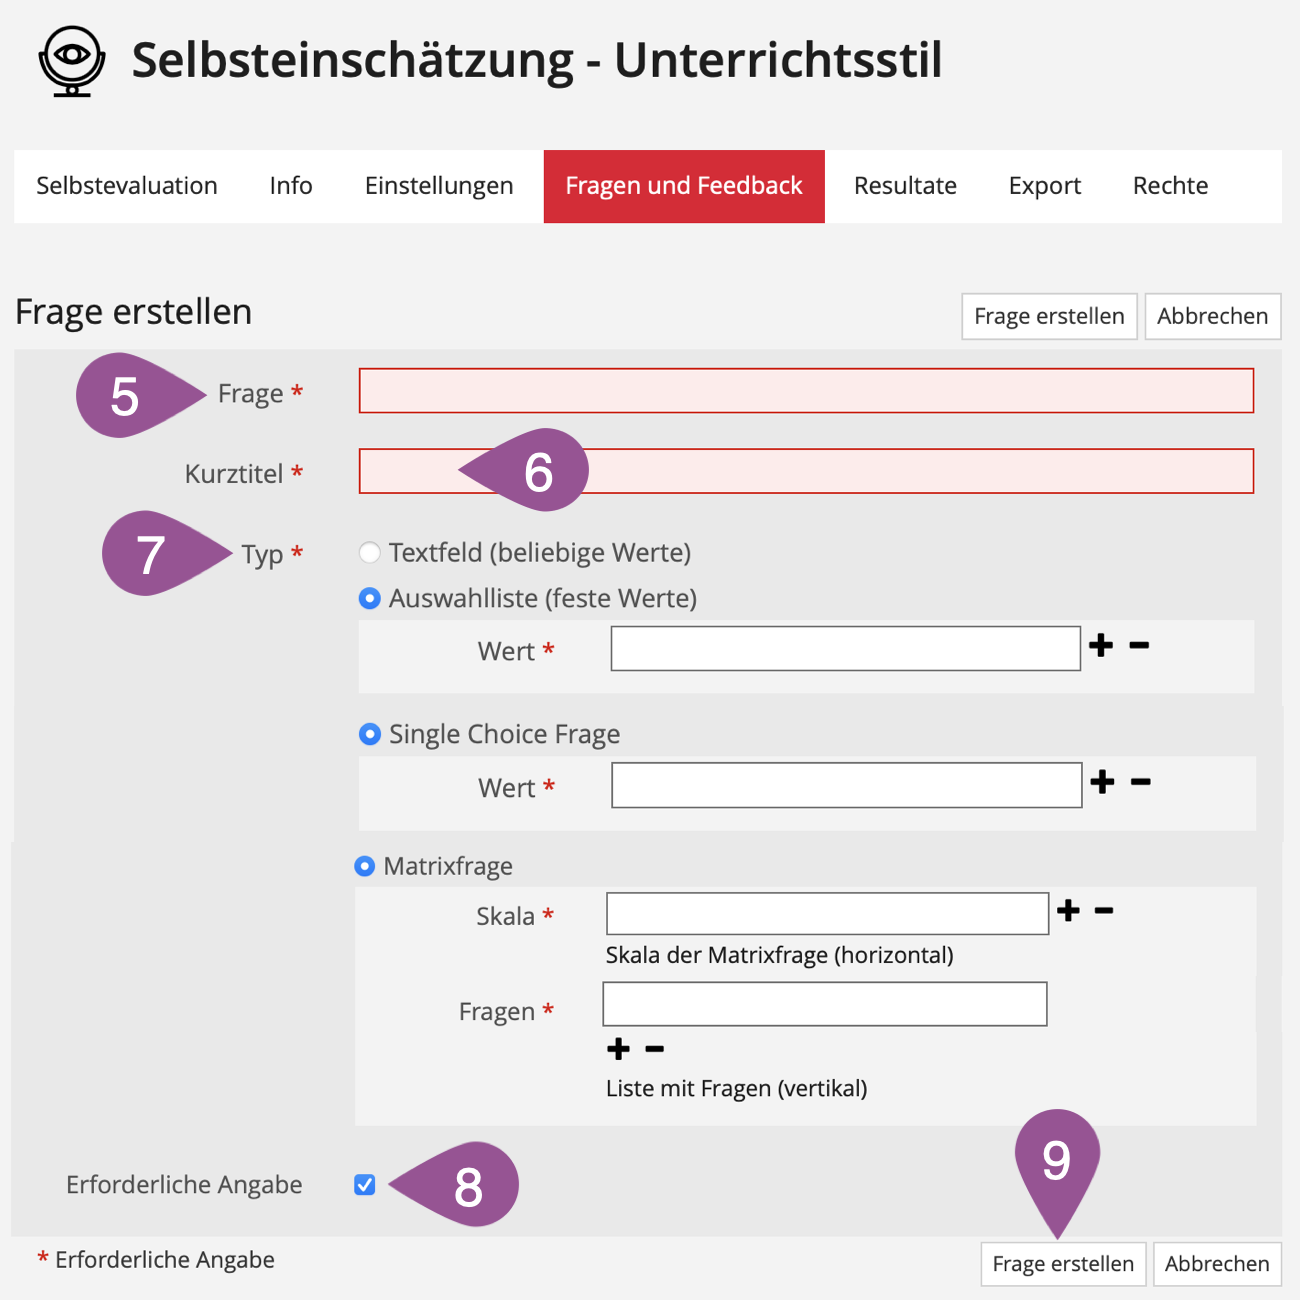
Click on «Frage hinzufügen». | |
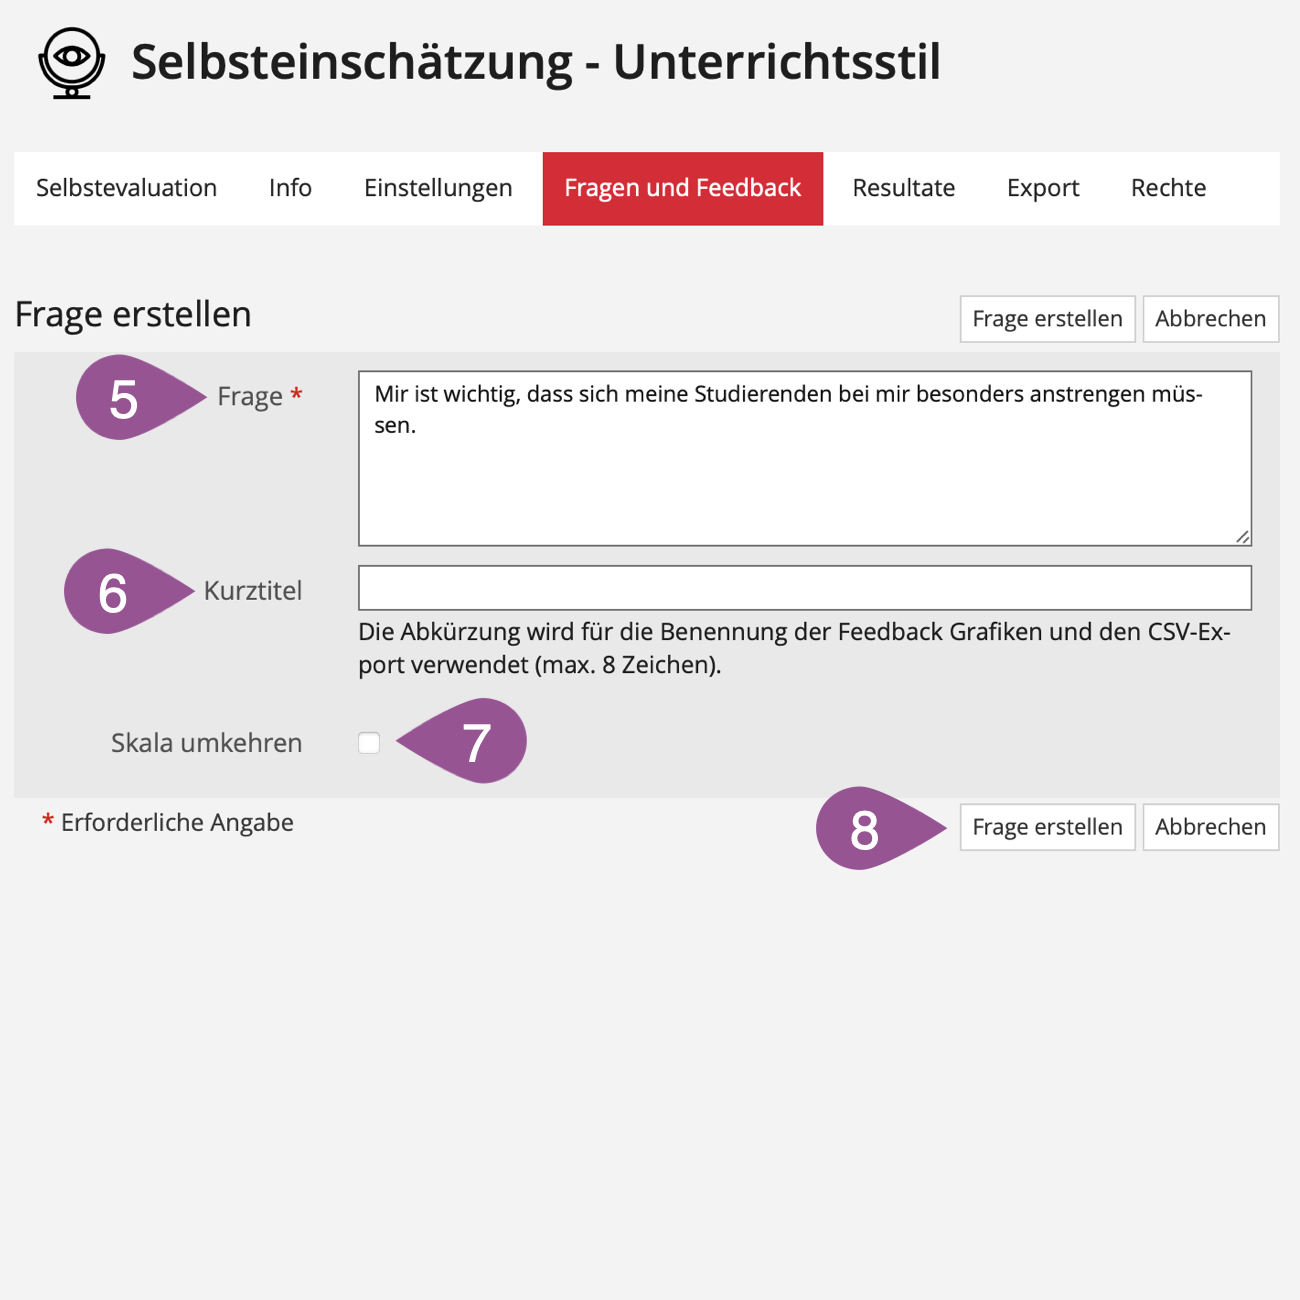
Enter your question. Make sure that the wording of the questions is compatible with the answer options of the scale defined in the settings (see 2. Adjust settings). | |
You can enter a short title for the question. If you do not enter a short title, «Question 1.1», «Question 1.2», etc., will automatically be used as the title. | |
For negatively worded questions, you can invert the scale defined in the settings (see 2. Adjust settings). | |
Click «Frage erstellen». |
.
Add questions to a master data block
If you ask for the students' matriculation numbers or similar personal data, please consider the data protection guidelines (see "Directives Data protection in the IT domain at the University of Bern").
Directives Data protection in the IT domain at the University of Bern
Go to the «Fragen und Feedback» tab. | |
Open the actions menu of the master data block. | |
Select «Fragen bearbeiten». | |
Click on «Frage hinzufügen». | |
Enter your question. | |
You can enter a short title for the question. The short title is used for feedback graphs and CSV export. | |
Select a question type:
| |
If checked, answering the question is obligatory. Participants cannot navigate to the next question or complete the self-evaluation without answering the question. | |
Click «Frage erstellen». |
.
4. Define feedback
The most crucial aspect of self-evaluation is that participants do not simply answer questions, as is common with surveys or tests, but receive feedback regarding their answers in the individual blocks.
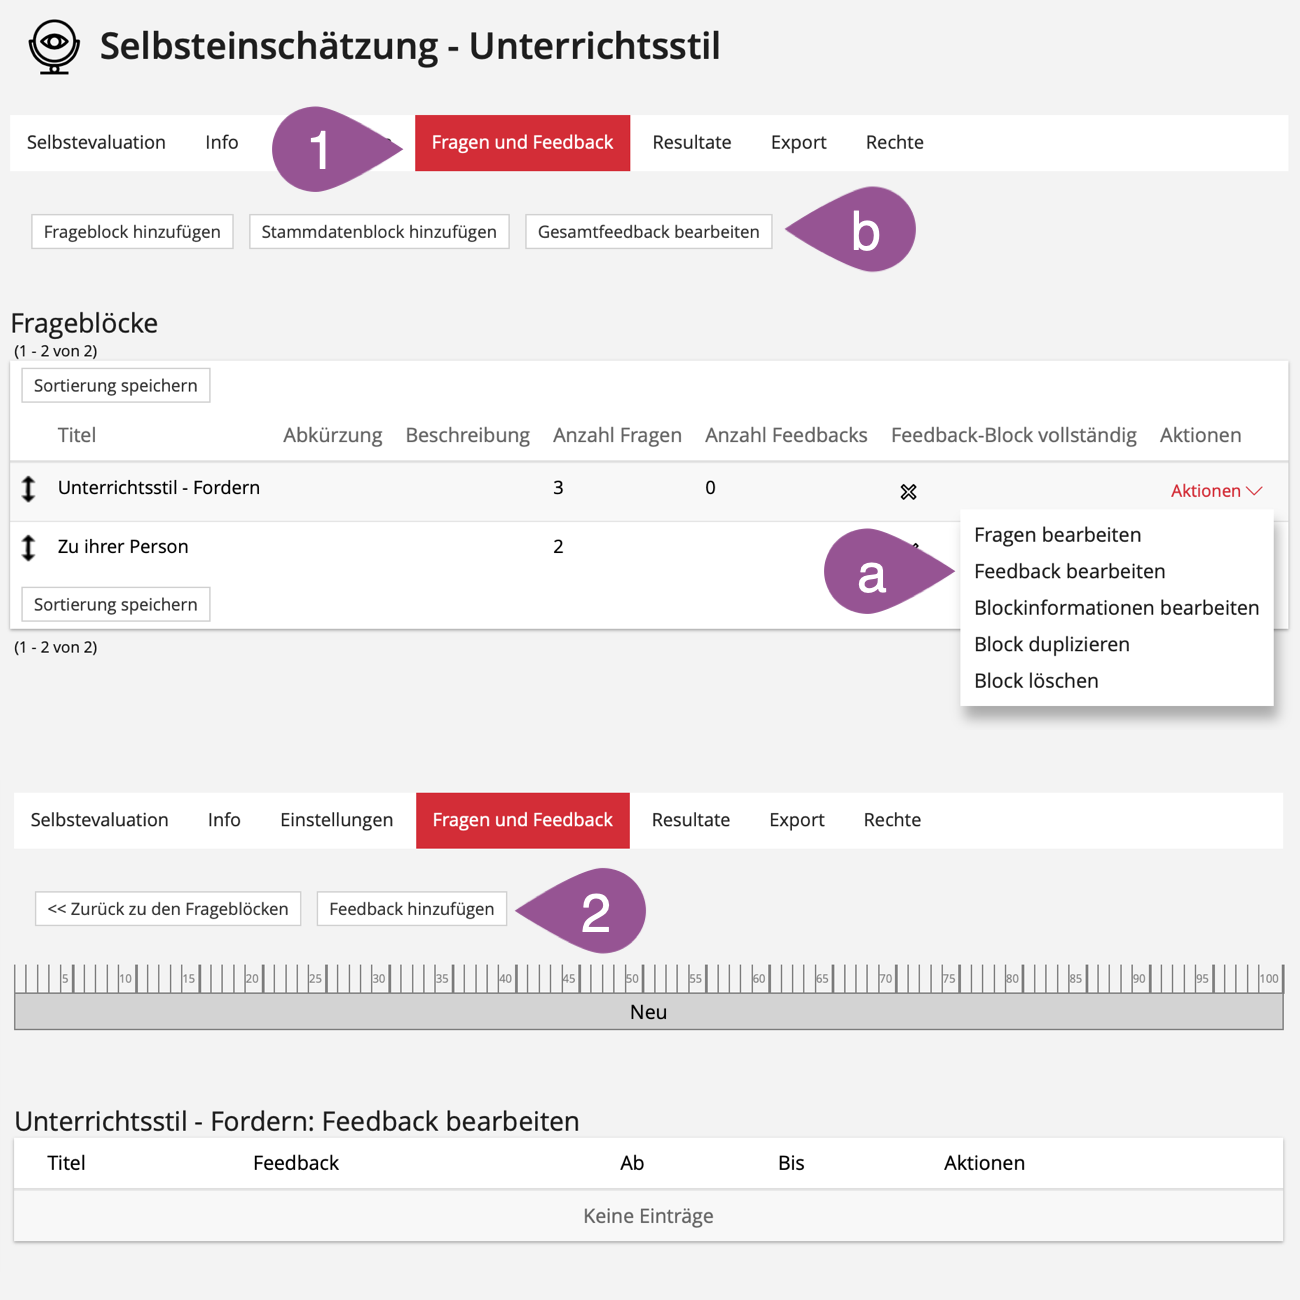
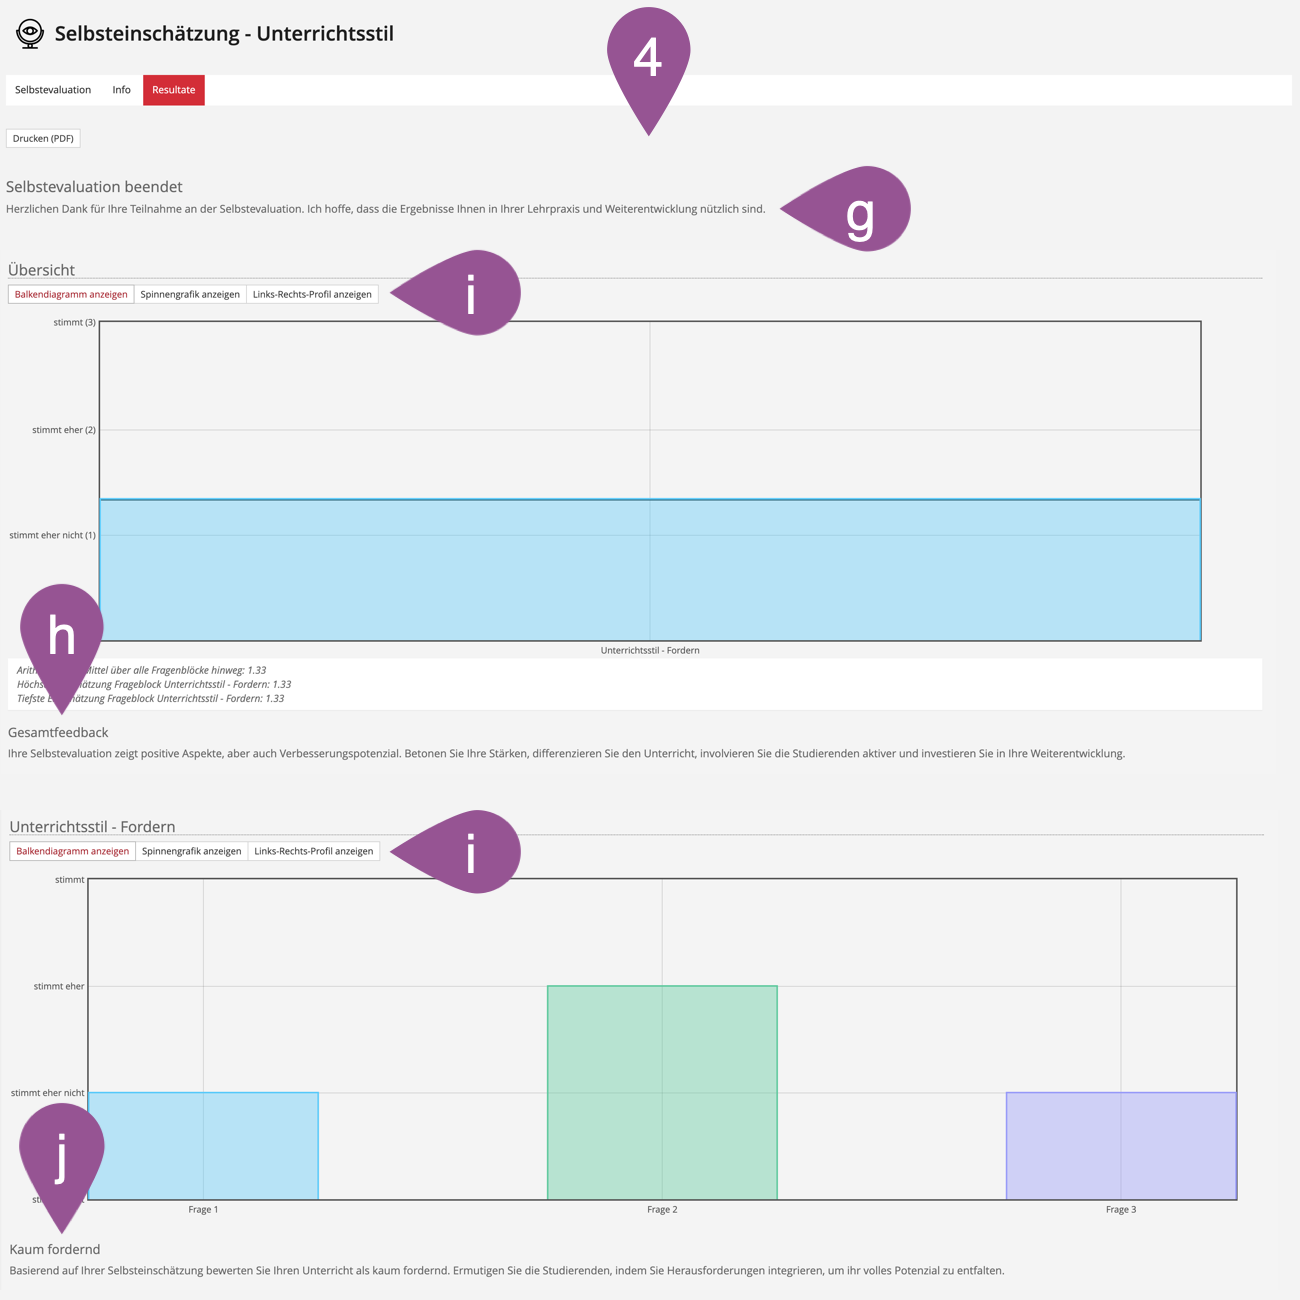
You have to define at least one feedback for each question block. You can also provide overall feedback. The overall feedback refers to the overall result and is displayed at the top of the evaluation results below the «Overview». The feedback for the question block refers only to the respective block and is shown in the evaluation below the respective question block.
Go to the «Fragen und Feedback» tab.
| |||||
Click on «Feedback hinzufügen». | |||||
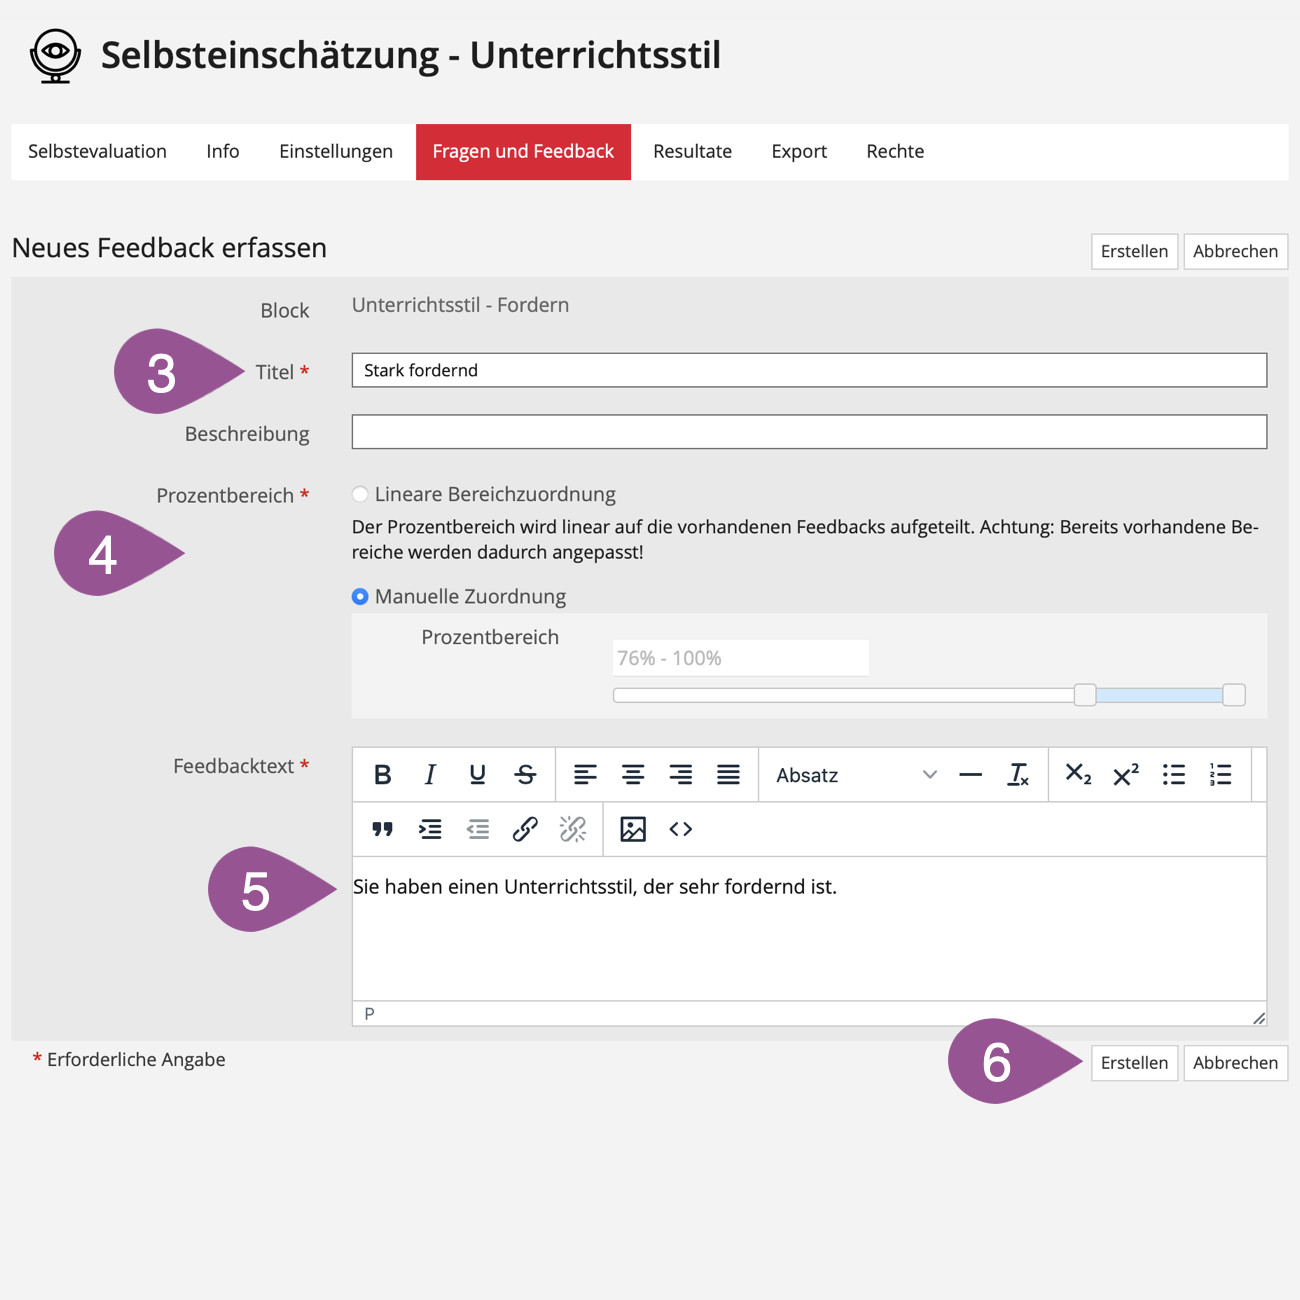
Give the feedback a title. | |||||
Select which percentage range the feedback should apply to.
For question blocks, the entire percentage range has to be covered with feedback. You can see whether this is the case in the «Fragenblöcke» table in the «Feedback-Block vollständig» column («Fragen und Feedback» tab). | |||||
Enter your feedback text. | |||||
Click «Erstellen». |
.
5. Conducting a self-evaluation
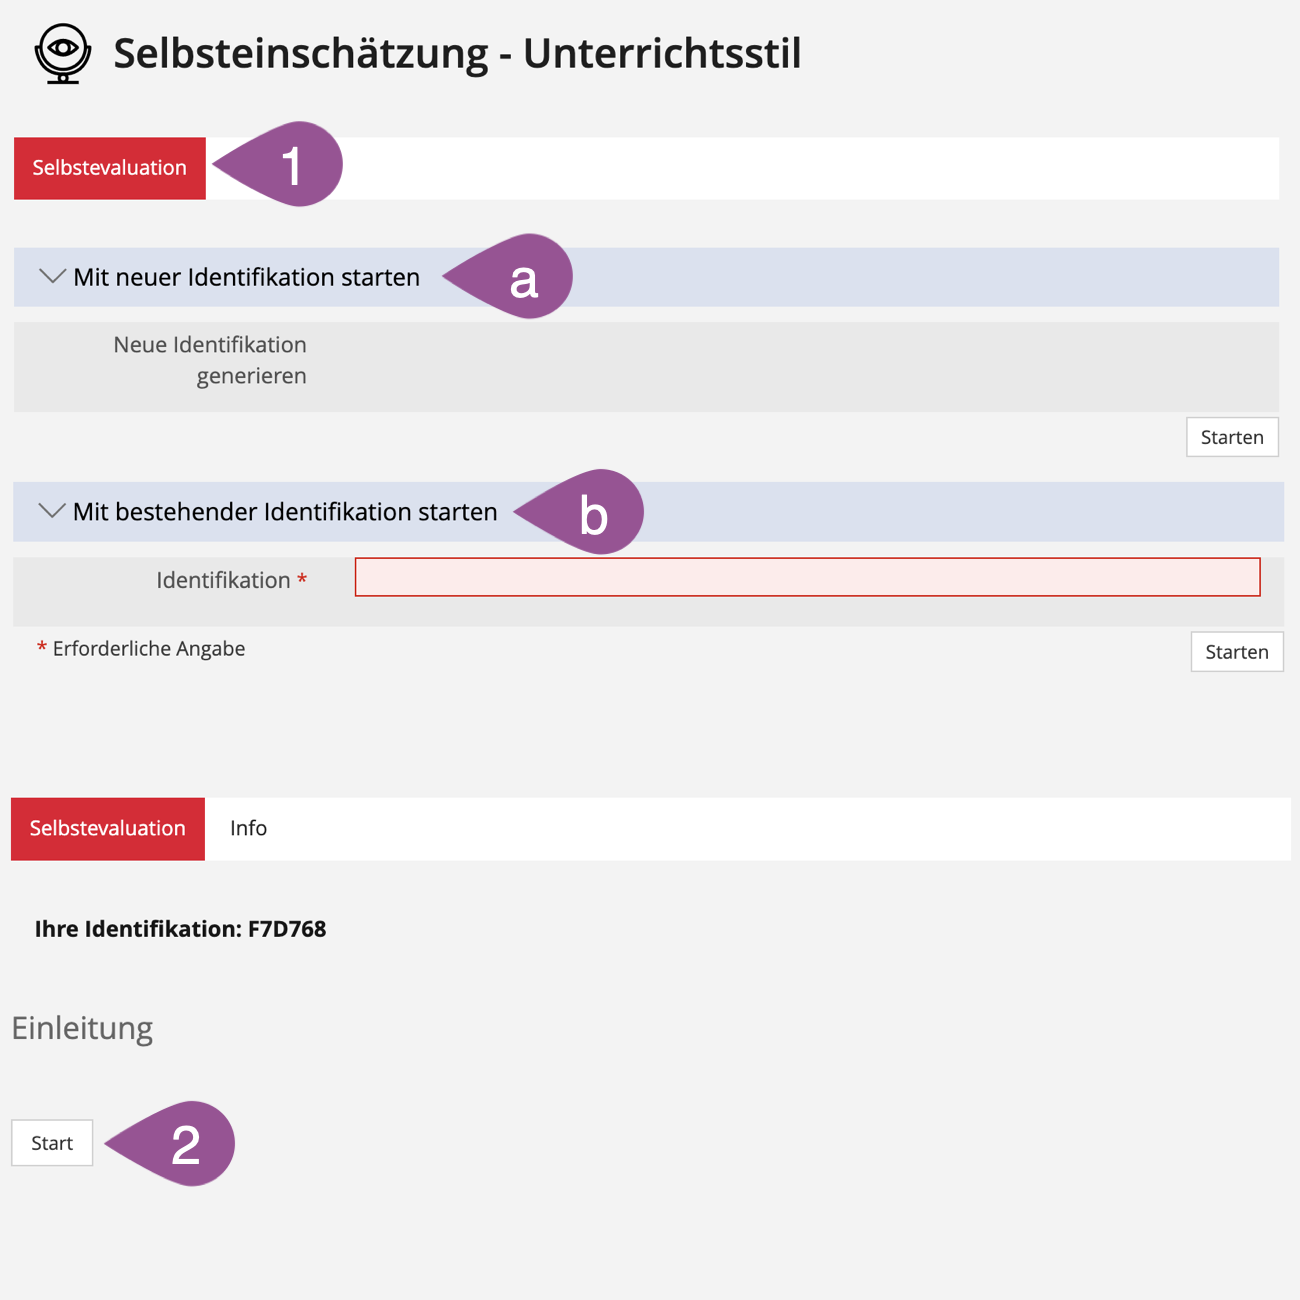
In order to conduct the self-evaluation, it has to be set «Online» (see 2. Adjust settings).
Go to the «Selbstevaluation» tab.
| |||||||||
A start button and, depending on the settings, the introductory message will appear (see 2. Adjust settings). Click «Start» or «Antworten bearbeiten». If instead of the start button you see a note that the self-evaluation cannot be started, check the following:
• Have you defined a scale (see 2. Adjust settings)? • Have you created at least one question block or master data block with at least one question (see 3.2 Add questions to a question block or 3.3 Add questions to a master data block)? • Is the feedback complete (see 4. Define feedback)? | |||||||||
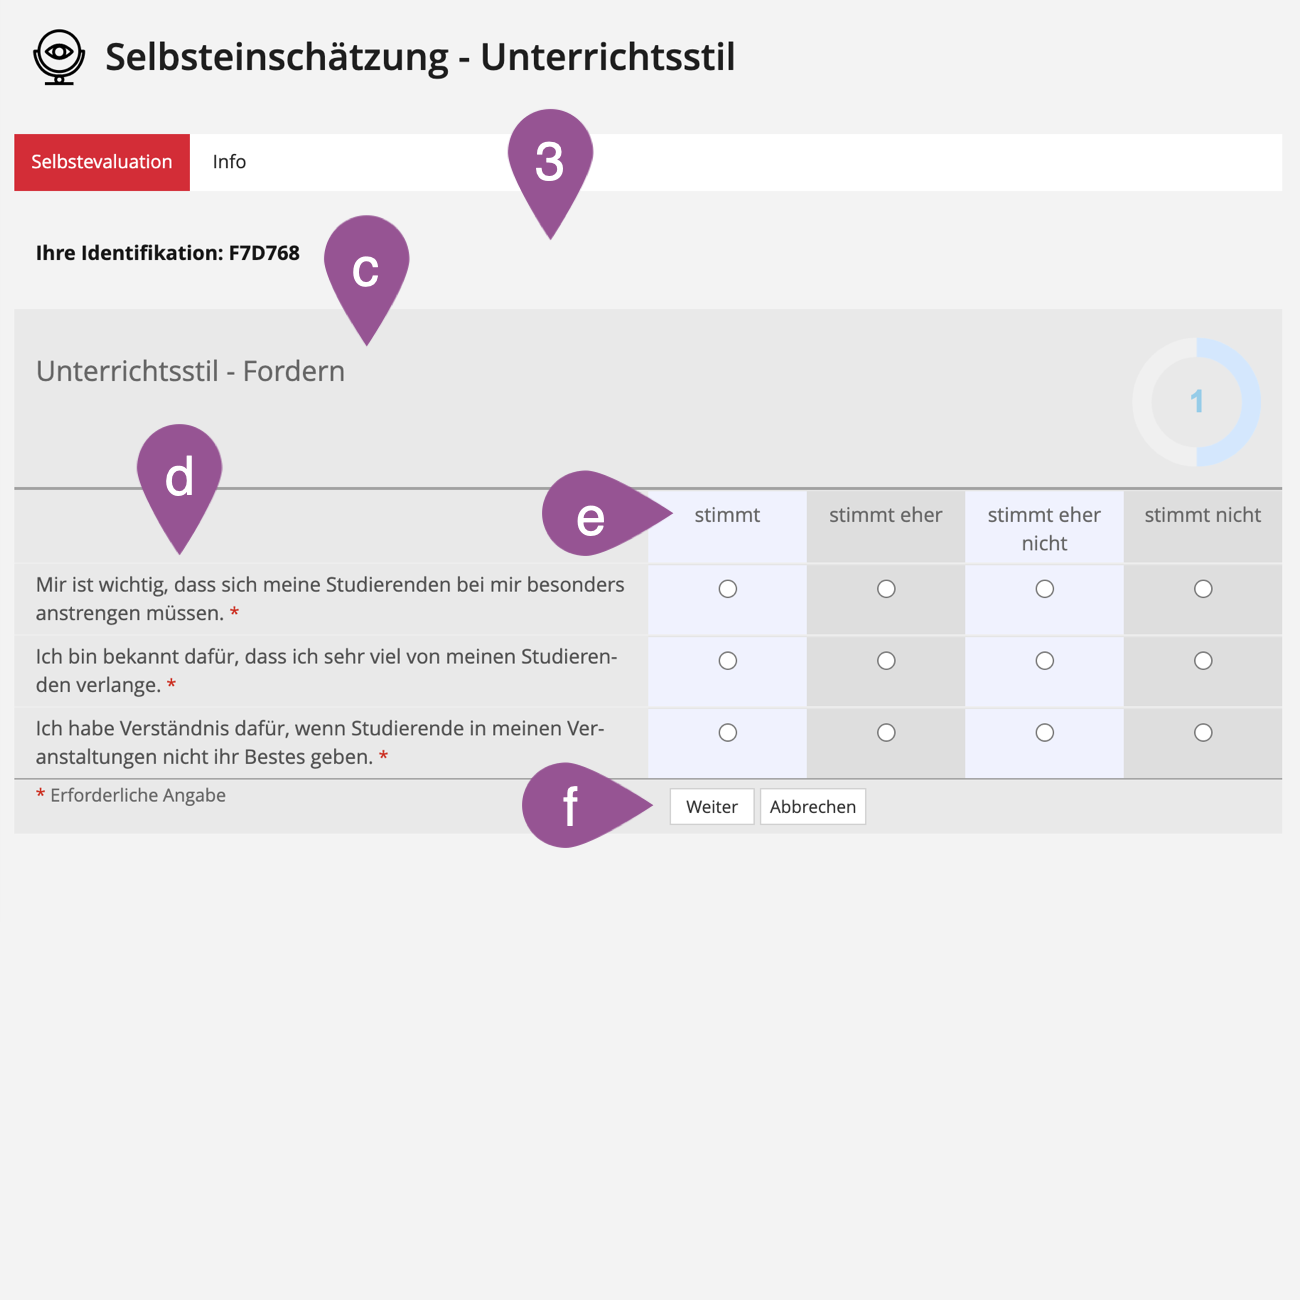
The following elements are visible to participants while filling out the form:
| |||||||||
The following elements are visible to participants after filling out the form:
|
.
6. View & manage results
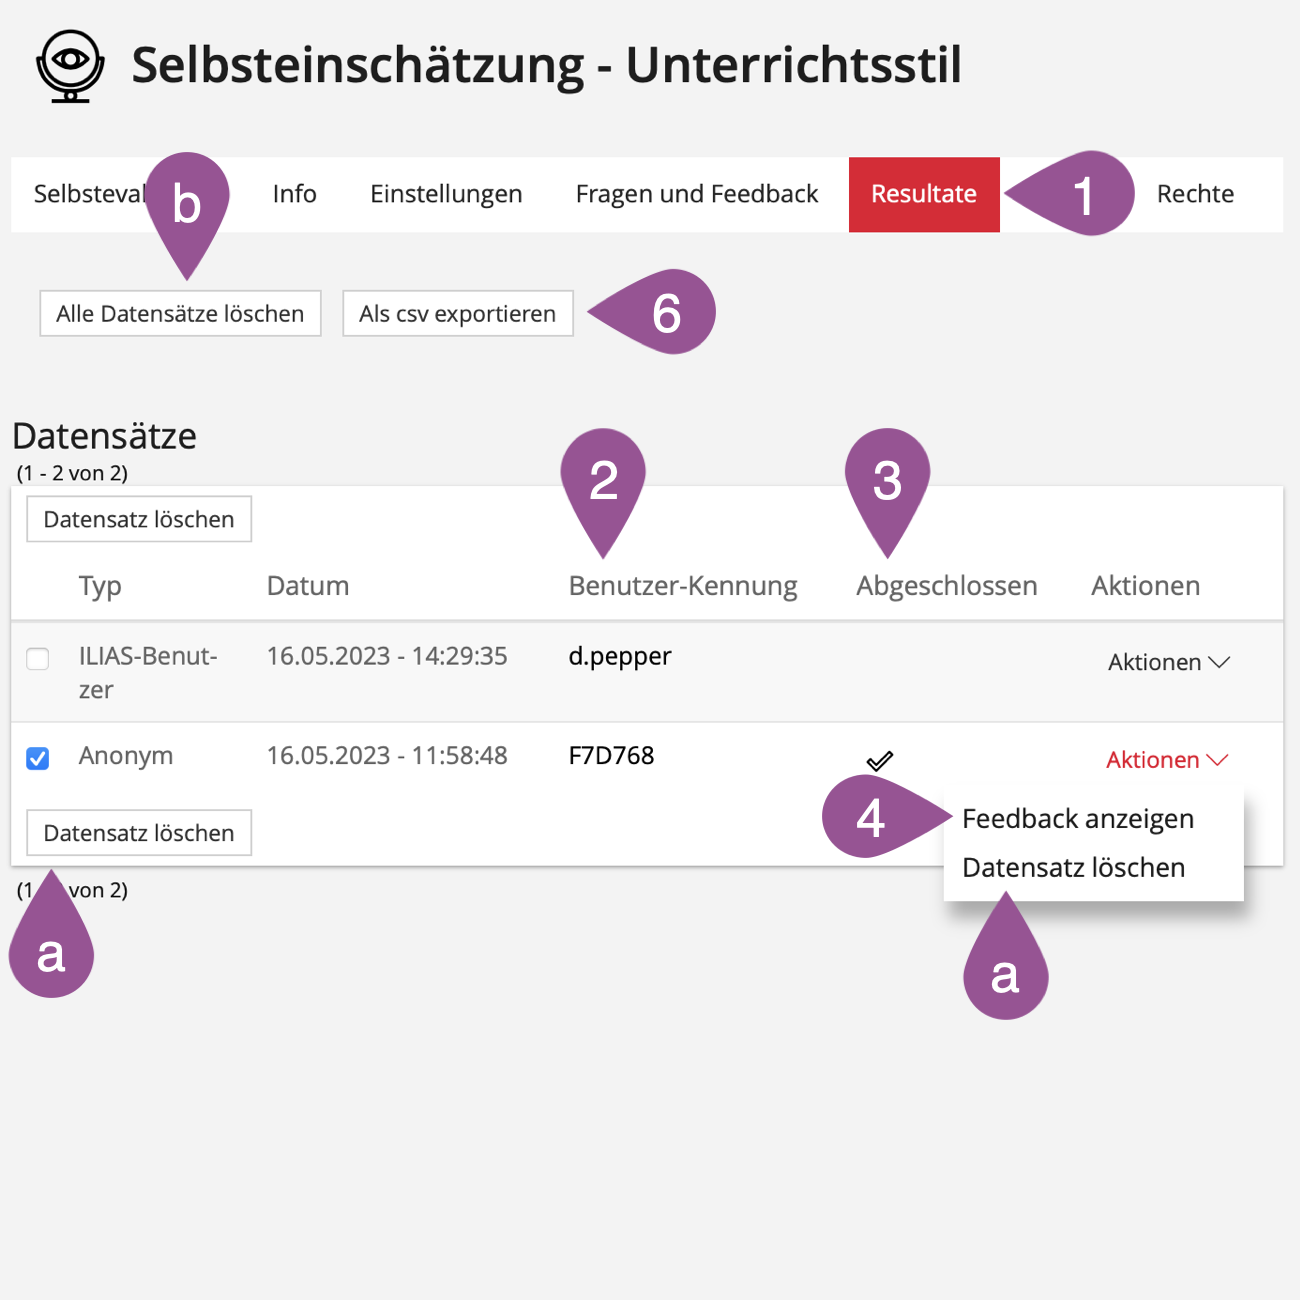
Go to the «Resultate» tab. You can see the results of all participants listed in the table. | |||||
You can identify participants by their user name. In case of anonymous participation, the identification code appears here instead of the user name. | |||||
You can see whether participants have completed the self-evaluation or not. | |||||
You can view what feedback each participant has received. To do this, open the person's actions menu and click «Feedback anzeigen». | |||||
You can delete records:
| |||||
You can export the results as a .csv file. |
.
7. Application scenarios
The following pages will give you an idea of how a Self-evaluation can be used:
Zuletzt geändert: 5. Sep 2025, 10:35, Thiel, Anja [a.thiel5]


