


ILIAS Support (English)
Reiter
Manual: Wiki
Landing page > Manuals > Wiki
Deutsch | English
Manual: Wiki
1. Create a wiki
2. Adjust settings
2.1 Configure basic settings
2.2 Restrict availability
2.3 Enable notifications
3.1 Create a wiki page
3.2 Add content to a wiki page
3.3 Create page templates
3.4 Rename a wiki page
3.5 Set a page to read-only
3.6 Activate rating for a page
3.7 Delete a wiki page
4. Edit the wiki navigation
5. Enter & use metadata
5.1 Add a metadata set
5.2 Define fields
5.3 Assign metadata to pages
.
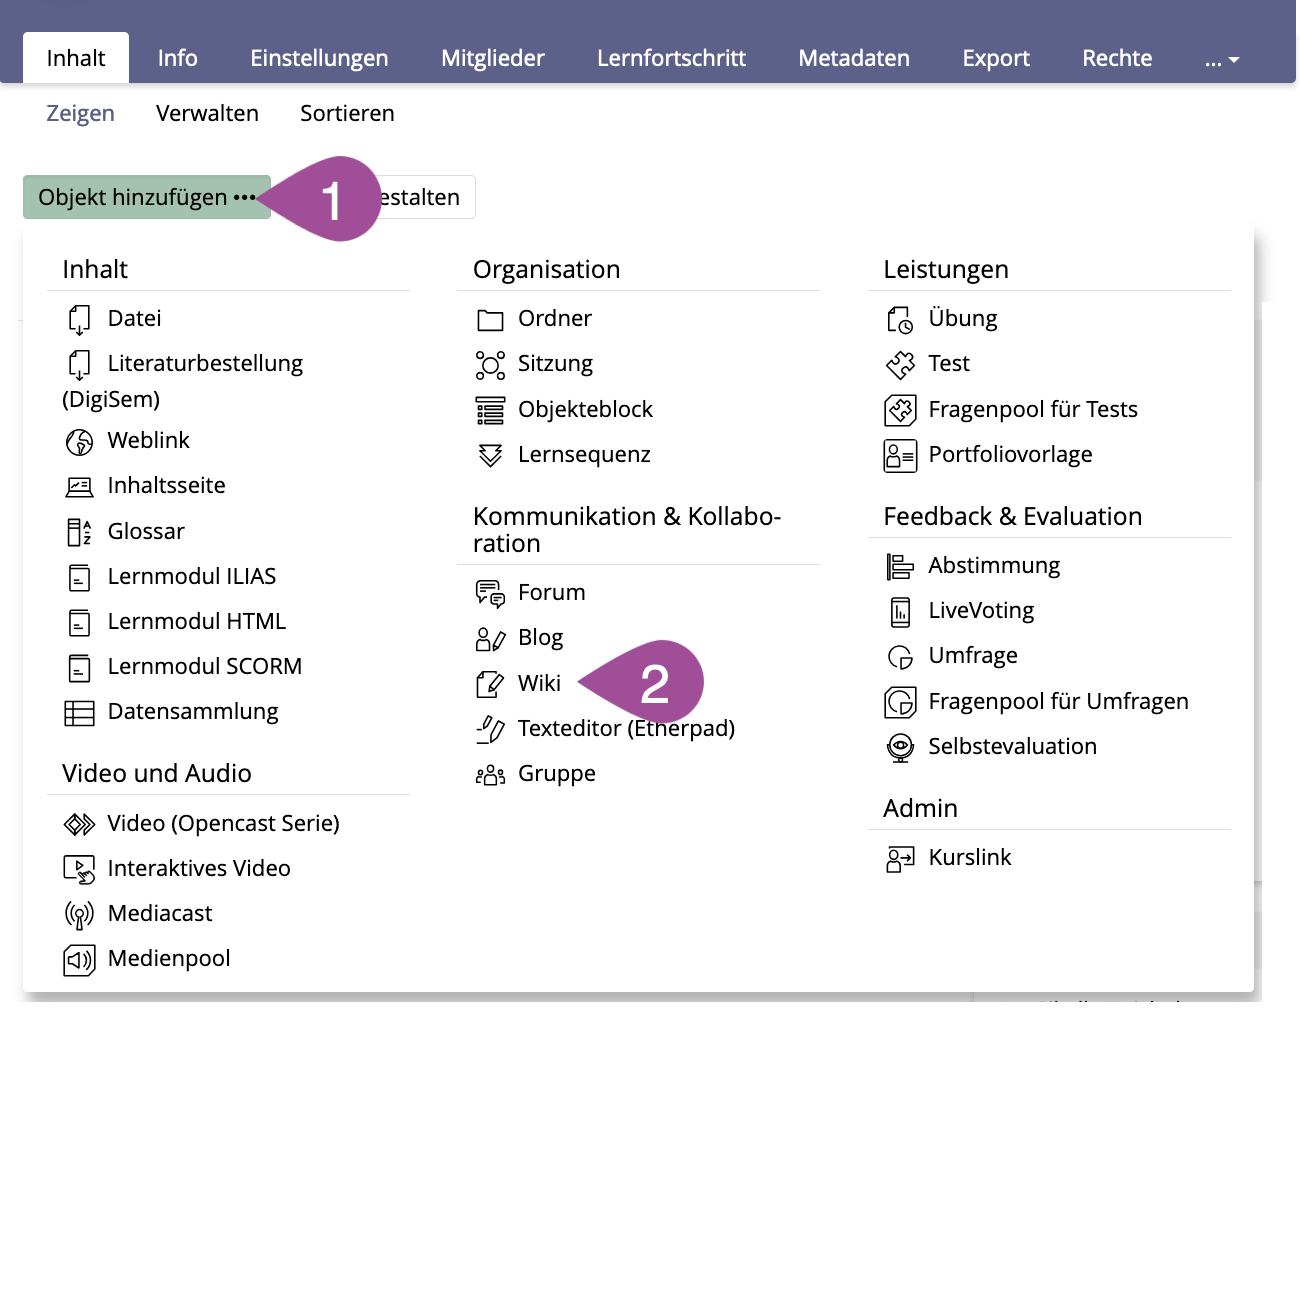
1. Create a wiki
 | Click on «Add New Item». |
 | Select «Wiki». |
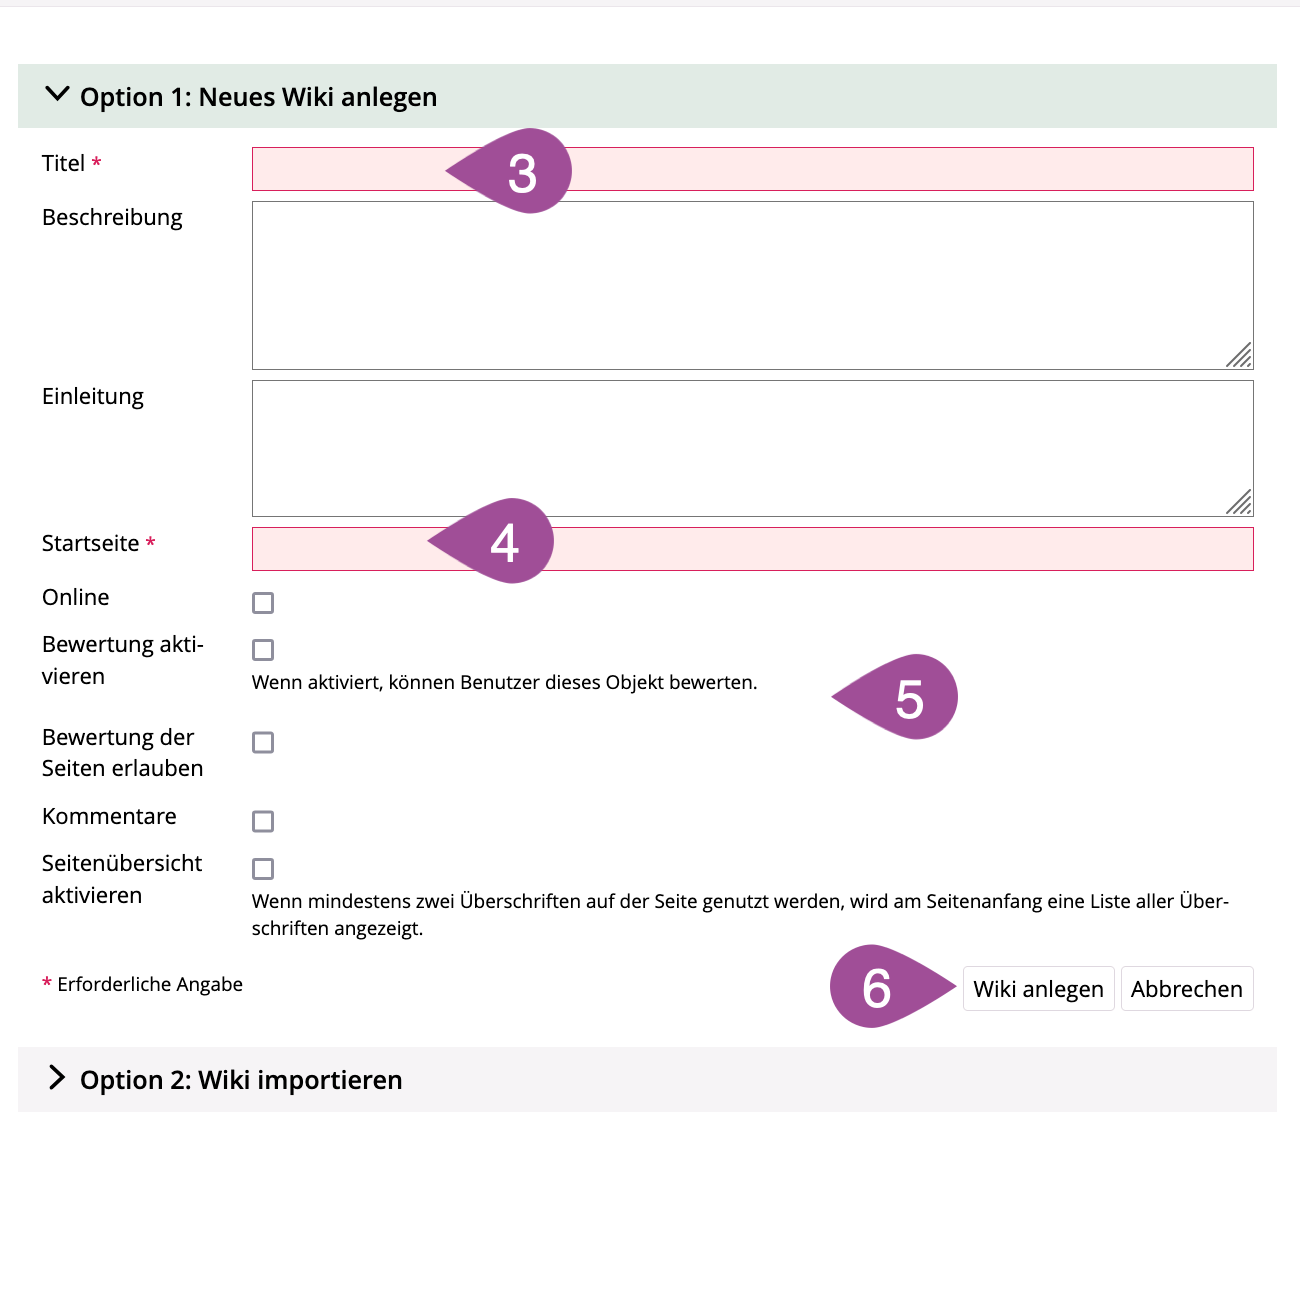
 | Give the wiki a «Title». |
 | Give the start page of your wiki a title. You can rename (see 3.4 Rename a wiki page) or change (see 4. Edit the wiki navigation) the start page later. |
 | All the settings listed here can also be configured later (see 2.1 Configure basic settings). |
 | Click on «Add Wiki». |

.
2. Adjust settings
.
Configure basic settings
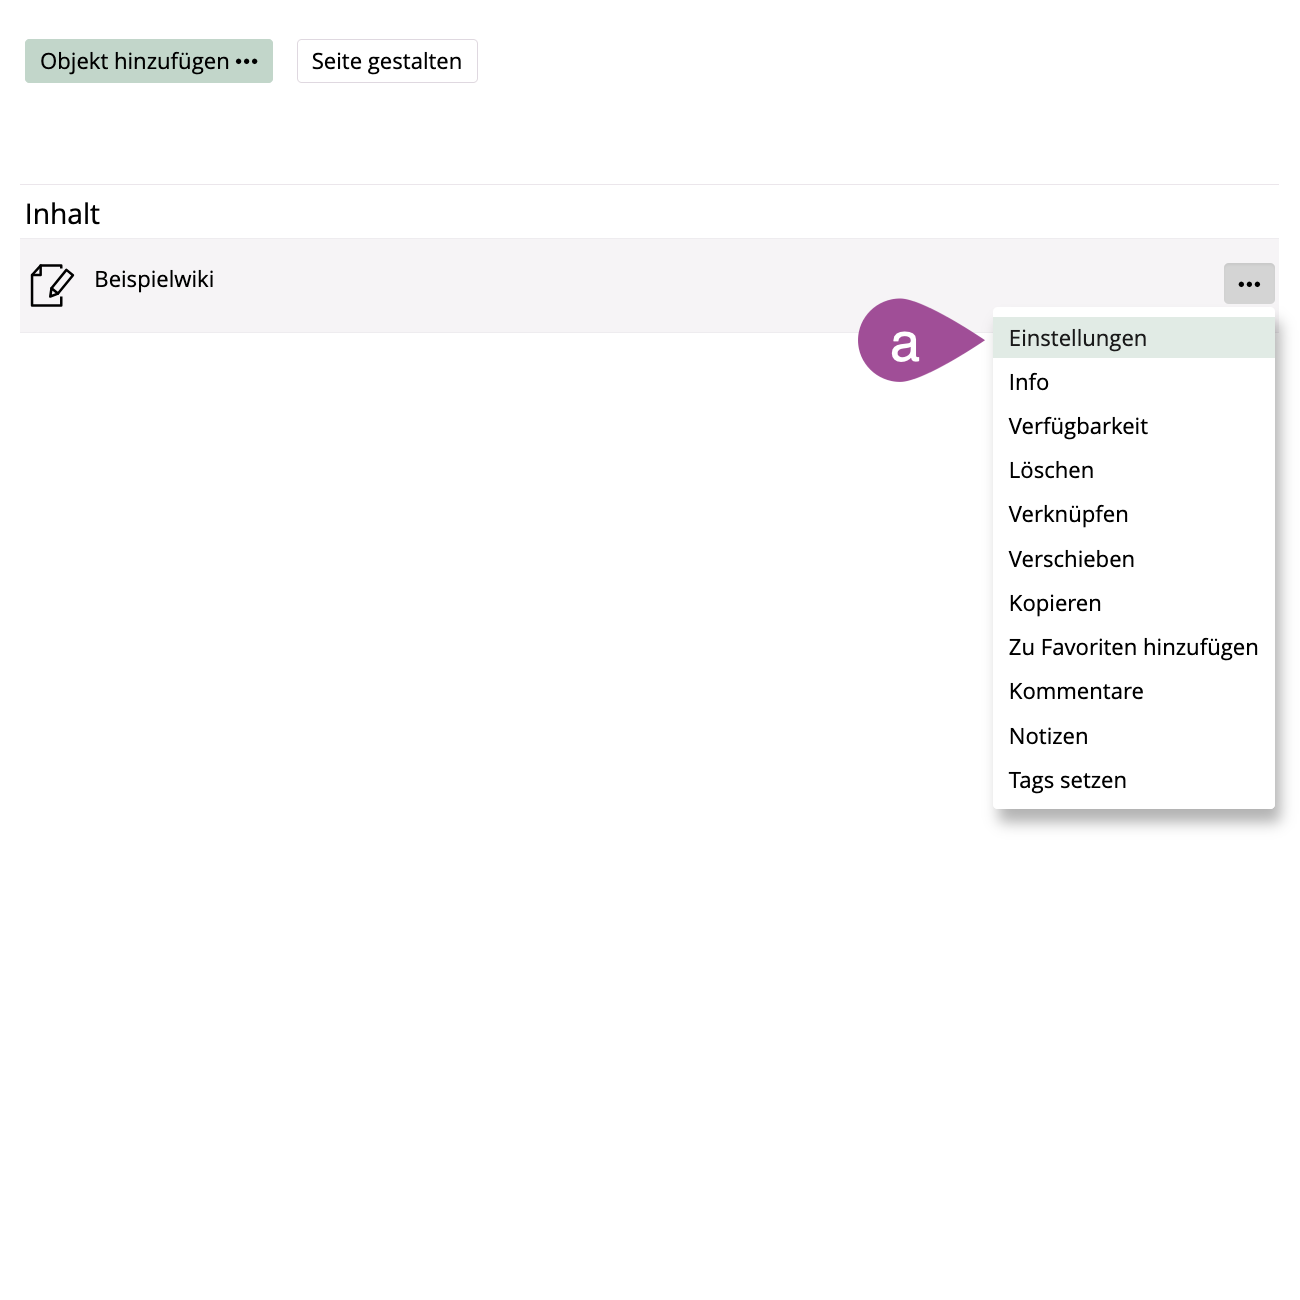
| Go to the «Settings» tab.
| ||||
| When «Online», others can access the wiki and co-edit it with you. | ||||
| If checked, users can rate the entire wiki. | ||||
 | If checked, users can rate individual wiki pages for which rating is enabled (see 3.6 Activate rating for a page). | ||||
 | If checked, users can leave «comments» at the bottom of every wiki page. | ||||
| If checked, a linked «Page Overview» (table of contents) is automatically added to wiki pages with at least two headings. Texts that have the paragraph format «Headline 1», «Headline 2», or «Headline 3» in the Page Editor are detected as headings (see "Manual: Page Editor"). Manual: Page Editor | ||||
 | Under «Tile Image» you can upload a tile image for the wiki (see also Manual: Tile design). When inserting images, please follow the recommended image sizes. Notes on image sizes on ILIAS | ||||
 | If checked, you can enter and manage «Custom Metadata» (see 5. Enter & use metadata). | ||||
 | You can enable multiple languages for your wiki. Then, for each page, a copy is created in the other language, and a button is displayed on the pages themselves that allows users to switch languages.
|


.
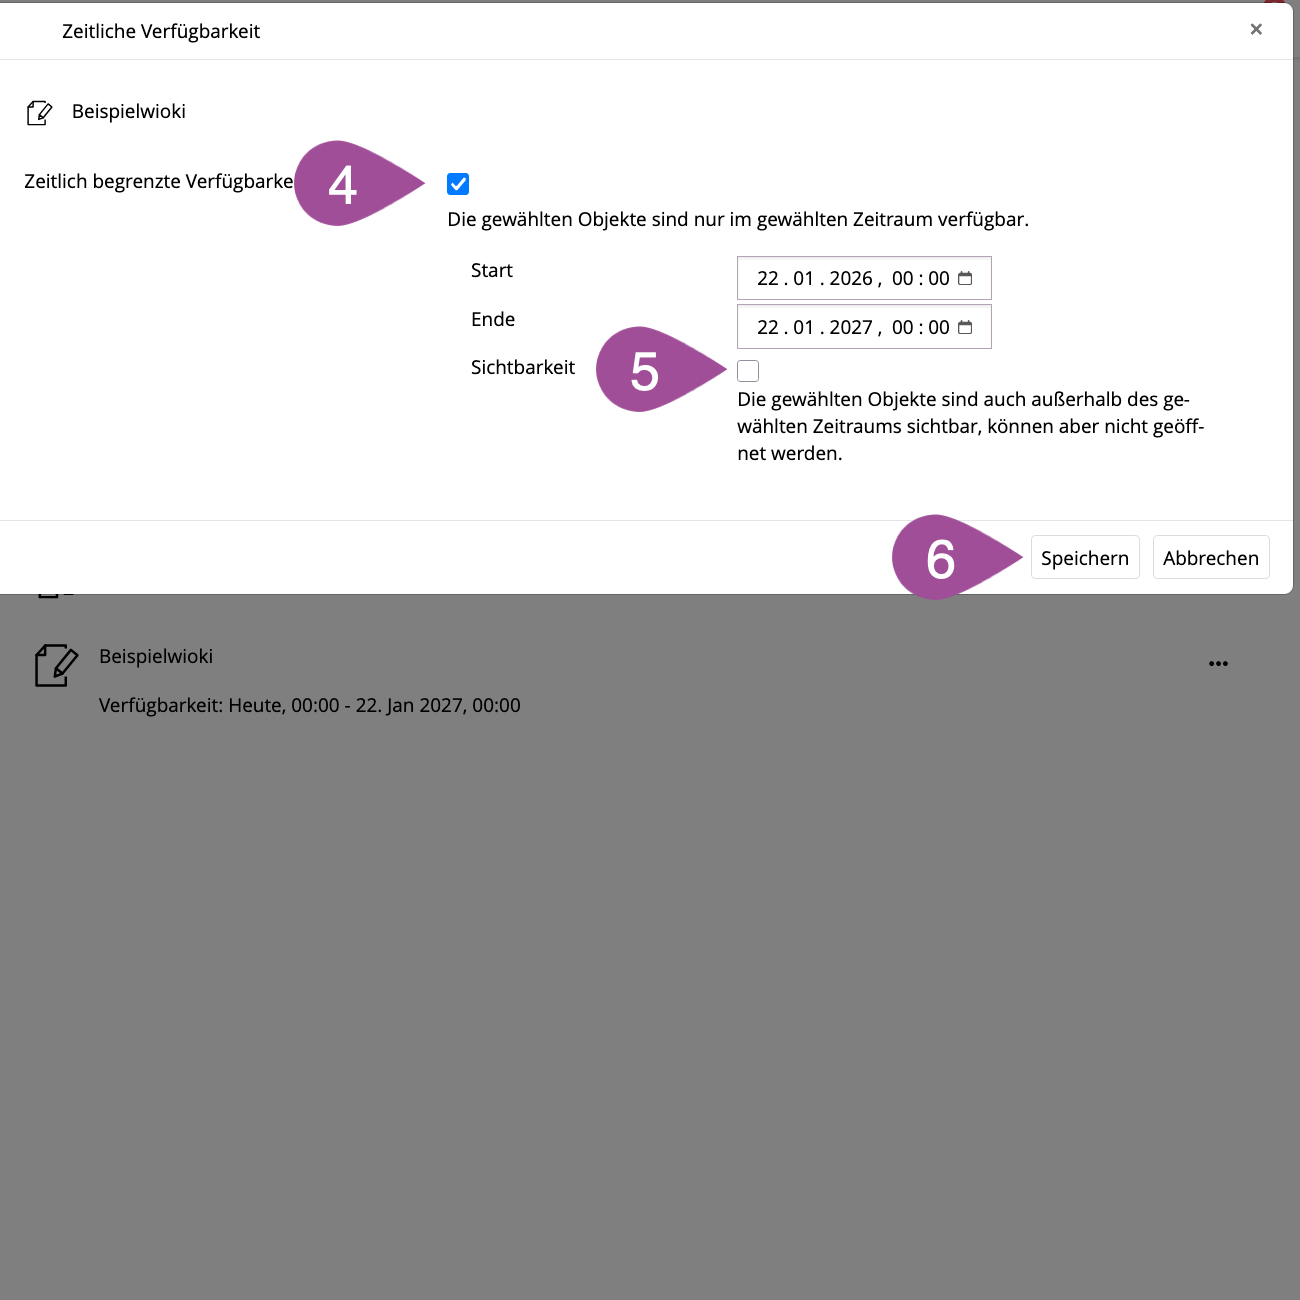
Restrict availability
You can set the period in which the wiki can be accessed. Outside this period, the wiki cannot be accessed.
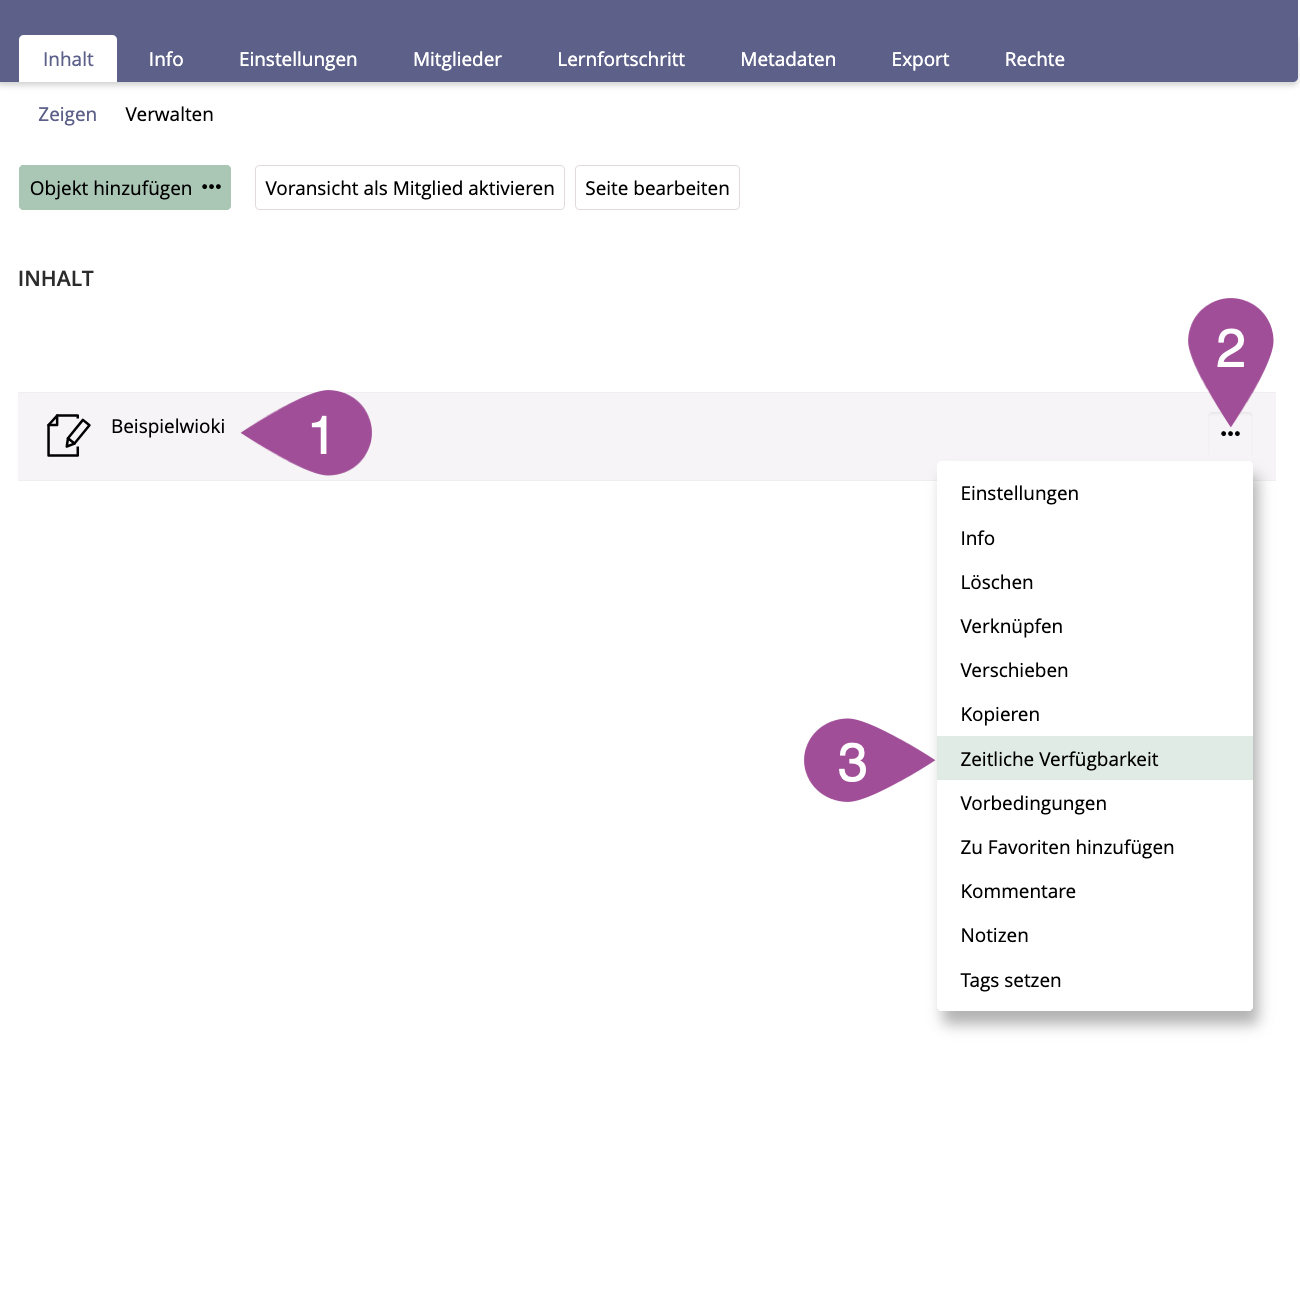
| Go to the location on ILIAS where you have stored the wiki. |
| Open the wiki's actions menu. |
| Select «Availability». |
| Activate the «Temporarily available» option and enter the period during which you want the wiki to be accessible. |
| If checked, the wiki is visible outside the designated availability but cannot be accessed. |
| «Save» your settings. |
.
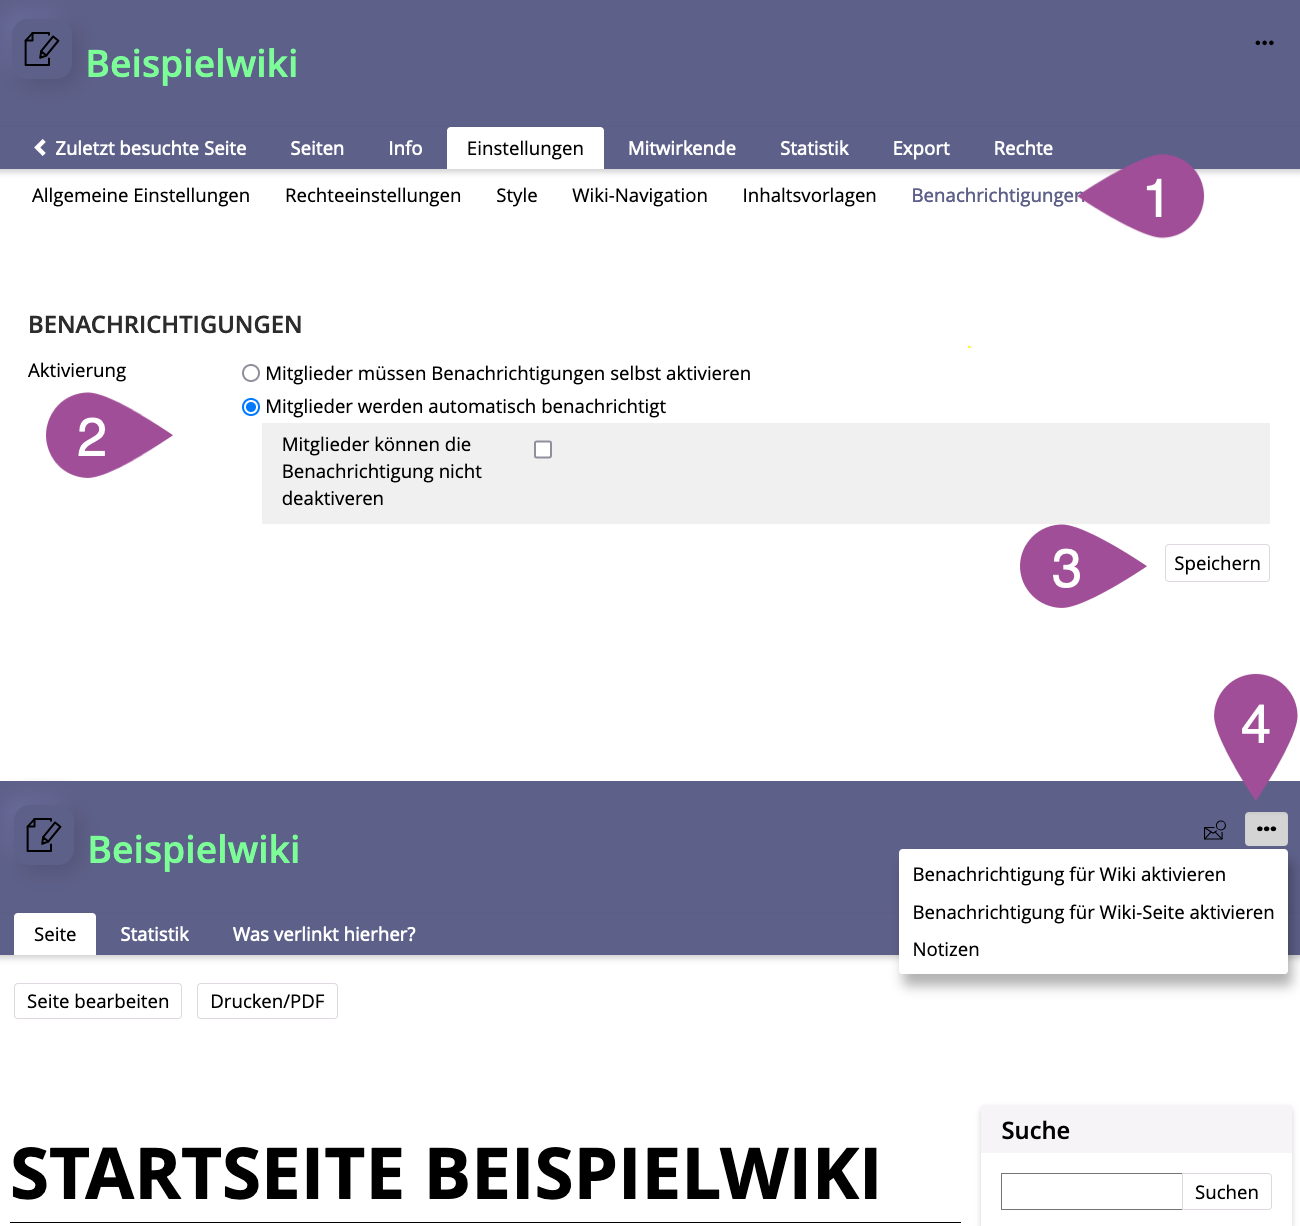
Enable notifications
As an administrator, you can set whether all course or group members are automatically notified of changes to wiki pages or whether they have to enable these notifications themselves.
| In the «Settings» tab, go to the «Notifications» sub-tab. |
| Choose whether members should be notified automatically or have to enable notifications themselves. |
| «Save» your settings. |
| To enable notifications themselves, members have to open the wiki's actions menu. Here they can choose whether they want to be notified about changes on all pages or only on the current page. |
.
3. Create & manage wiki pages
.
Create a wiki page
After you create your wiki, it contains a single start page. You can create as many new wiki pages as you like on this start page. Once a new wiki page is created, you can create new wiki pages on that page as well. The procedure is the same in each case and is done in two steps:
.
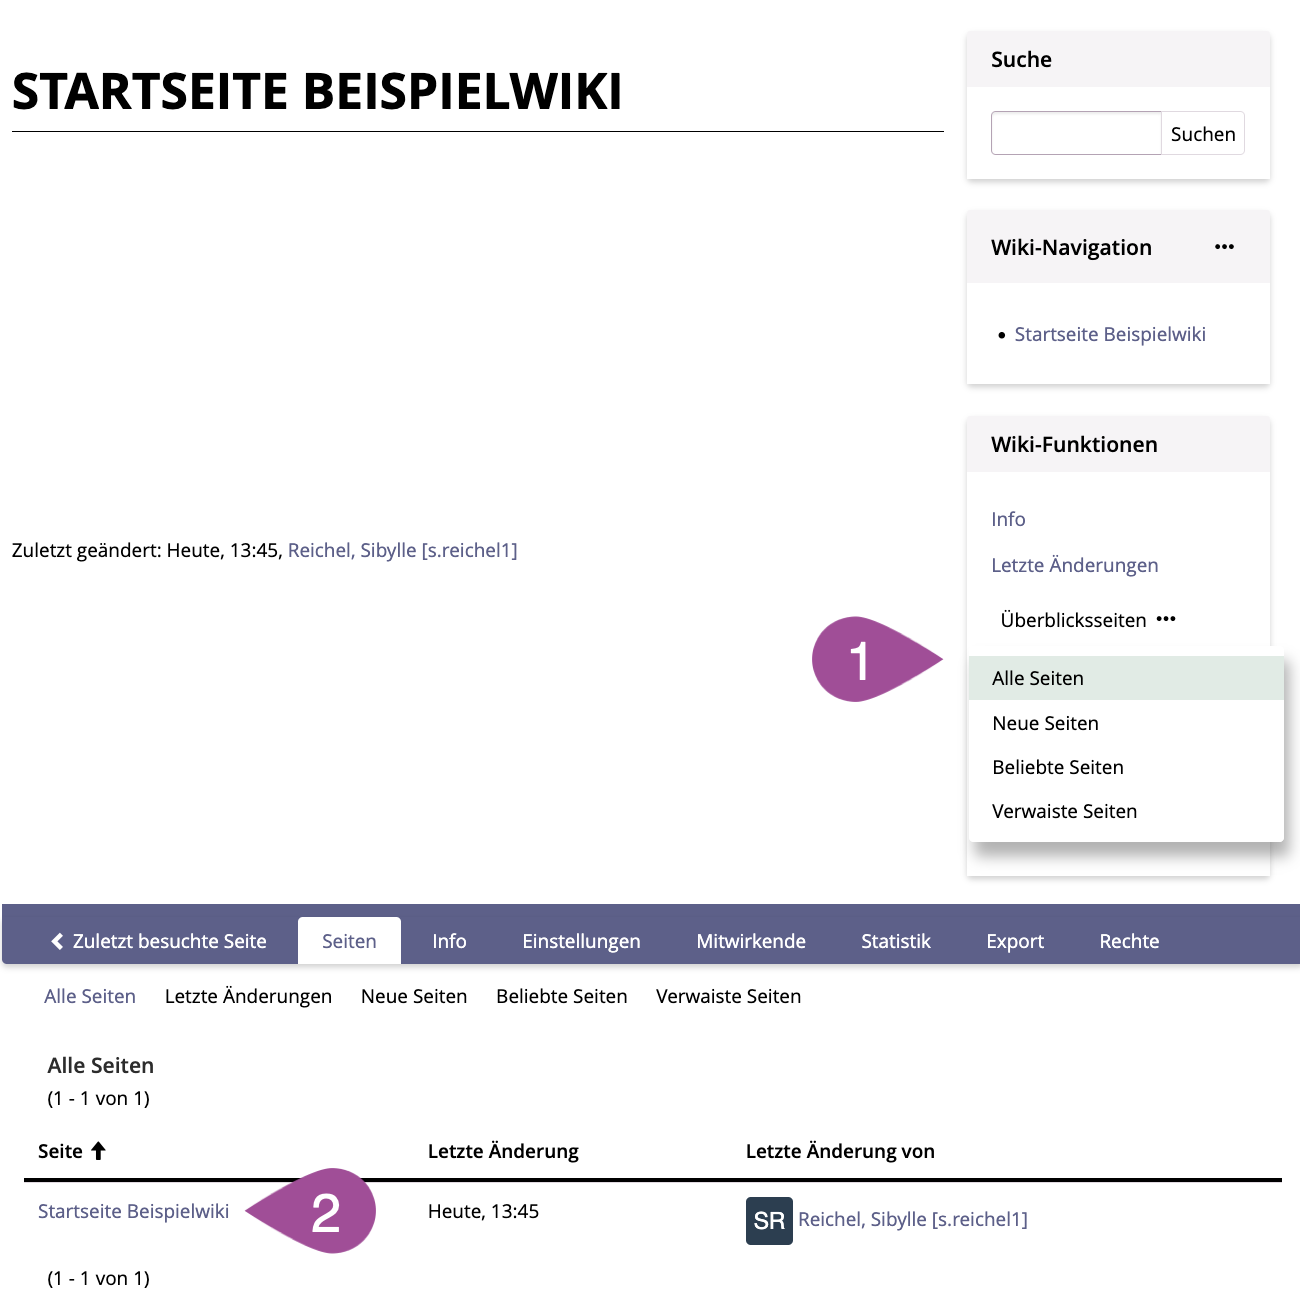
Step 1: Create a page link
| In the «Wiki Functions» box, click on «Page Overview» and select «All Pages». Existing pages are listed in alphabetical order. |
| Click on the page where you want to create the link. |
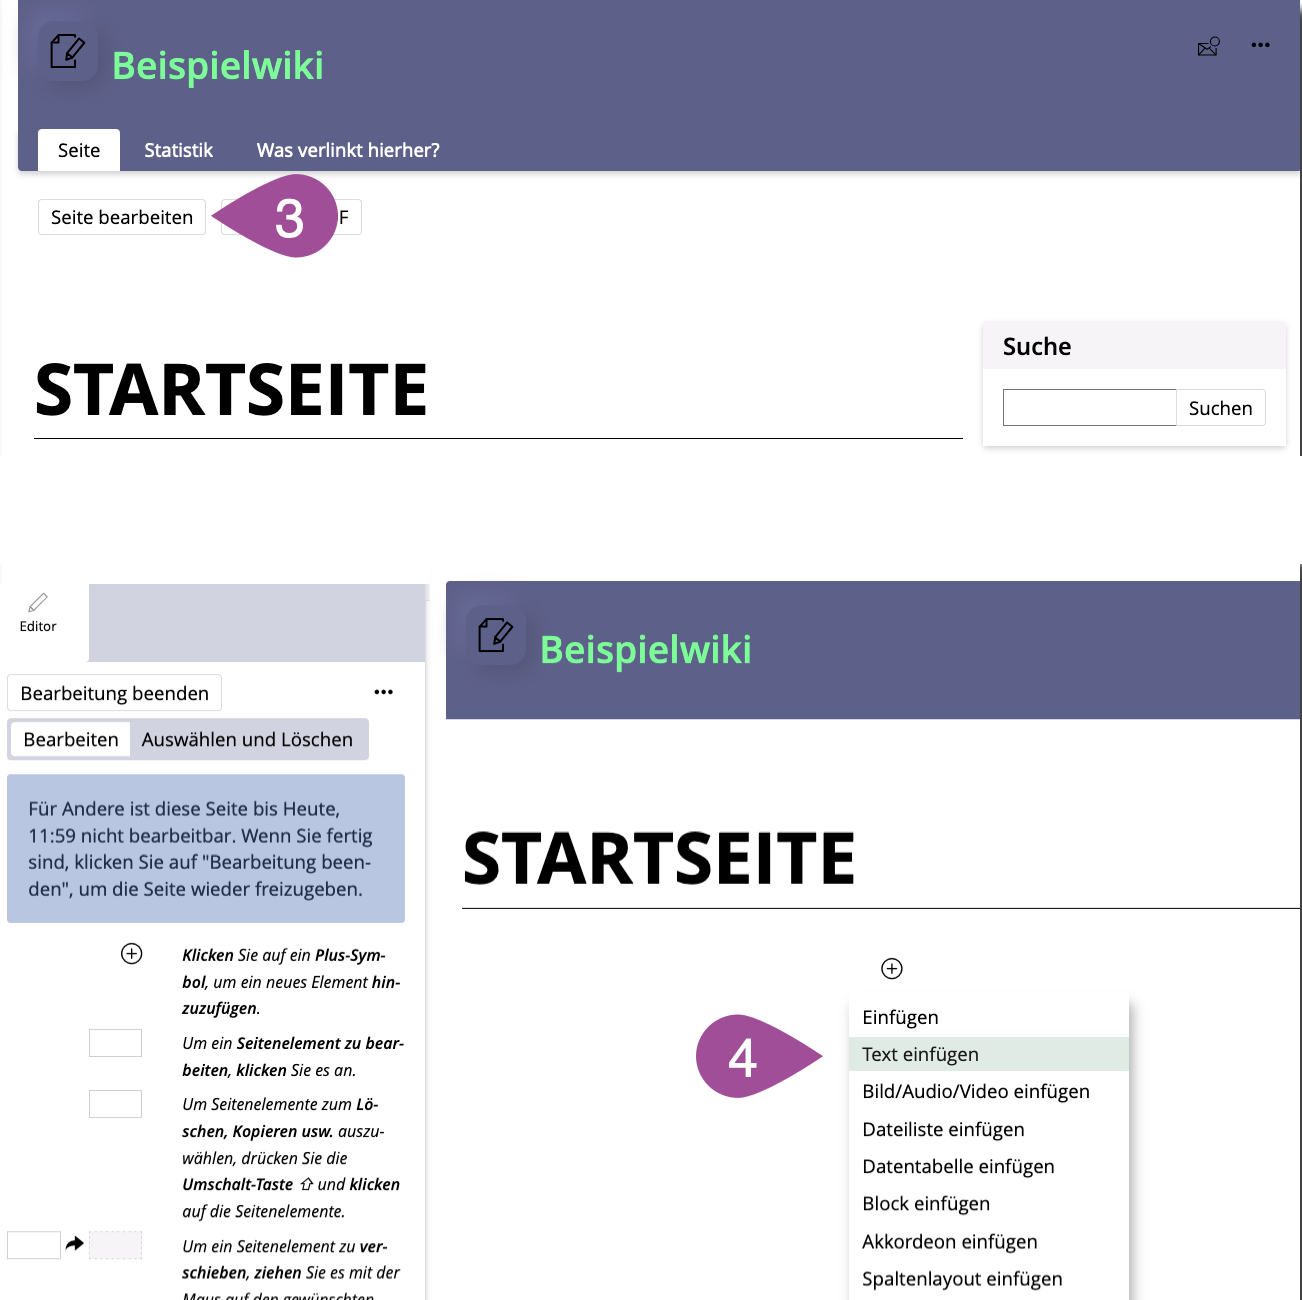
| Click on «Edit Page». |
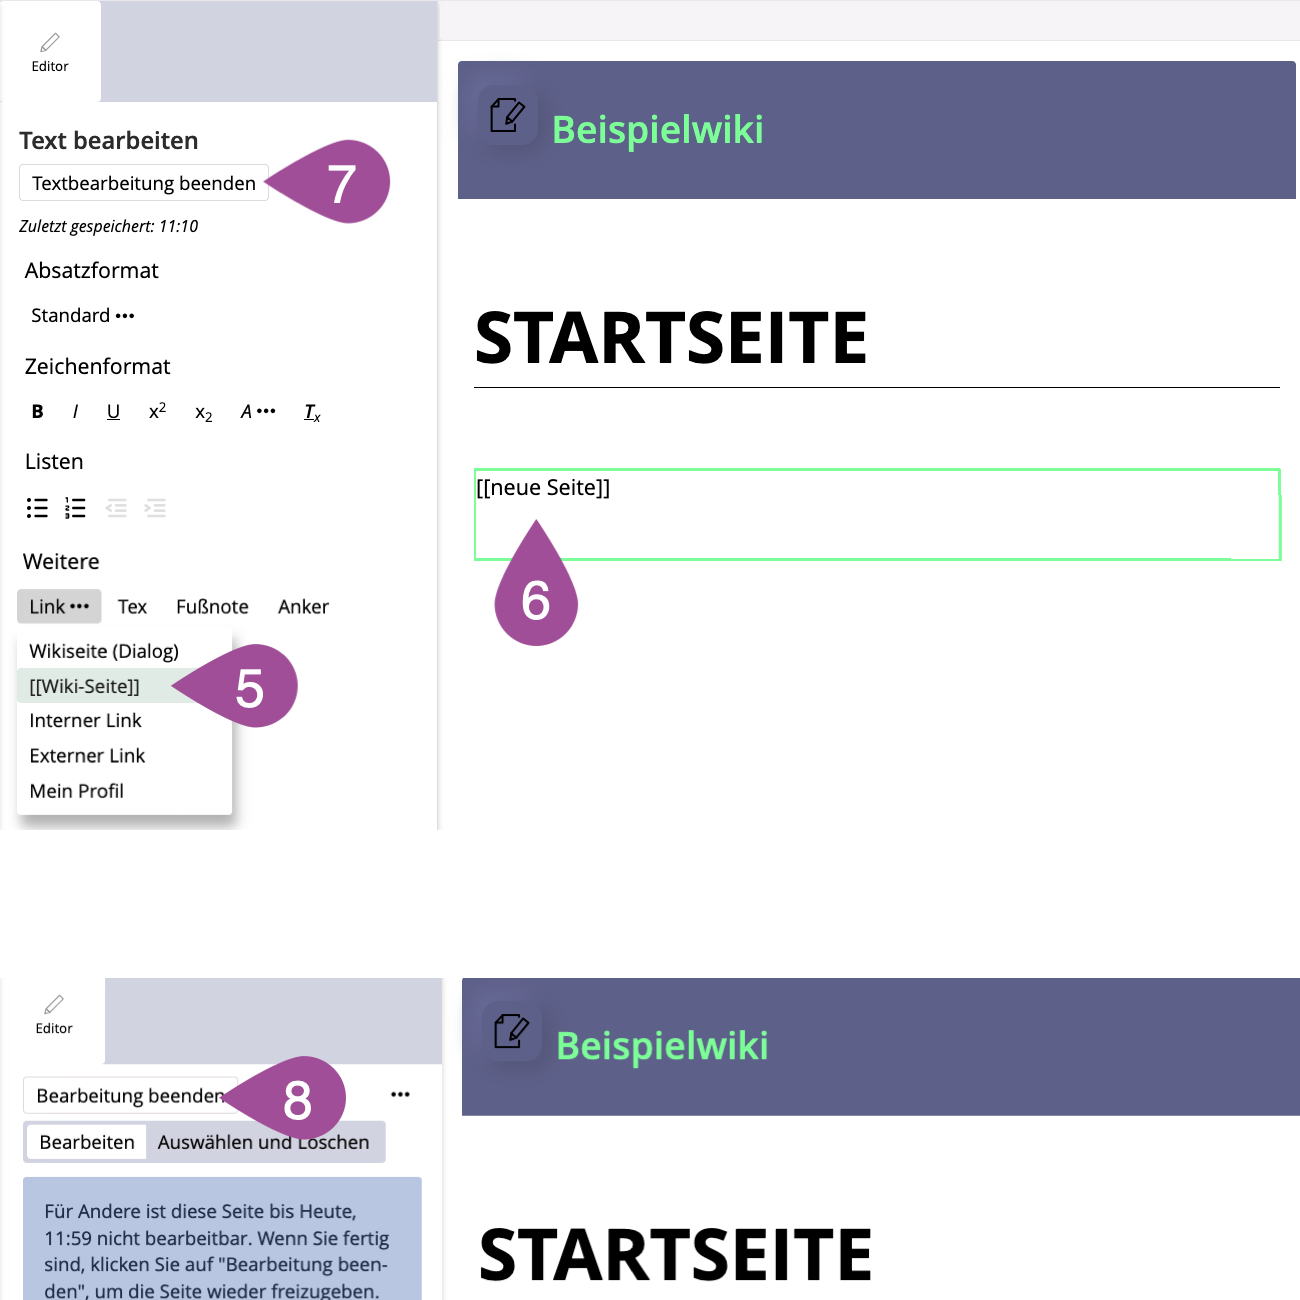
| Click on «+» and select «Insert Text». |
| Click on «Link» and select «[.[Wiki Page].]». Alternatively, you can manually enter two opening square brackets and two closing square brackets in the text field. |
| Place the title of the new page between the opening and closing brackets. In the same way, you can also insert additional links to already existing pages. To do this, enter the title of the existing page between the brackets. |
| Click on «Save and Return». |
| Click on «Finish Editing». |
.
Step 2: Activate a wiki page
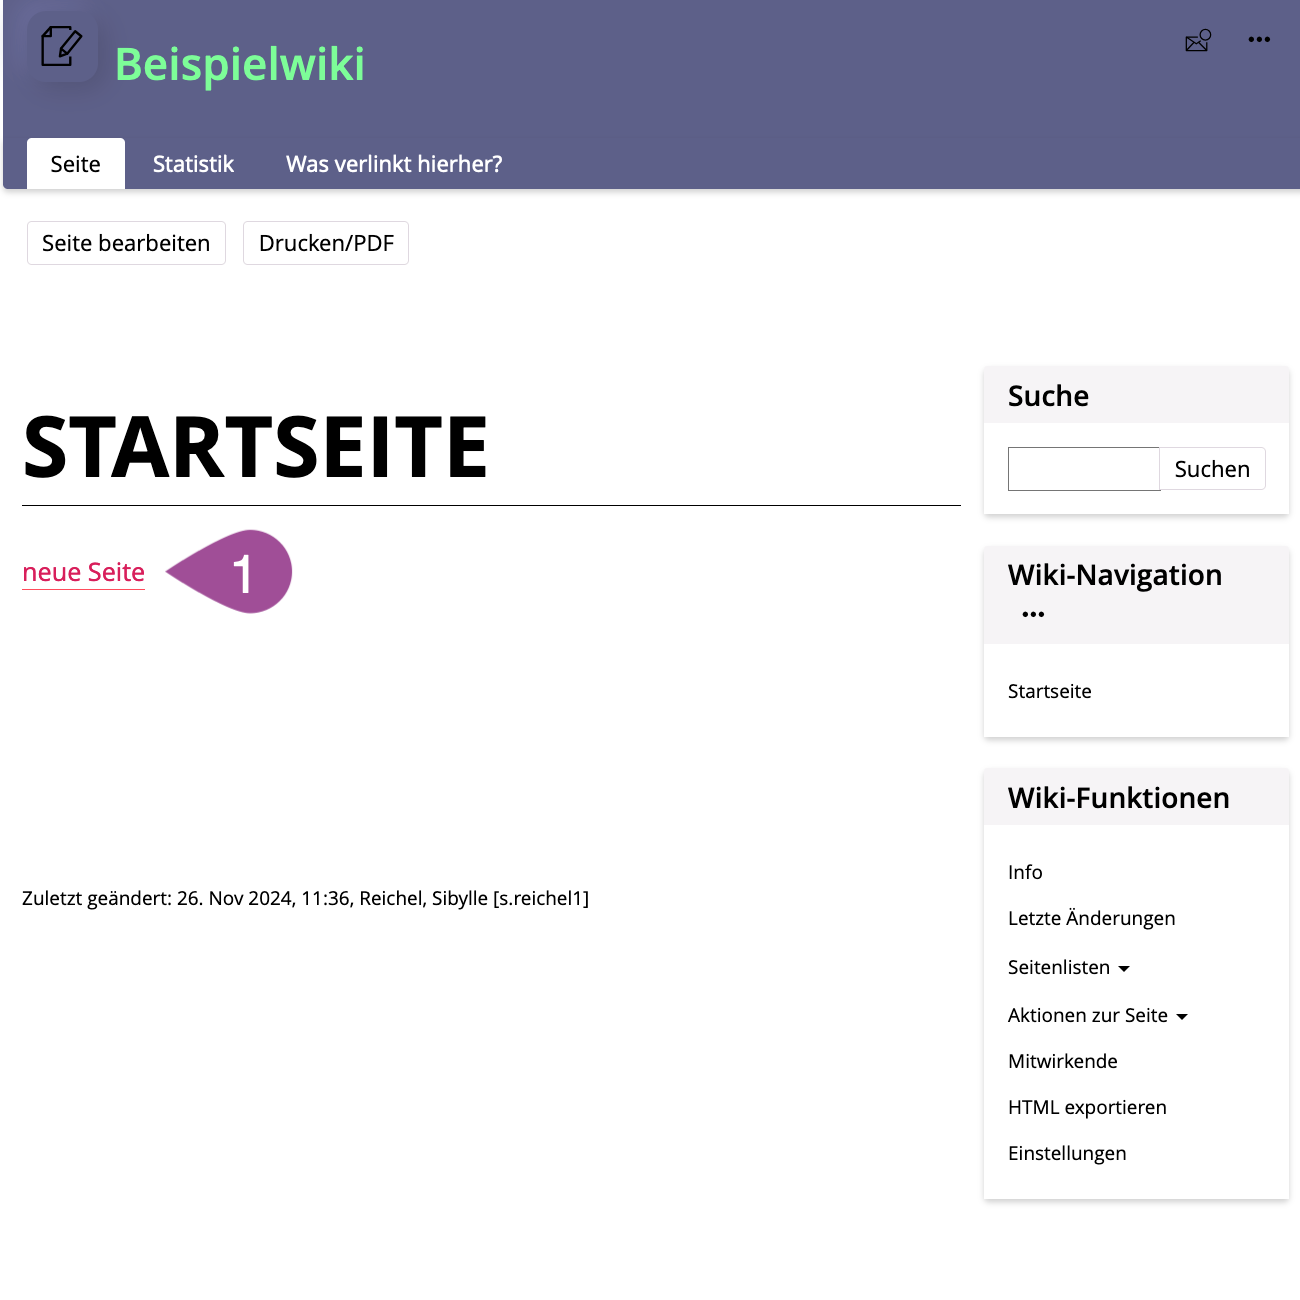
| After you have created a page link, the new link appears on the page. The red color indicates that no page has been created for the link yet. Click on the link to create the page. Afterward, you can add content to the page (see 2.3 Add content to a wiki page). If you have created page templates (see 3.3 Create page templates), you will be presented with the available templates to choose from. Select the template you want and click on «Create Page». |
.
Add content to a wiki page
| In the «Wiki Functions» box, click on «Page Overview» and select «All Pages». Existing pages are listed in alphabetical order. |
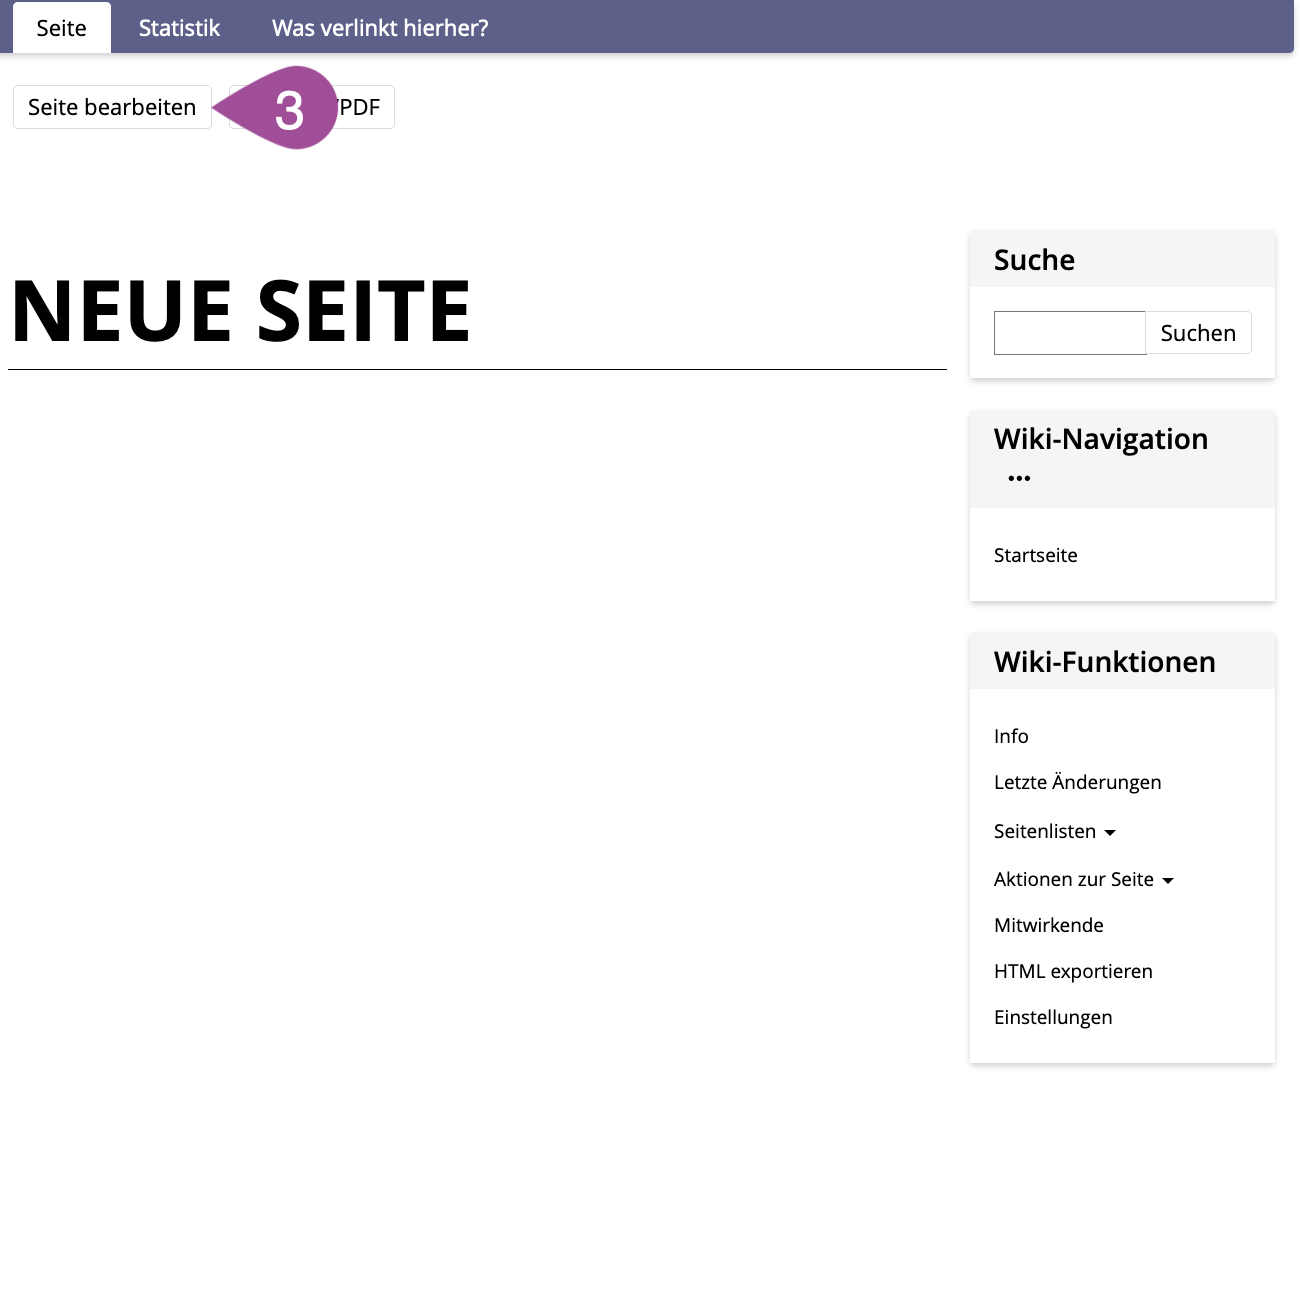
| Click on the page you want to edit. |
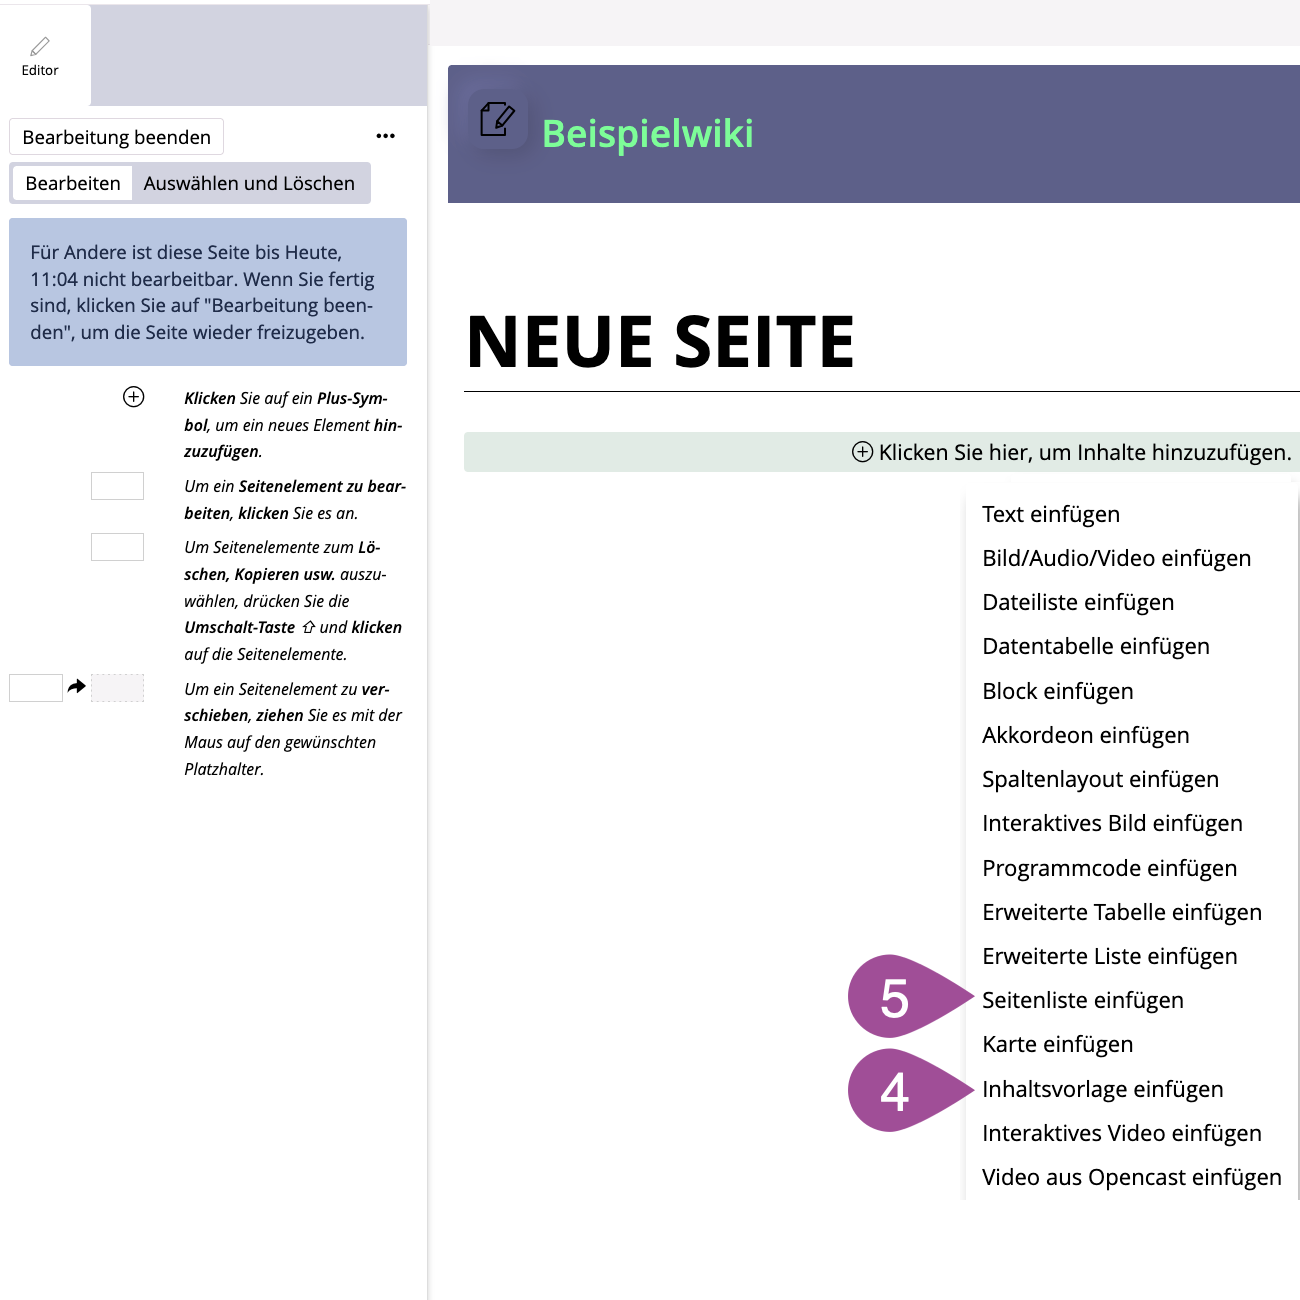
| Click on «Edit Page». This opens the page editor, with which you can add content to your page and design it (see Manual: Page Editor). |
| If you want to add an already existing page template (see 3.3 Create page templates) to your wiki page, you can do so using the «Insert Content Template» option. |
| If you want to add an automatically generated list of other wiki pages with specific metadata (see 5. Enter & use metadata), you can do so via the «Insert Page List» option. Page lists update automatically when pages with the appropriate metadata are created or removed. |
.
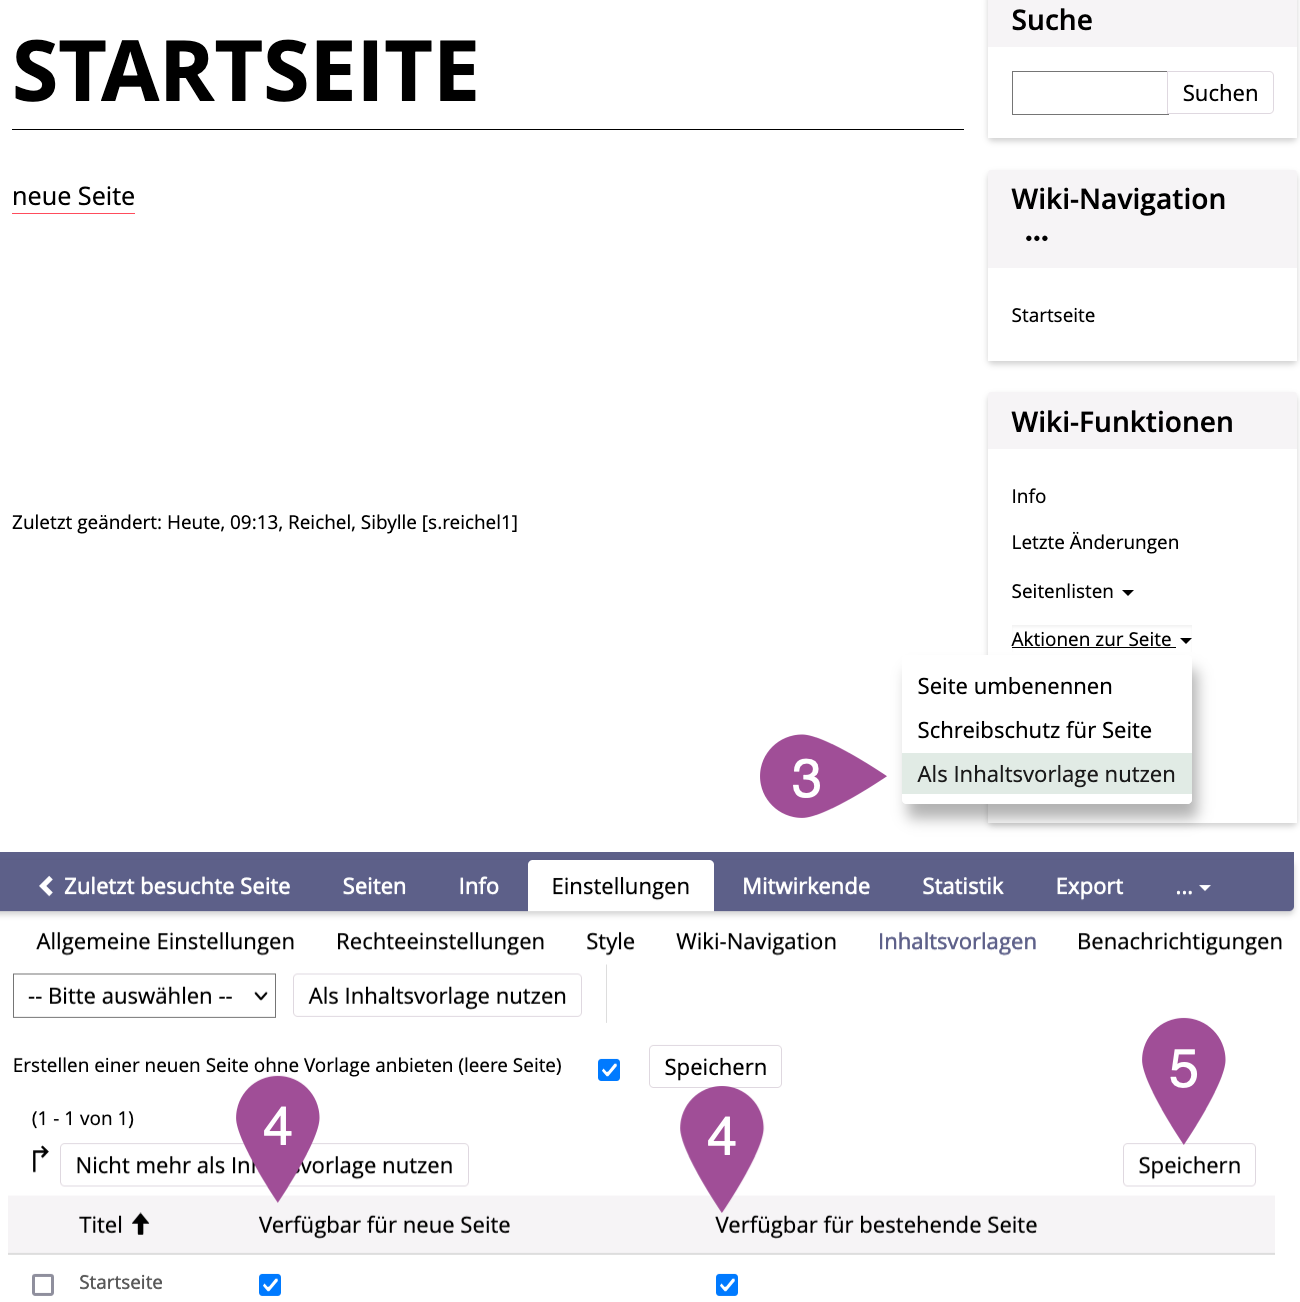
Create page templates
If you want to create several wiki pages with the same layout, you can save existing pages as a template. You can then use this template to create new pages (see 3.1 Create a wiki page) and/or add it to existing pages (see Point 4). This way, you do not have to insert recurring elements on each page individually.
| In the «Wiki Functions» box, click on «Page Overview» and select «All Pages». Existing pages are listed in alphabetical order. |
| Click on the page you want to use as a template. |
| In the «Wiki Functions» box, click on «Page Actions» and select «Set Template Status». |
| Specify whether the content template should be available for new and/or existing pages. |
| «Save» your settings. |
.
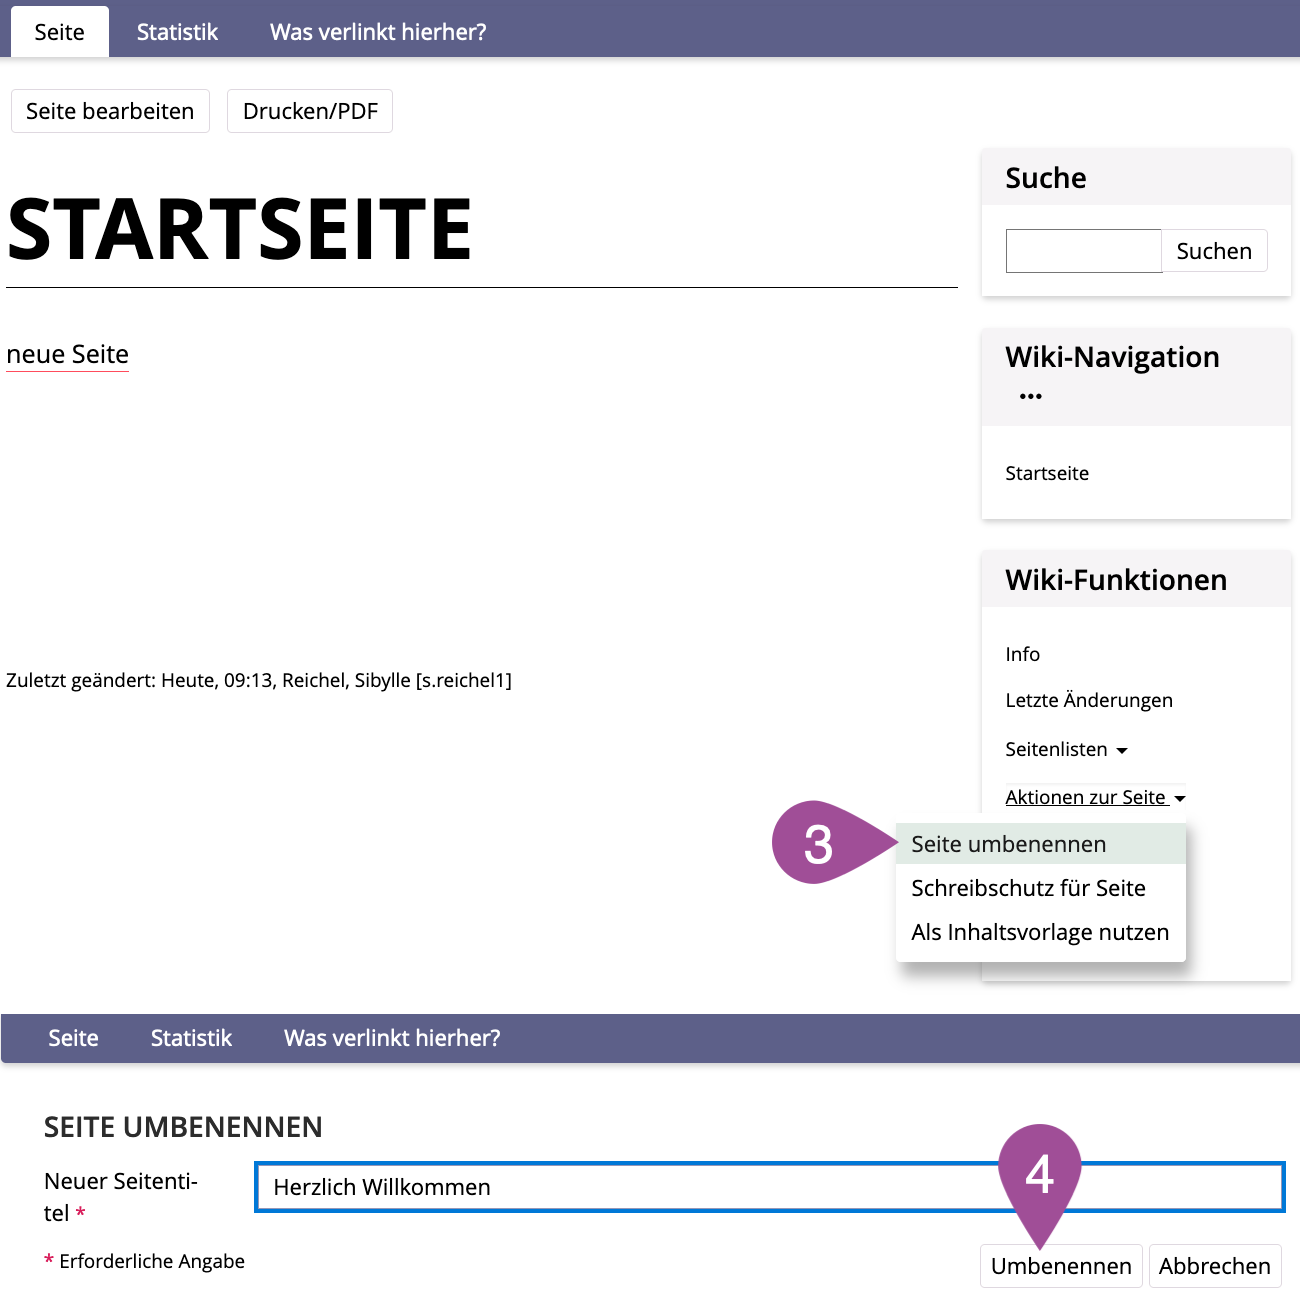
Rename a wiki page
| In the «Wiki Functions» box, click on «Page Overview» and select «All Pages». Existing pages are listed in alphabetical order. |
| Click on the page you want to raname. |
| In the «Wiki Functions» box, click on «Page Actions» and select «Rename Page». |
| Enter the new title and click «Rename». The link used to create the wiki page is automatically adjusted to the new title. Do not modify only the creation link of the wiki page. This will cause the reference to the page to be lost and the link will no longer link to the intended page. |
.
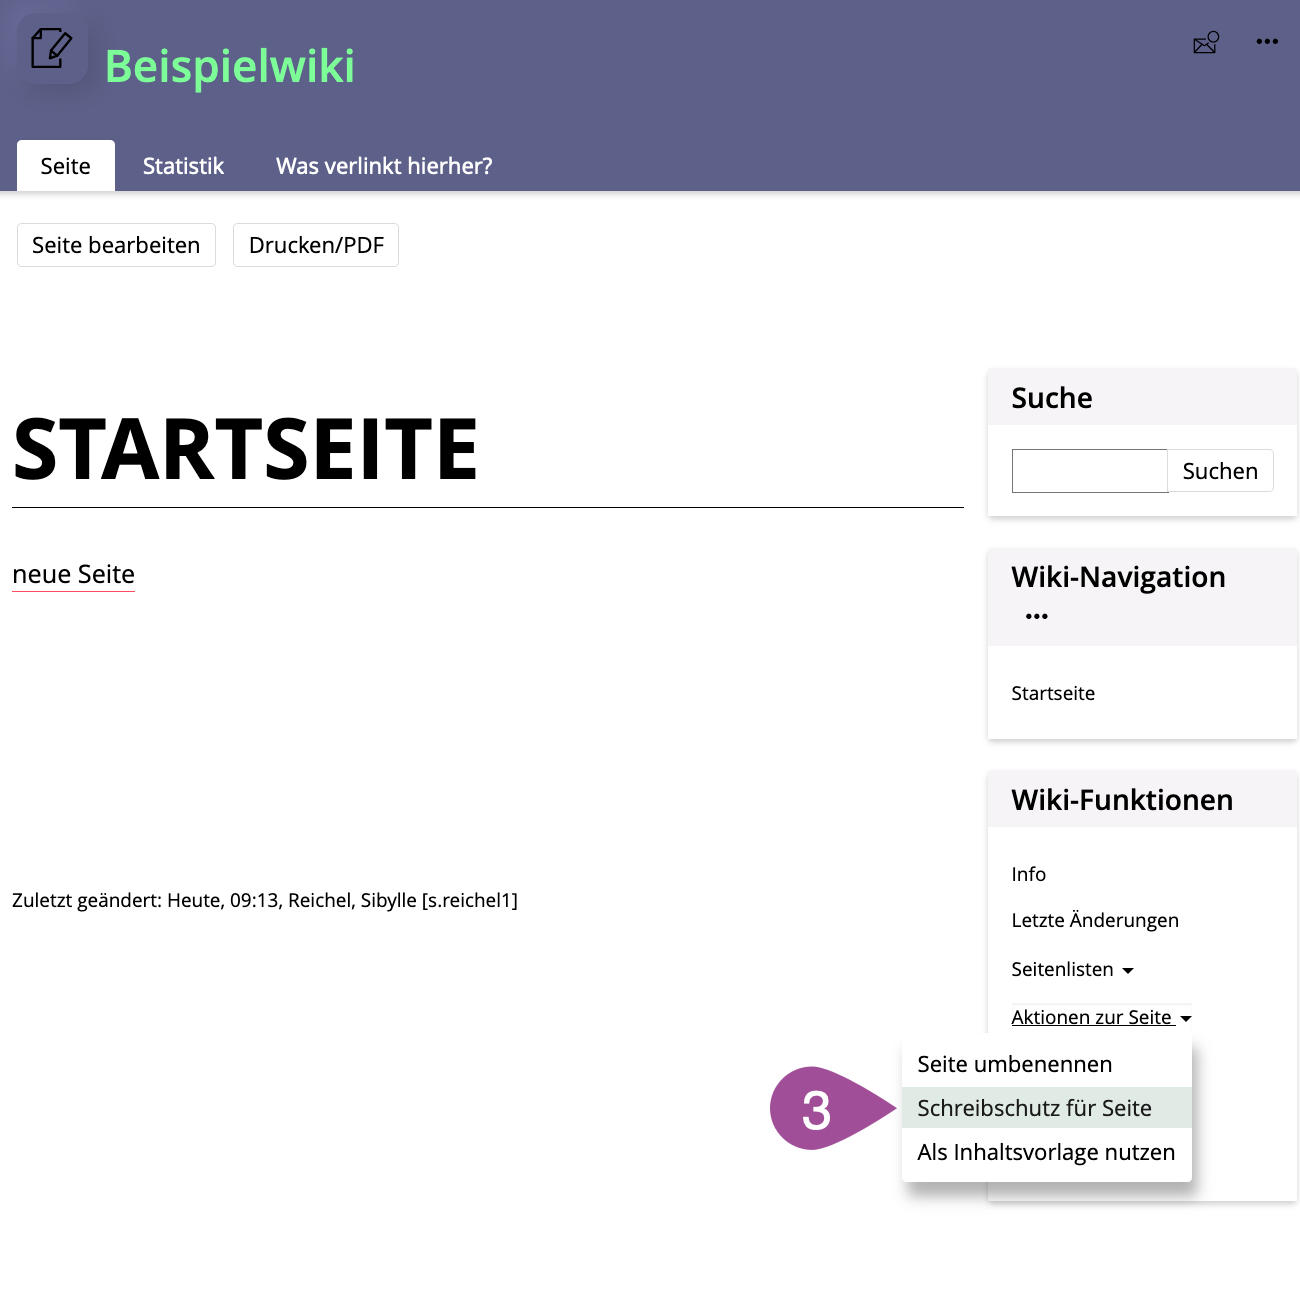
Set a page to read-only
You can set read-only protection for individual pages so that only users with permission to «Edit Settings» can edit this page. Students usually do not have this permission.
| In the «Wiki Functions» box, click on «Page Overview» and select «All Pages». Existing pages are listed in alphabetical order. |
| Click on the page you want to set to read-only. |
| In the «Wiki Functions» box, click on «Page Actions» and select «Set Read-Only». |
.
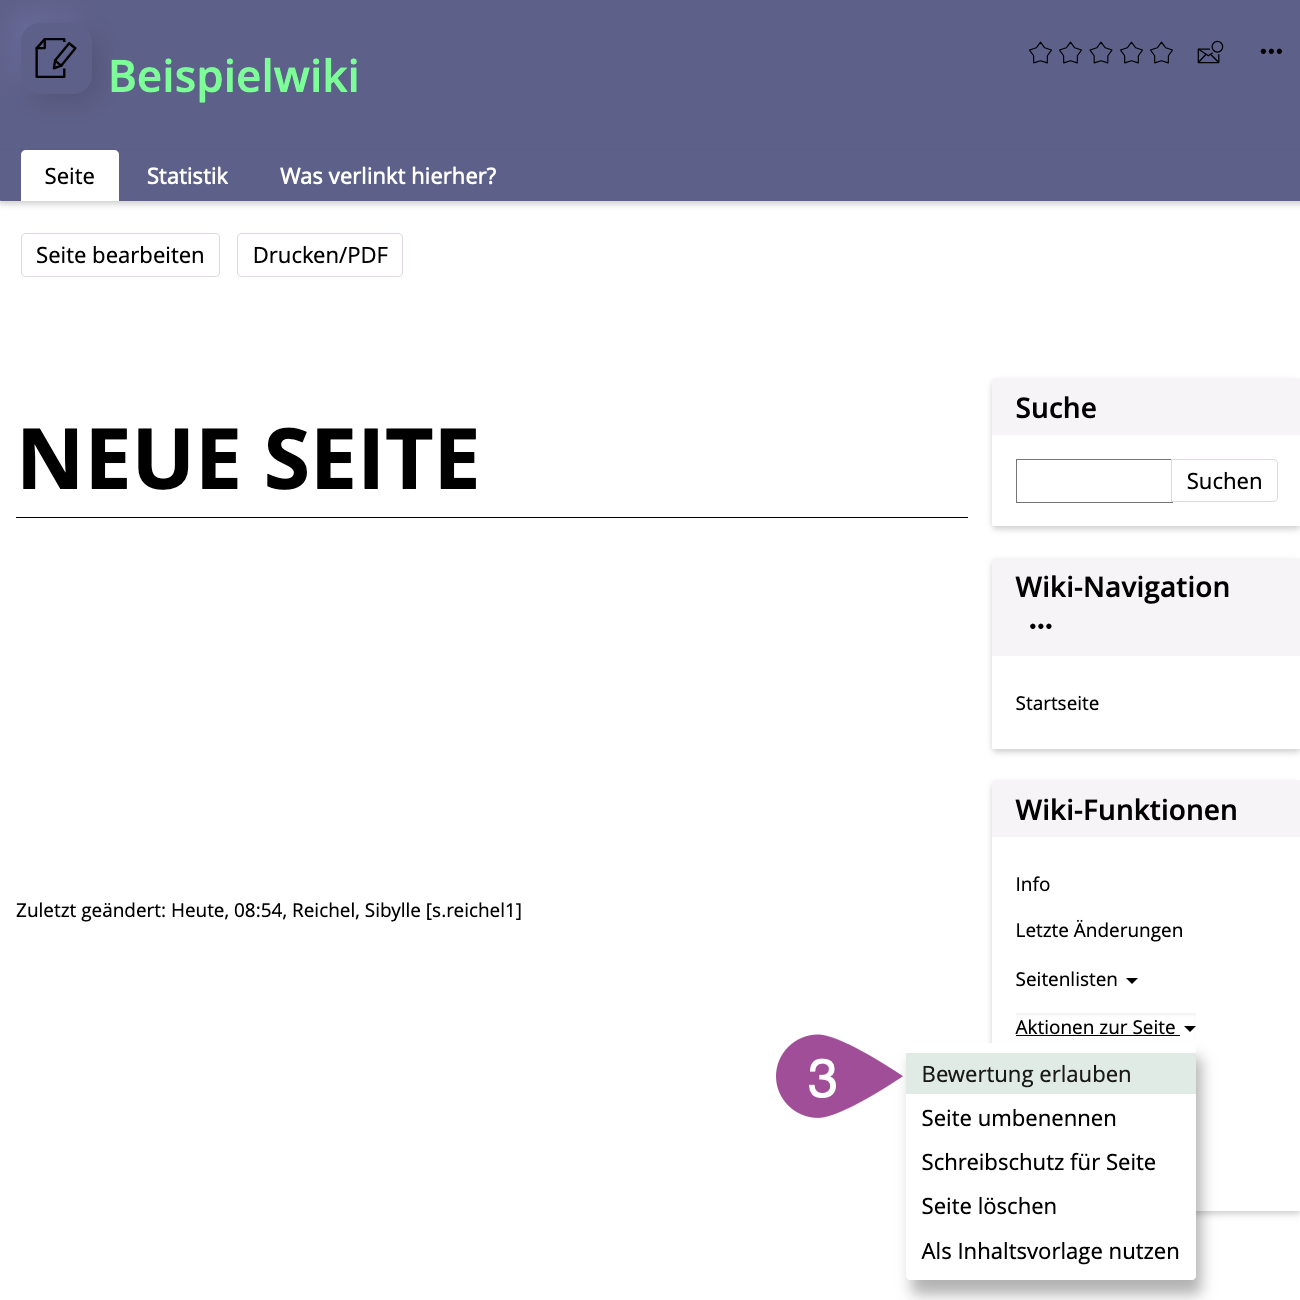
Activate rating for a page
Users can rate wiki pages if you have checked the «Activate Rating For Pages» in the settings. The pages to be rated have to be enabled for a rating individually. Follow the steps below to do so:
| In the «Wiki Functions» box, click on «Page Overview» and select «All Pages». Existing pages are listed in alphabetical order. |
| Click on the page you want to be rated. |
| In the «Wiki Functions» box, click on «Page Actions» and select «Activate Rating». |
.
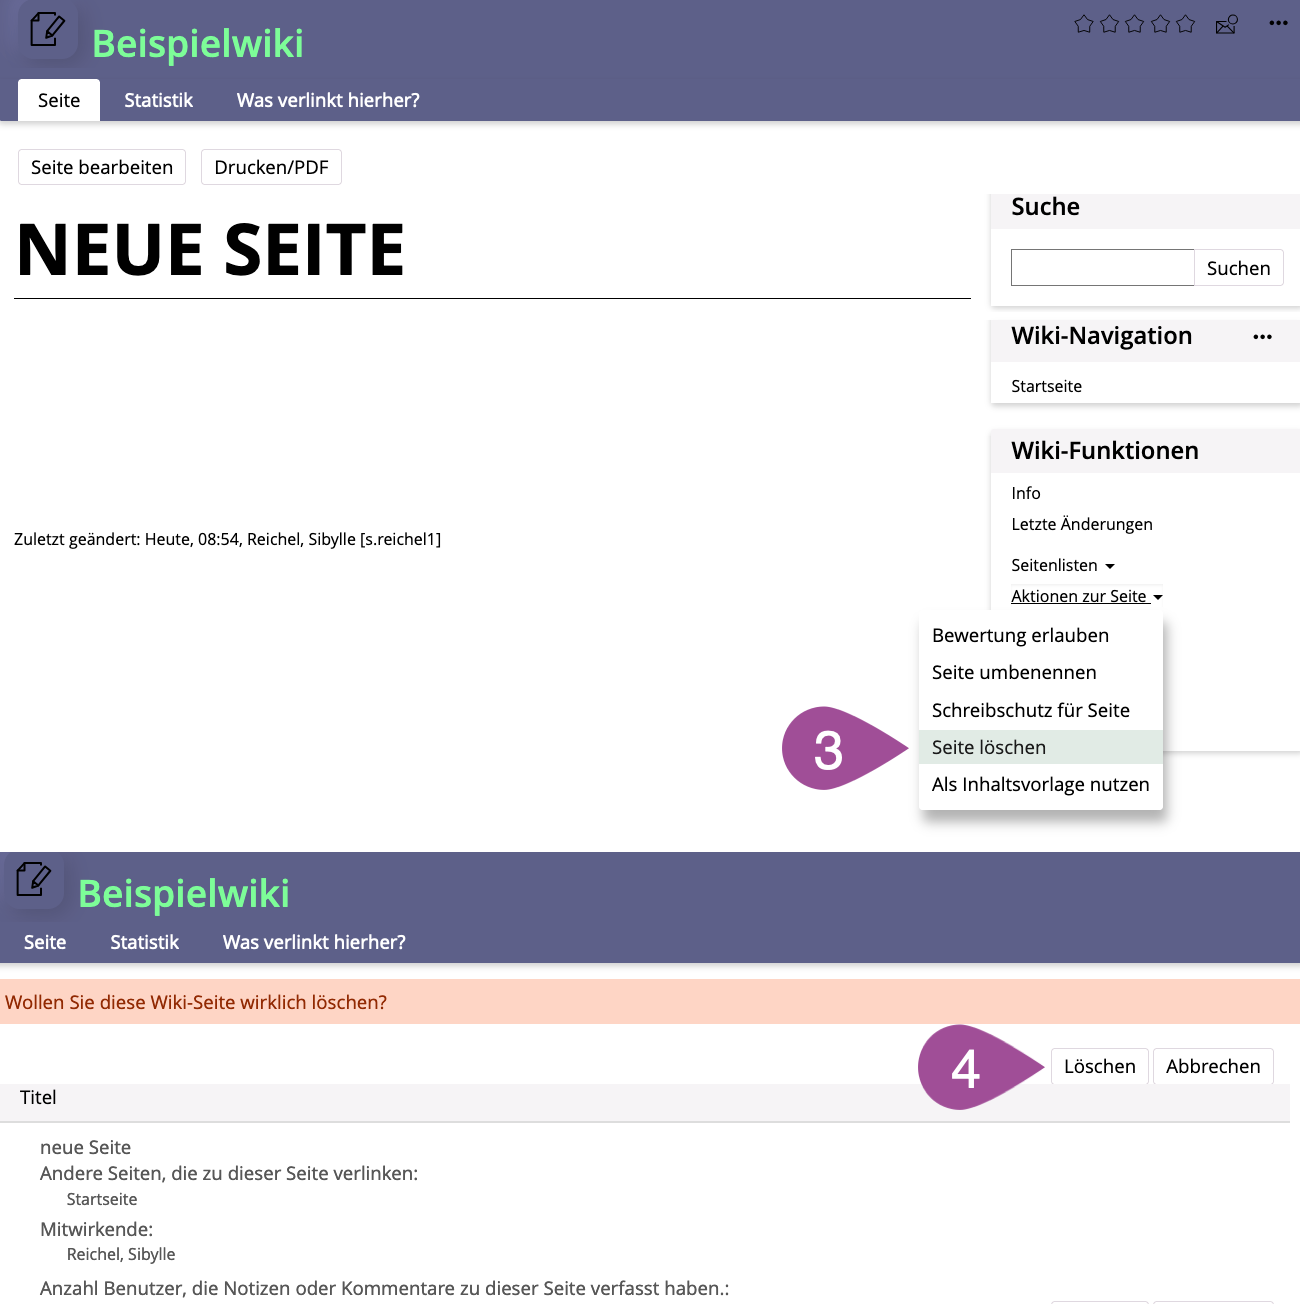
Delete a wiki page
| In the «Wiki Functions» box, click on «Page Overview» and select «All Pages». Existing pages are listed in alphabetical order. |
| Click on the page you want to delete. |
| In the «Wiki Functions» box, click on «Page Actions» and select «Delete Page». |
| Confirm the deletion. |
The start page cannot be deleted
.
4. Edit the wiki navigation
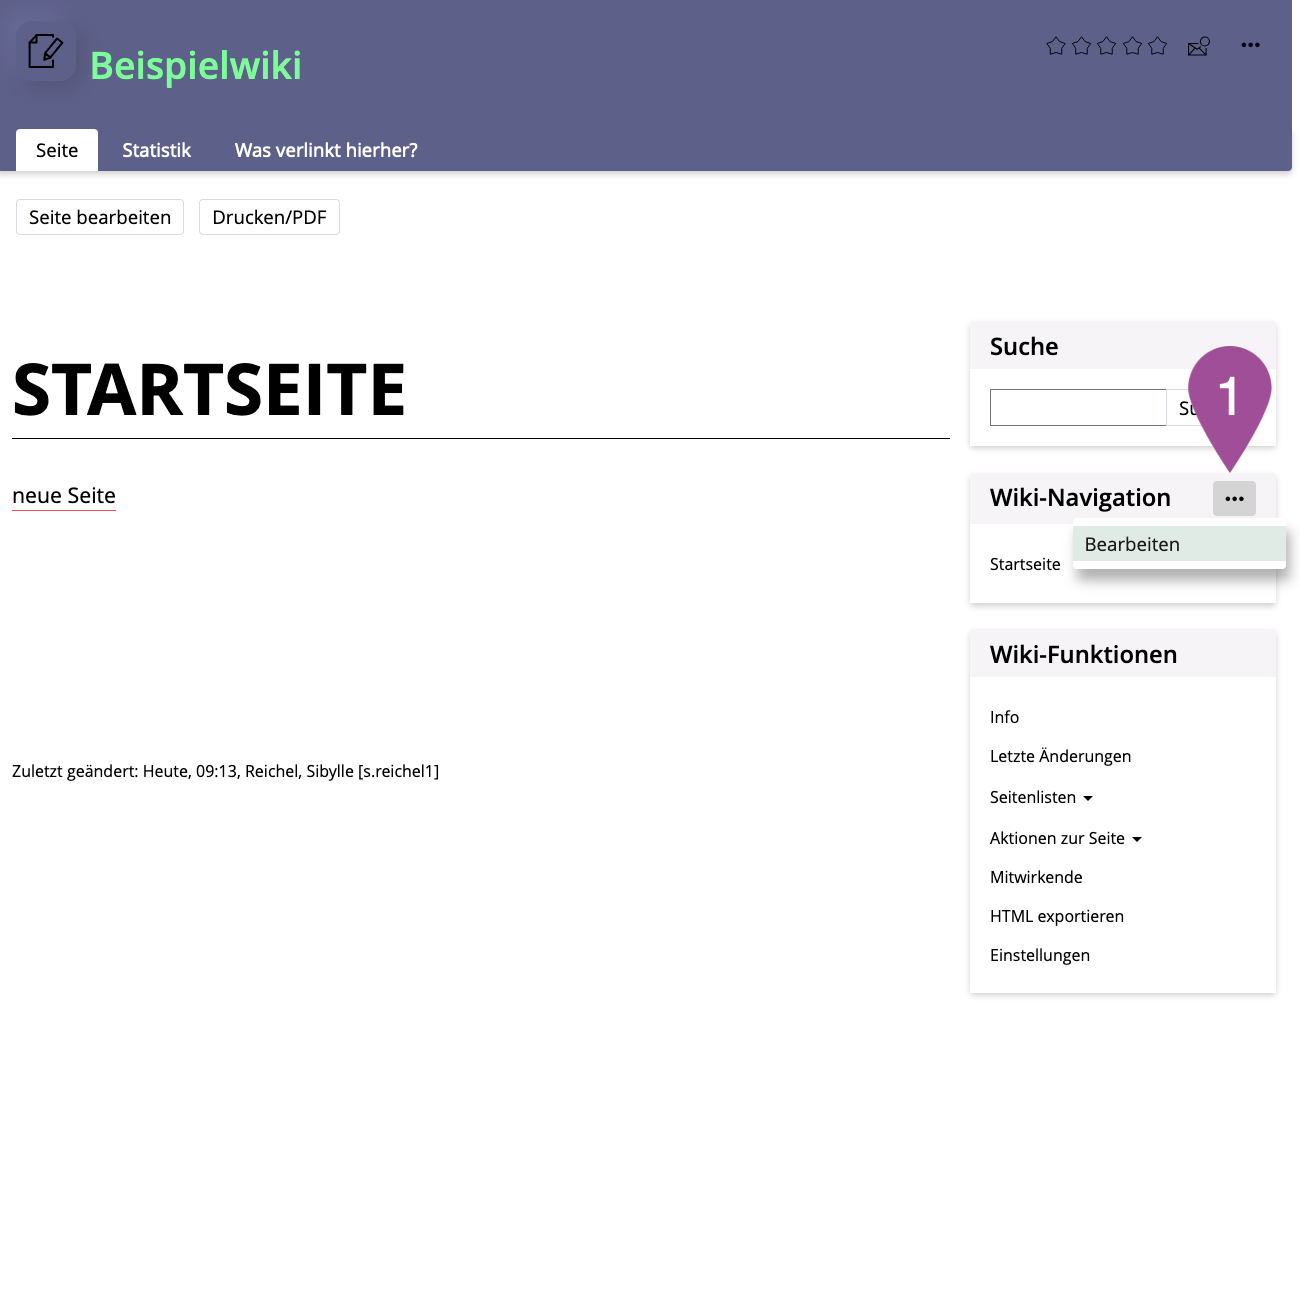
In the «Wiki Navigation», you can list all or selected (important) wiki pages in a three-level hierarchy so that related pages can be easily identified. The wiki navigation is visible on every page and all pages listed there are linked for quick access.
| Open the actions menu of the «Wiki Navigation» and select «Edit». |
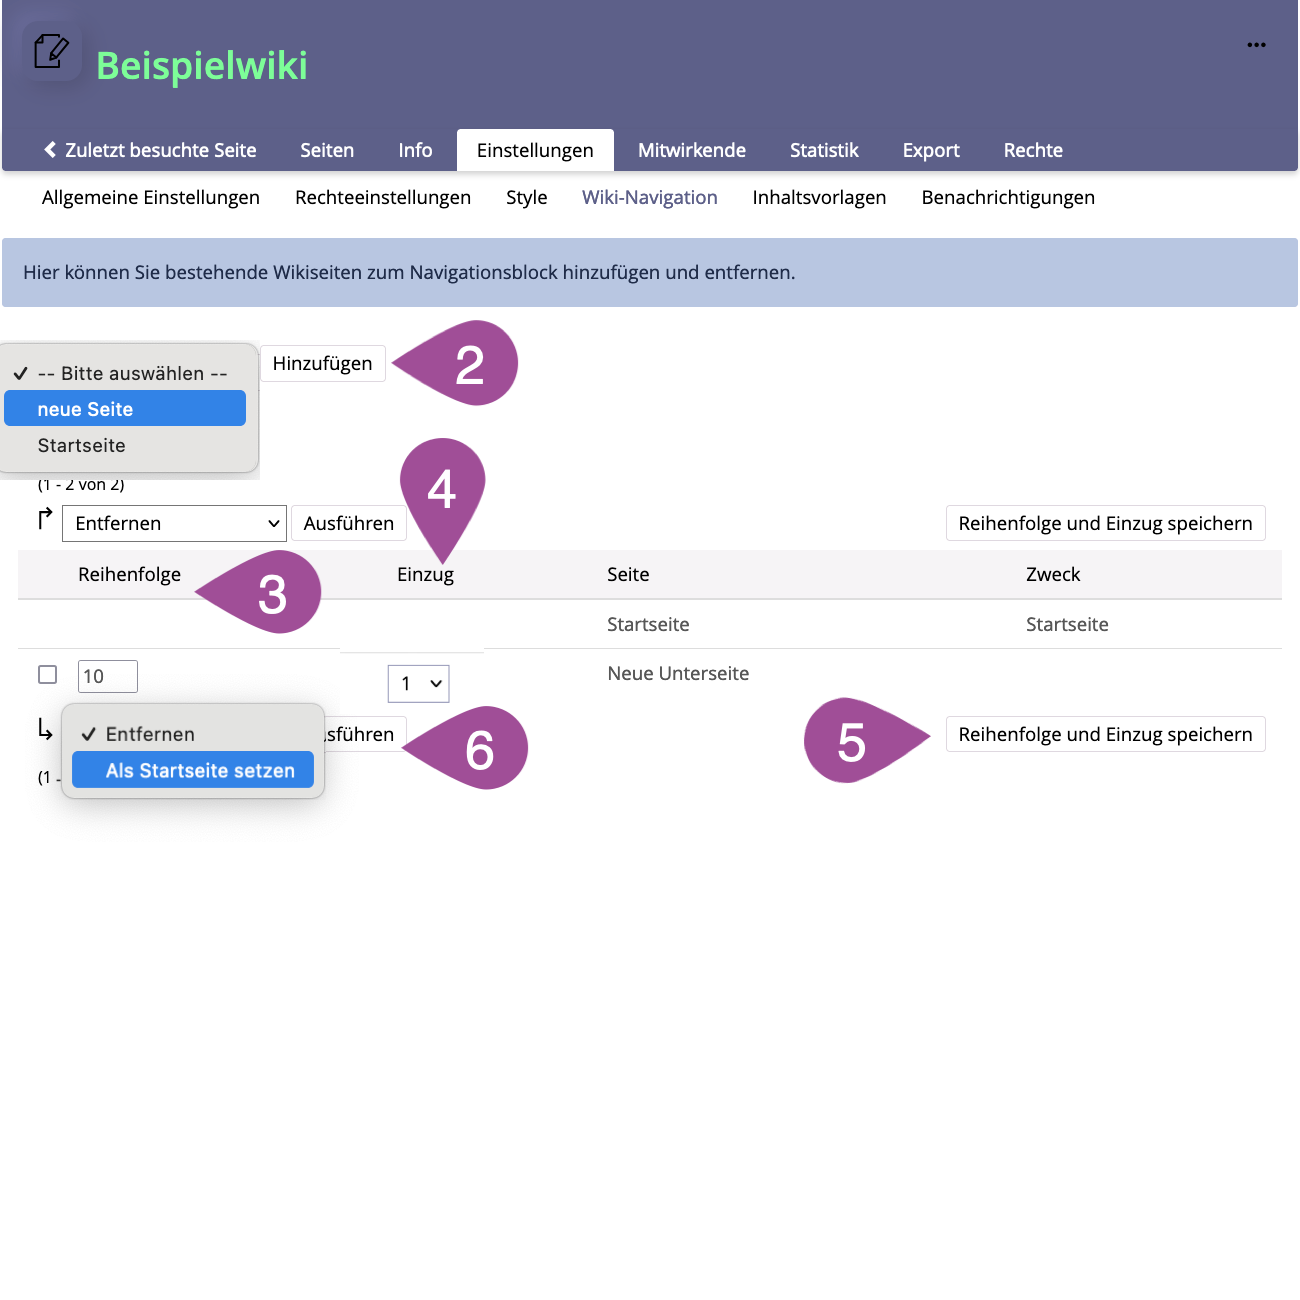
| In the drop-down menu, select a page to be displayed in the «Wiki Navigation» and click «Add». |
| To adjust the «Ordering» of the pages, enter a suitable sequence of numbers. |
| Select the desired «Indentation» to place the pages hierarchically. |
| Click «Save Ordering and Indentation». |
| To change the start page, select the desired page. Select «Set as Start Page» from the drop-down menu and click «Execute». |
.
5. Enter & use metadata
You can use metadata to categorize wiki pages and generate automated page lists (see 3.2 Add content to a wiki page). Metadata consists of metadata sets and individual fields. After you have defined the datasets and fields, you can assign metadata to your wiki pages and have page lists generated automatically based on these assignments.
.
Add a metadata set
You can create one or more data sets. Each set is displayed in the wiki as a separate box.
If you want to use metadata to create page lists (see 3.2 Add content to a wiki page), keep in mind that the content of the page list may depend on whether the selected metadata was created in a single or in multiple datasets:
- Metadata within a single dataset: only those pages to which all selected metadata have been assigned are listed in the page list
- Metadata of different datasets: all pages to which at least one of the selected metadata has been assigned are listed in the page list
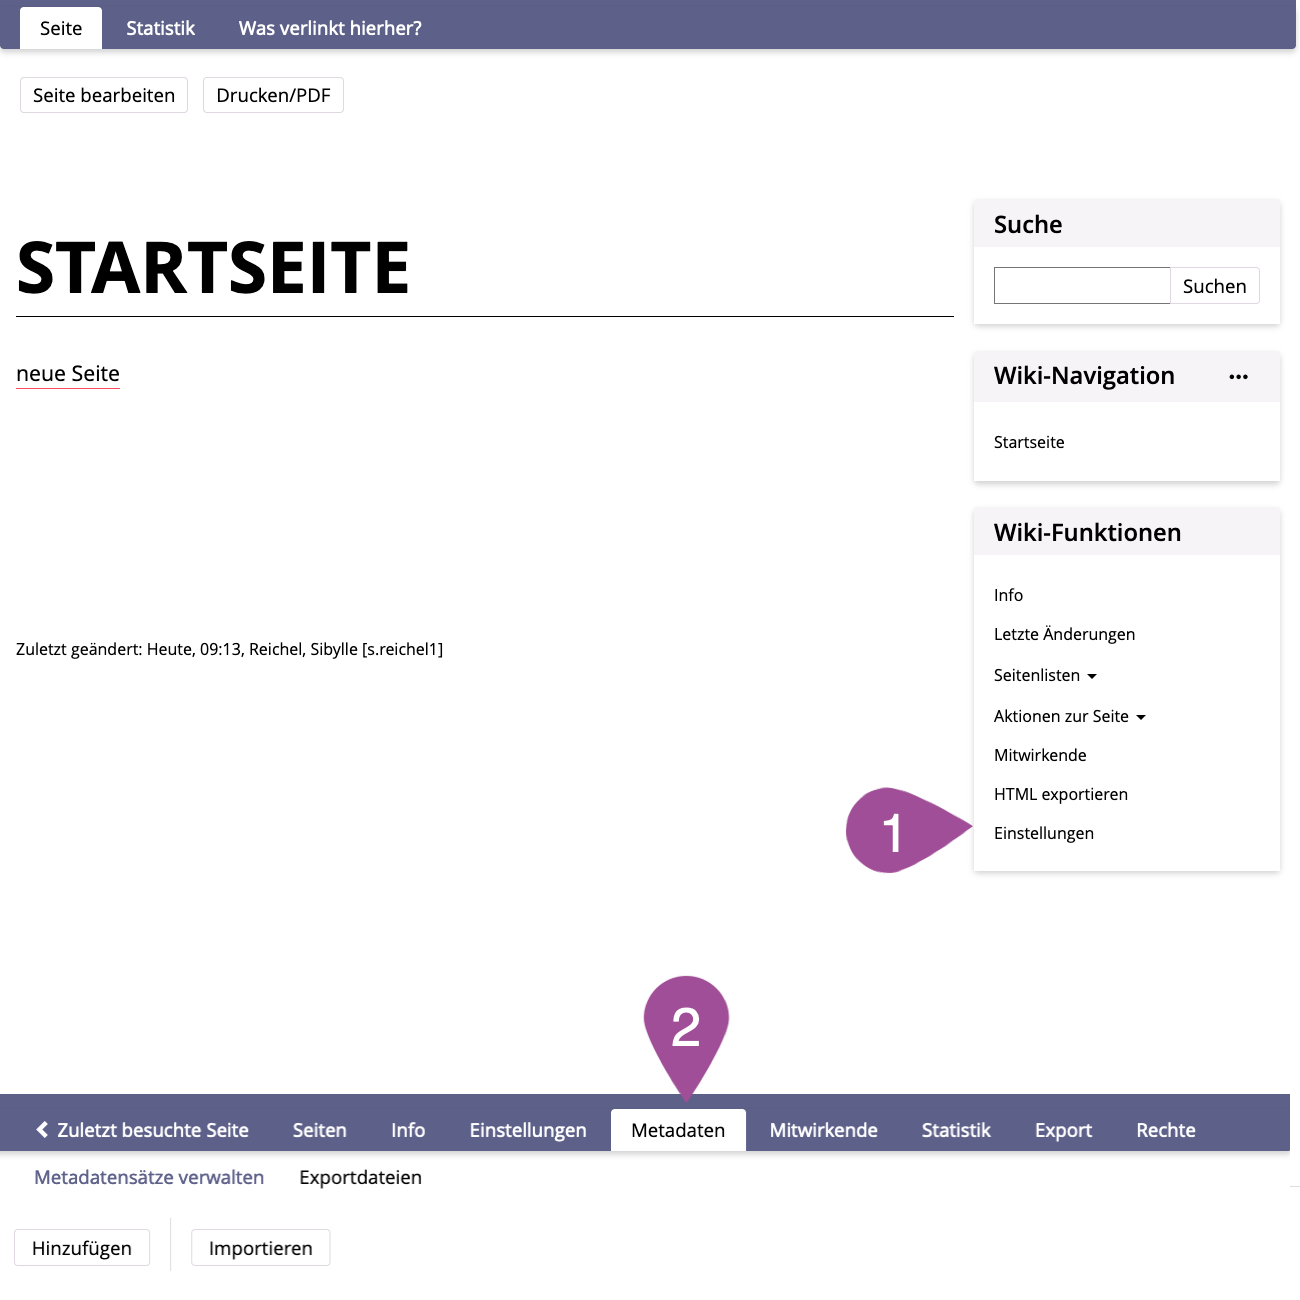
| Click on «Settings» in the «Wiki Functions». |
| Switch to the «Metadata» tab. If you don't see a «Metadata» tab, you first have to check the «Custom Metadata» option in the settings (see 2.1 Configure basic settings). |
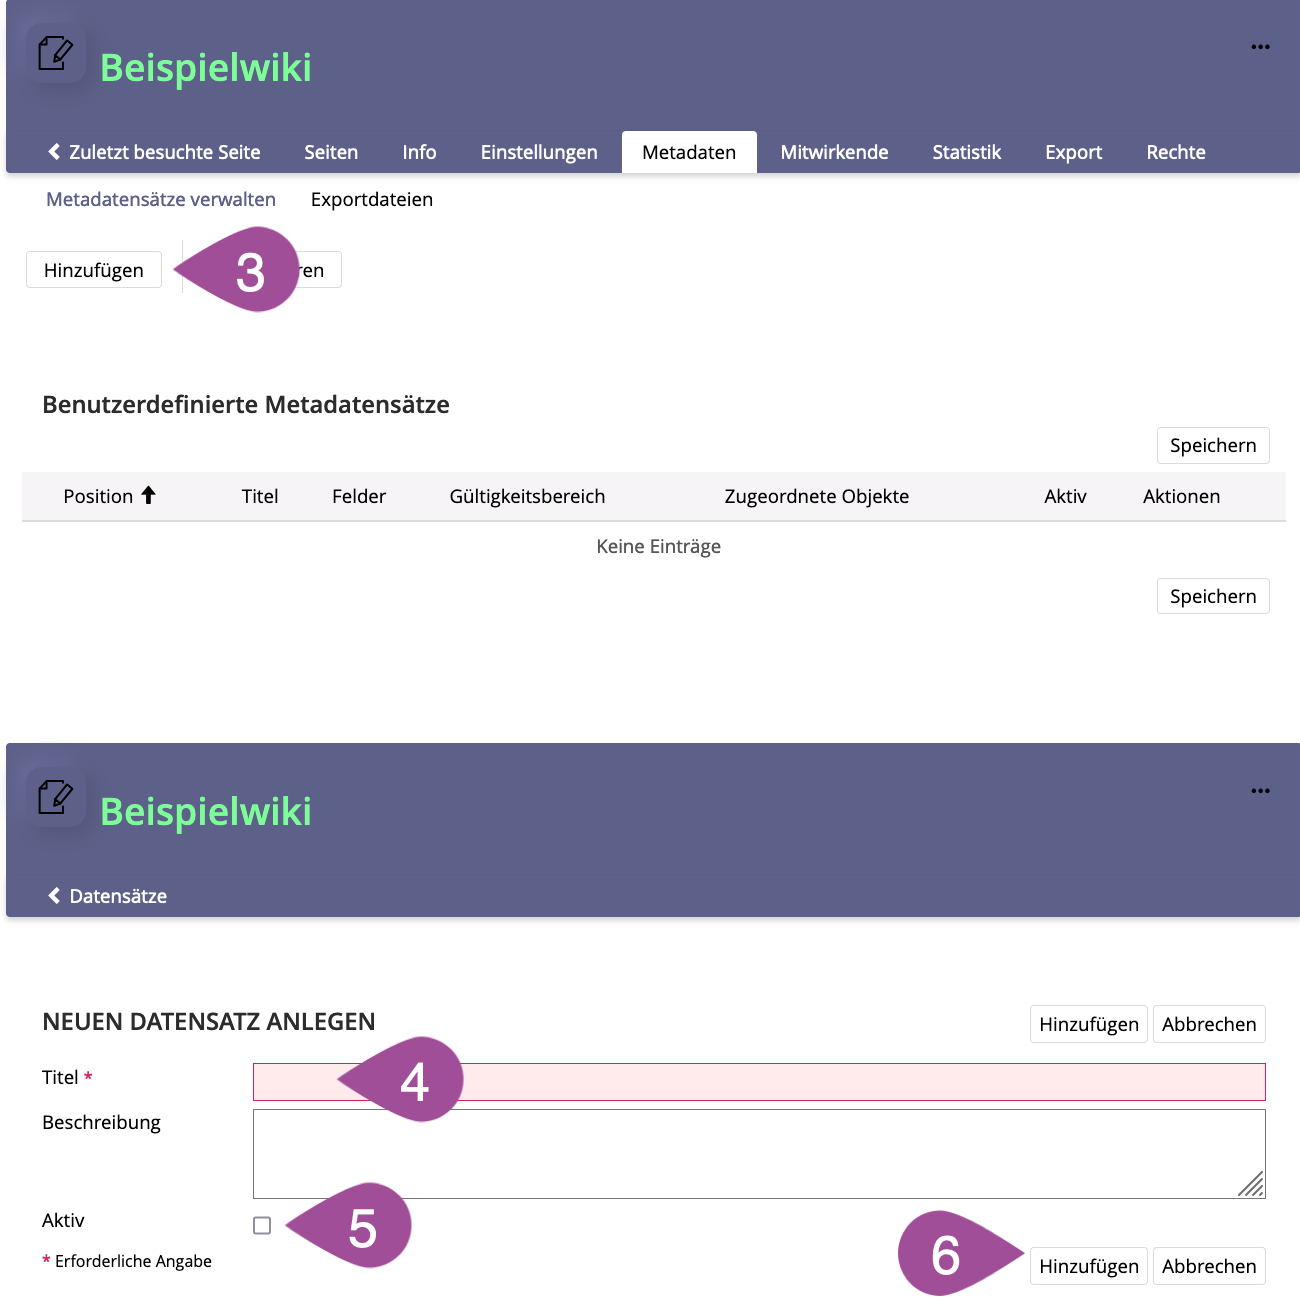
| Click «Add». |
| Give the dataset a «Title». |
| Set the dataset «Activ» so that it can be used. |
| Click «Add». |
.
Define fields
To add individual metadata to a dataset, you have to define fields.
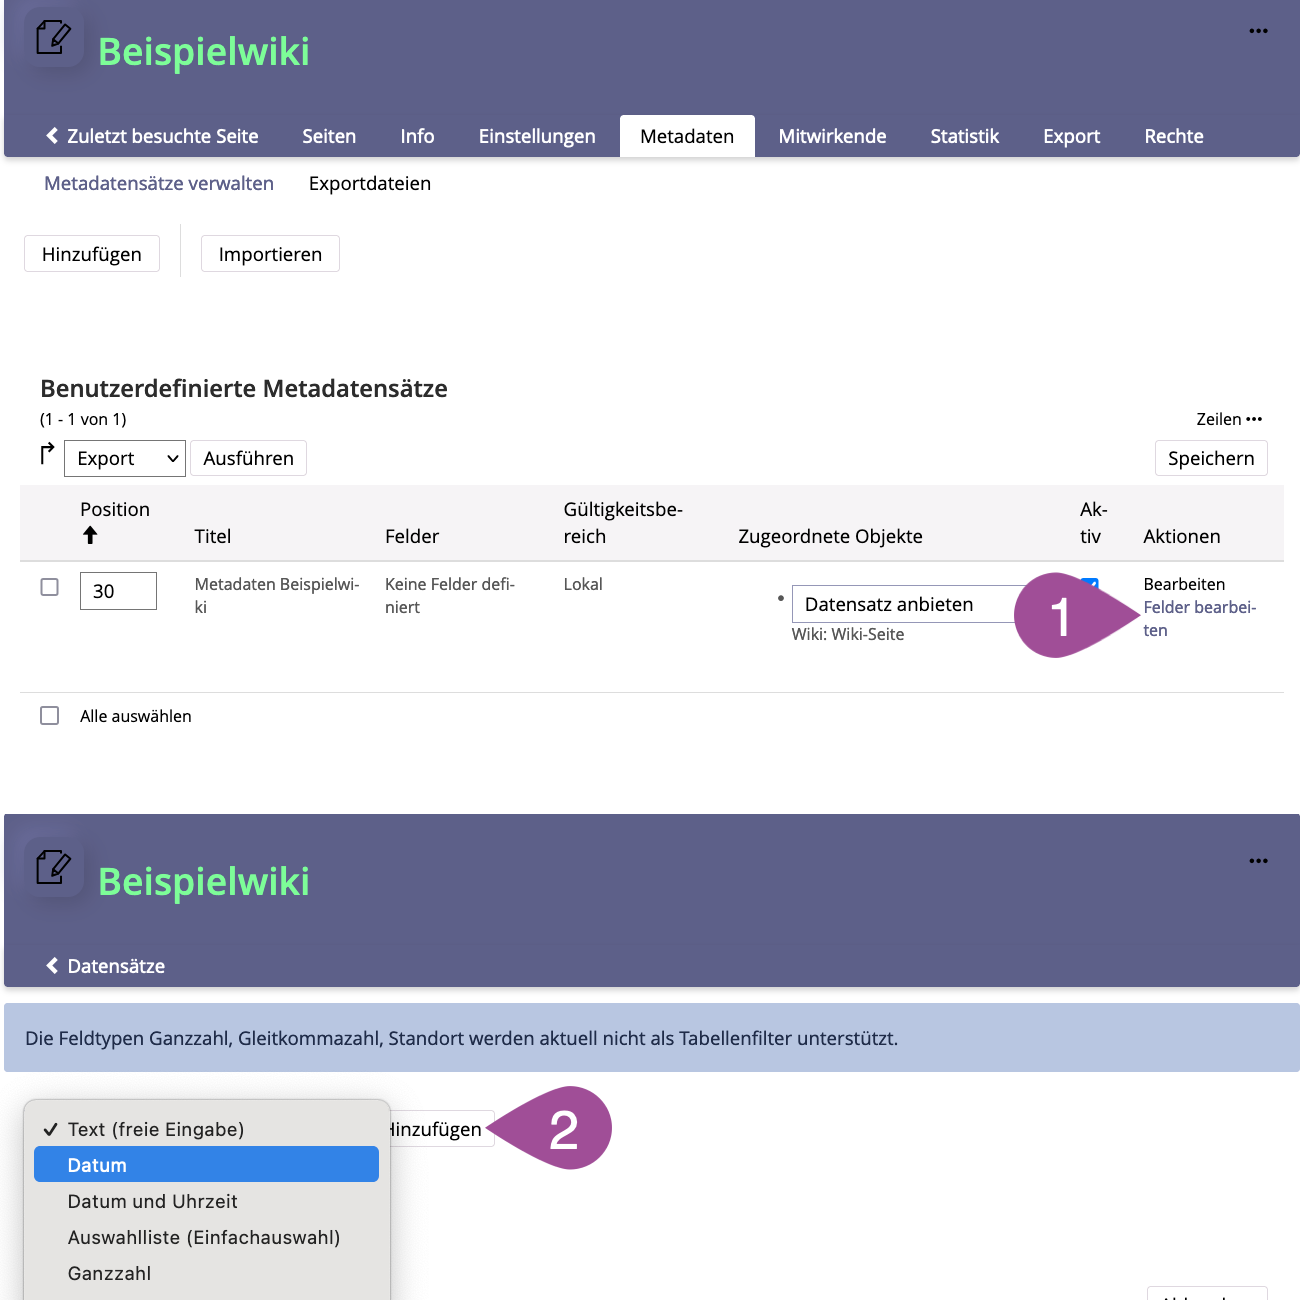
| Click on «Edit Fields» for the corresponding dataset. |
| Select a field type from the drop-down menu and click «Add». |
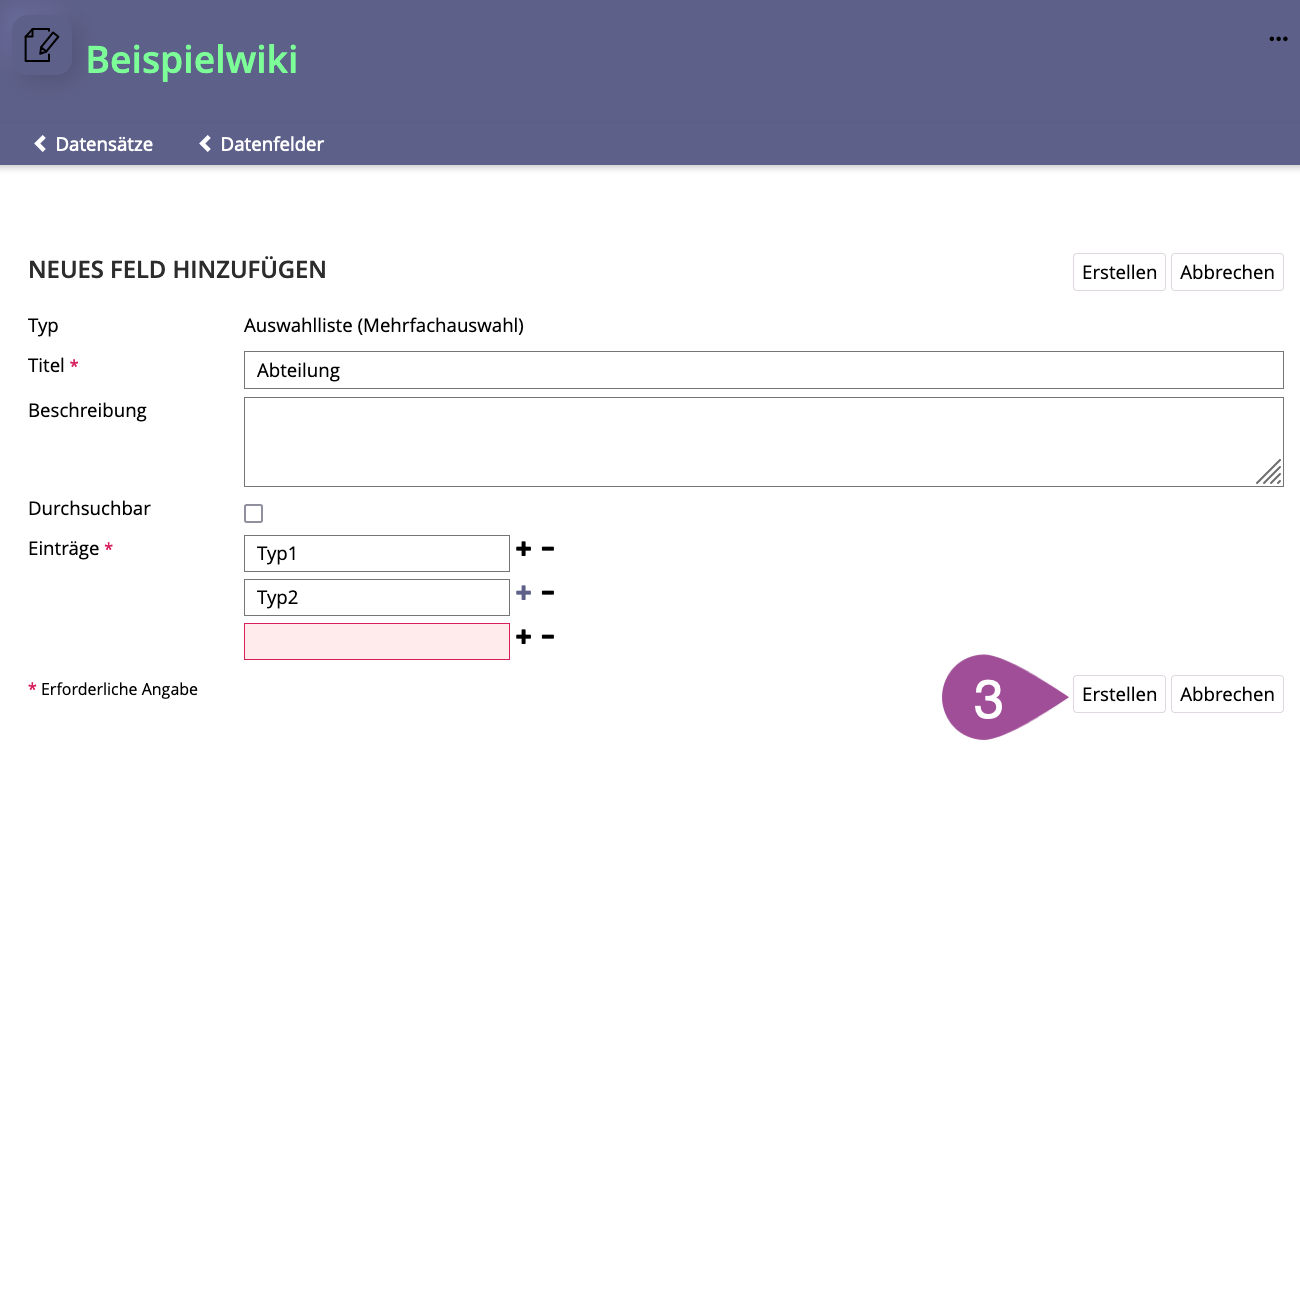
| Fill out the form and click on «Create». |
.
Assign metadata to pages
| In the «Wiki Functions» box, click on «Page Overview» and select «All Pages». Existing pages are listed in alphabetical order. |
| Click on the page that you want to assign metadata to. |
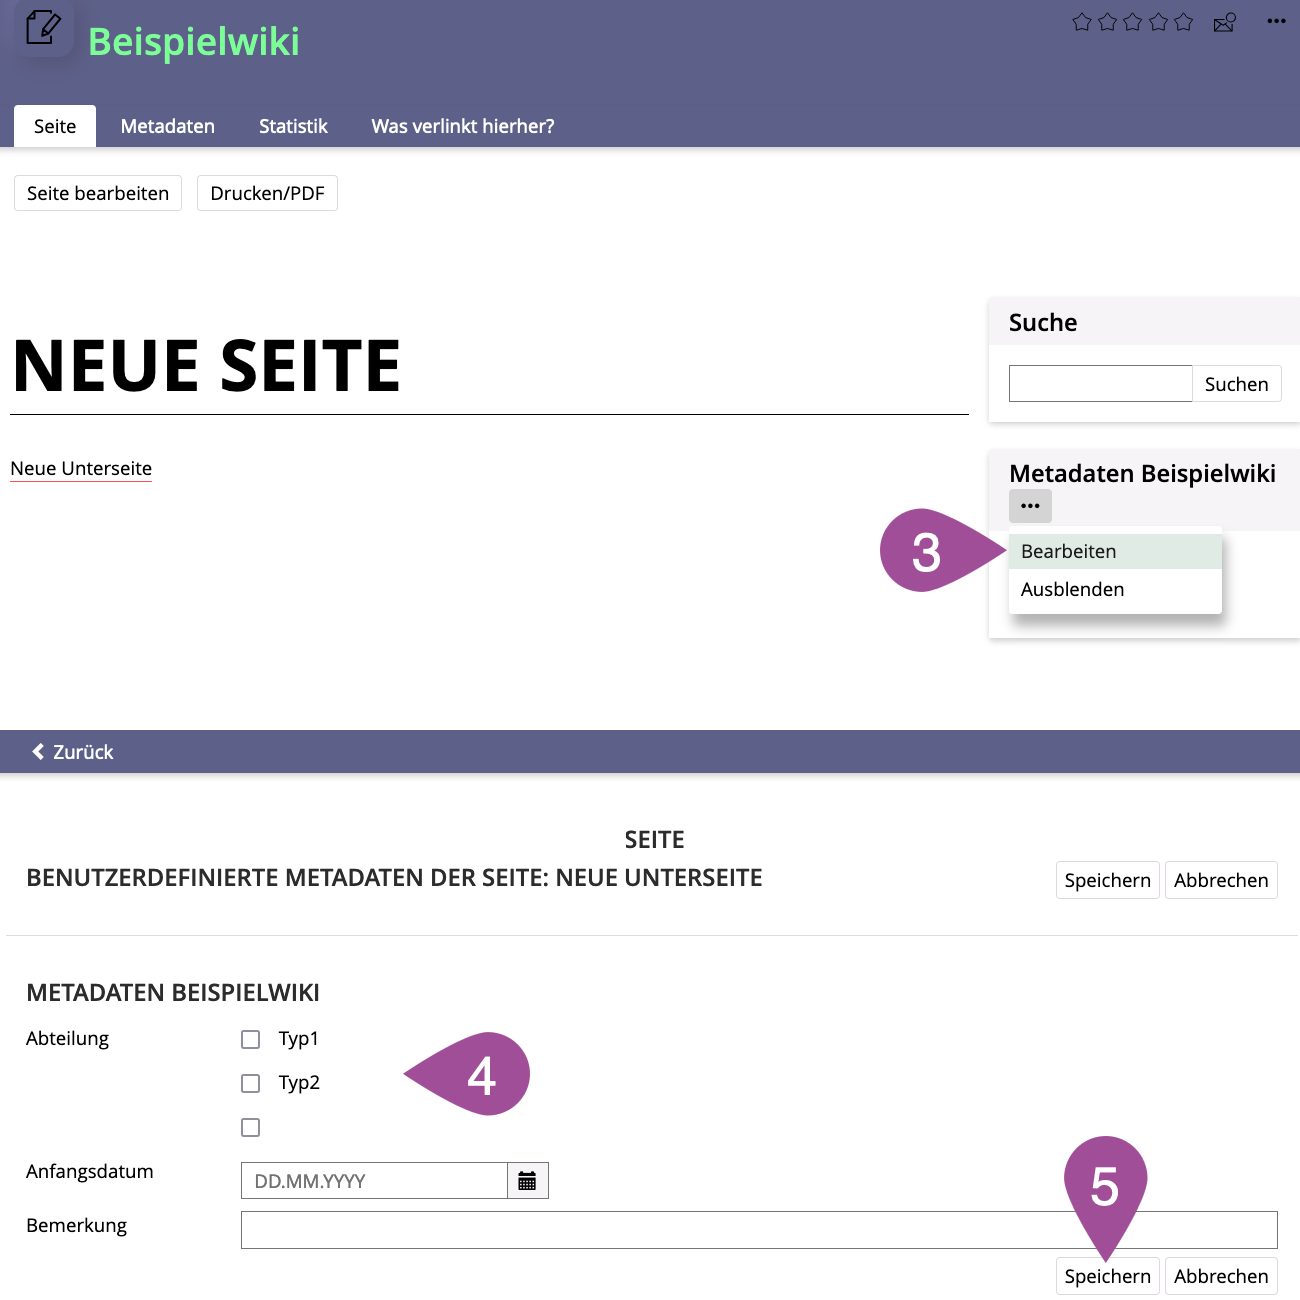
| Open the actions menu of the dataset and select «Edit». If no metadata set is shown, it either has to be activated (see 5.1 Add a metadata set) and/or shown for the page. To show the dataset, open the «Page Actions» in the «Wiki Functions» and select «Show additional properties». |
| Select the data that you want to assign to the page. |
| «Save» your selection. |
.
6. Check link structure
.
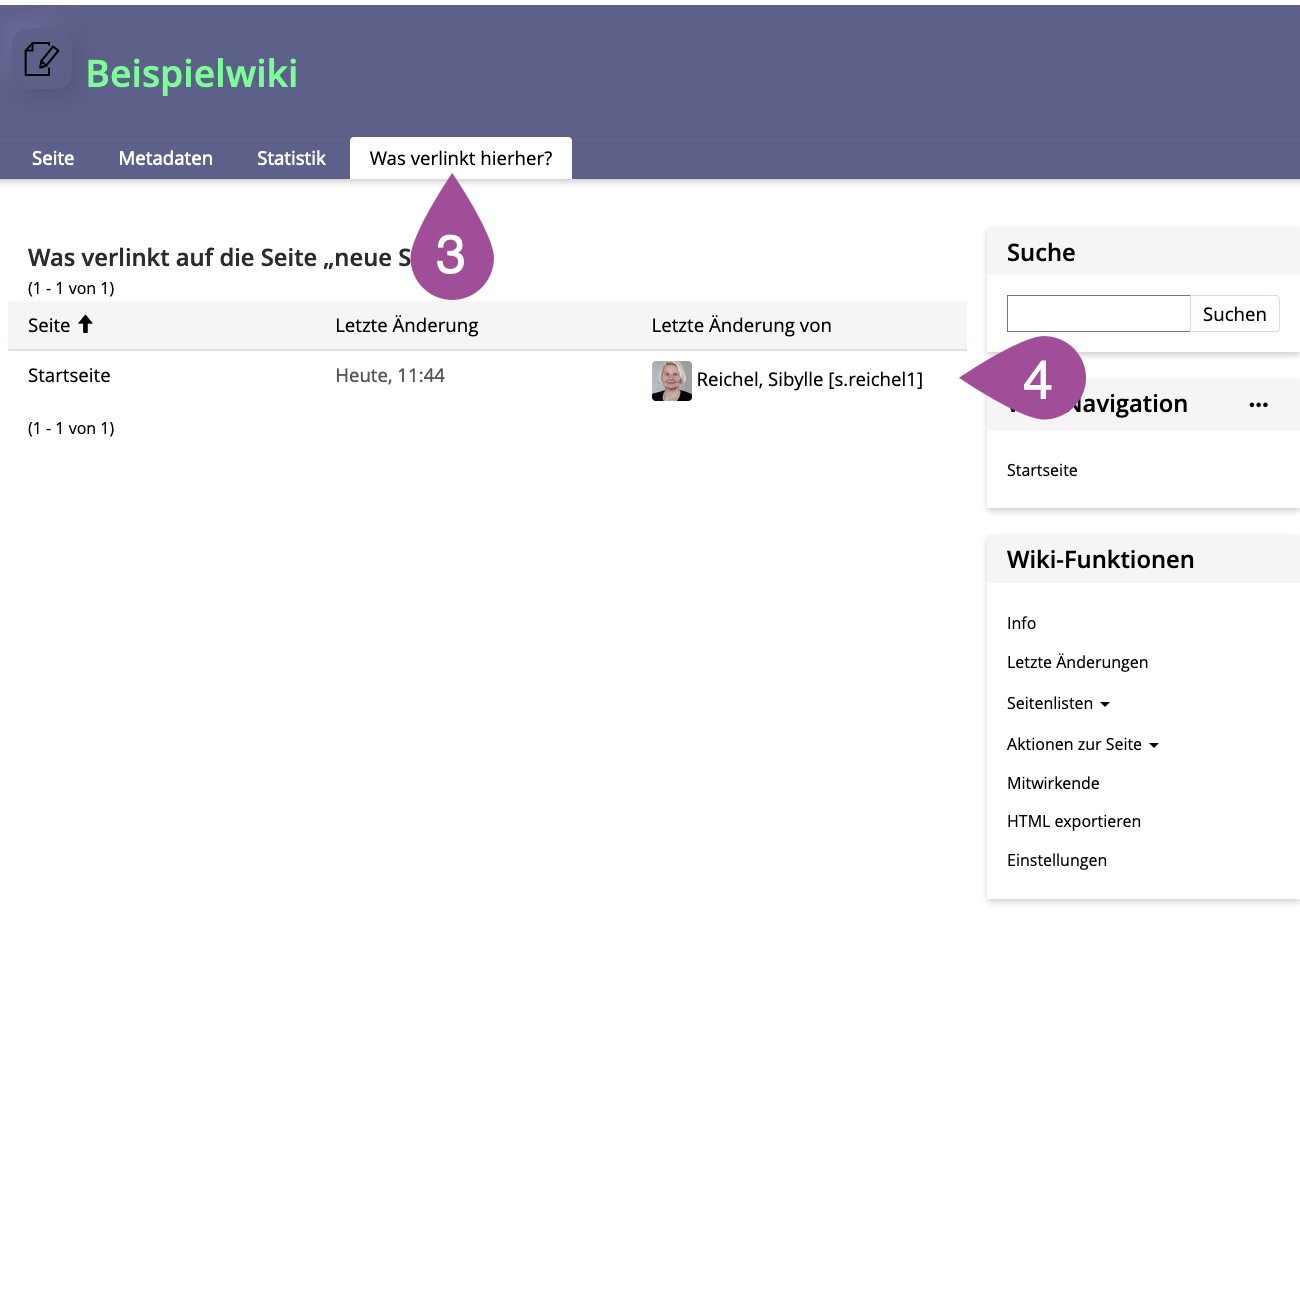
View links to a page
| In the «Wiki Functions» box, click on «Page Overview» and select «All Pages». Existing pages are listed in alphabetical order. |
| Click on the page for which you want to view the links. |
| Go to the «What Links Here?» tab. |
| A table lists all the pages that link to the selected wiki page. |
.
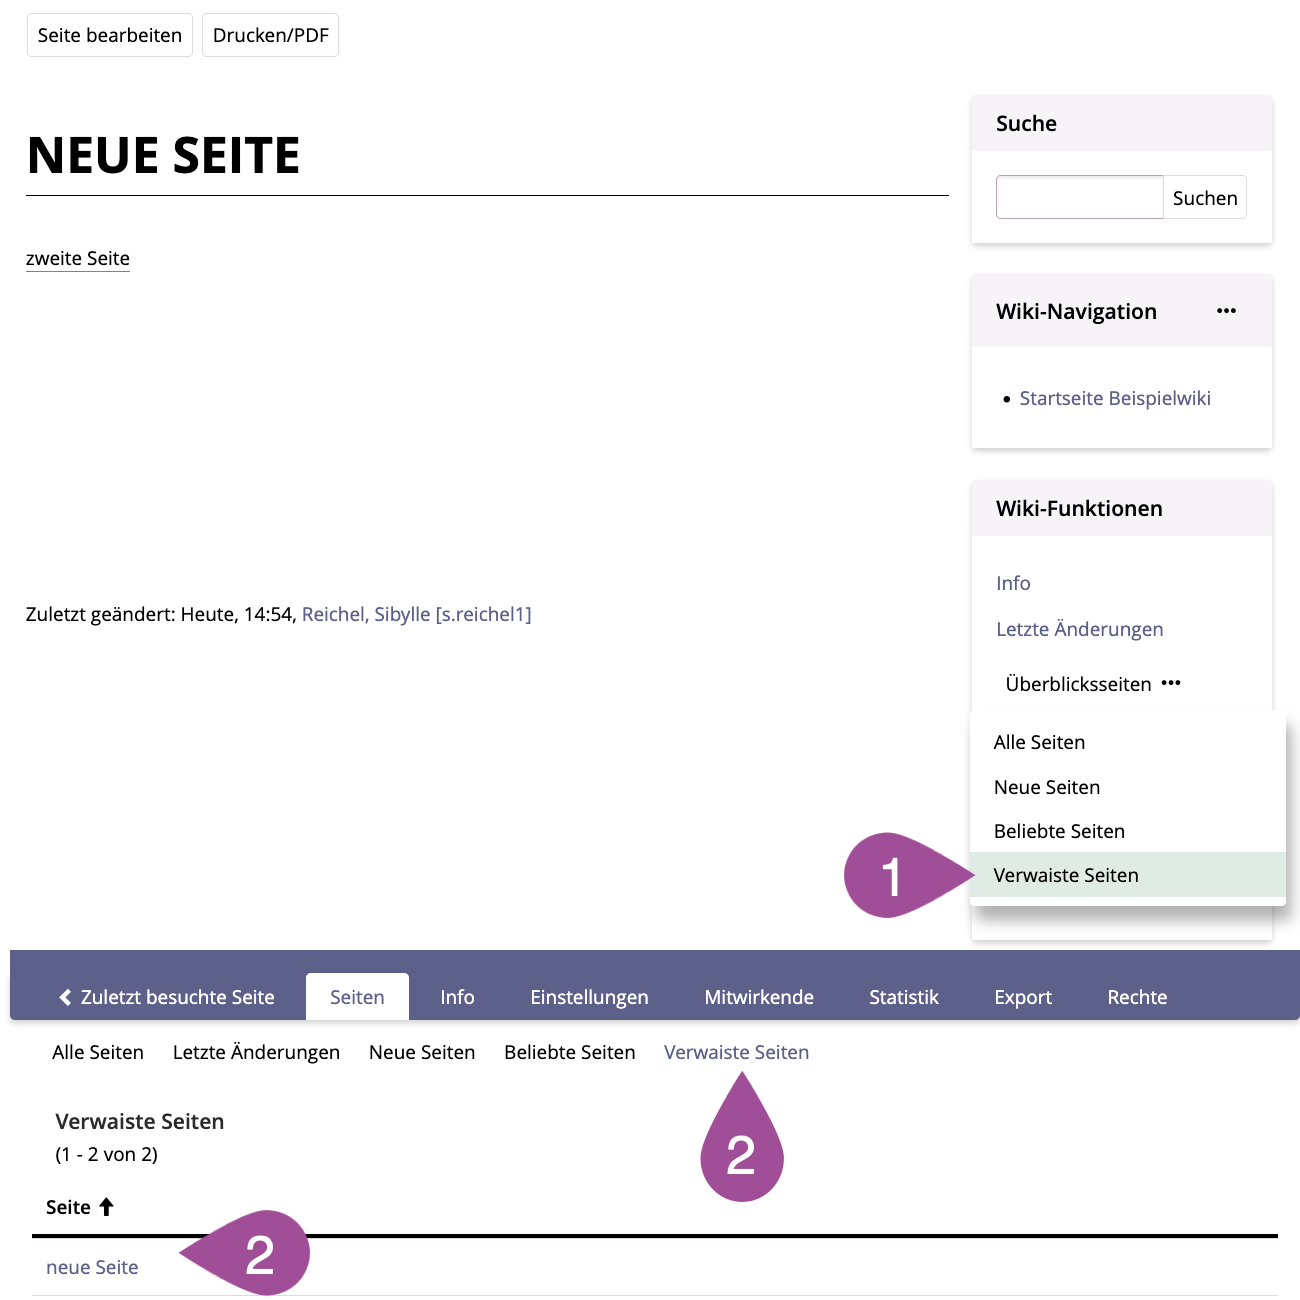
Find orphaned pages
To check if there are pages not linked to from any page, you can view «Orphaned Pages».
| In the «Wiki Functions» box, click on «Page Overview» and select «Orphaned Pages». |
| A table lists all the pages without any links from other pages. |
| You can delete these pages (see 3.7 Delete a wiki page) or create a page link to this page on another page. |
.
7. Application scenarios
The following pages will give you an idea of how a wiki can be used:
Zuletzt geändert: 27. Jan 2026, 16:18, Reichel, Sibylle [s.reichel1]